The Esme Tunic

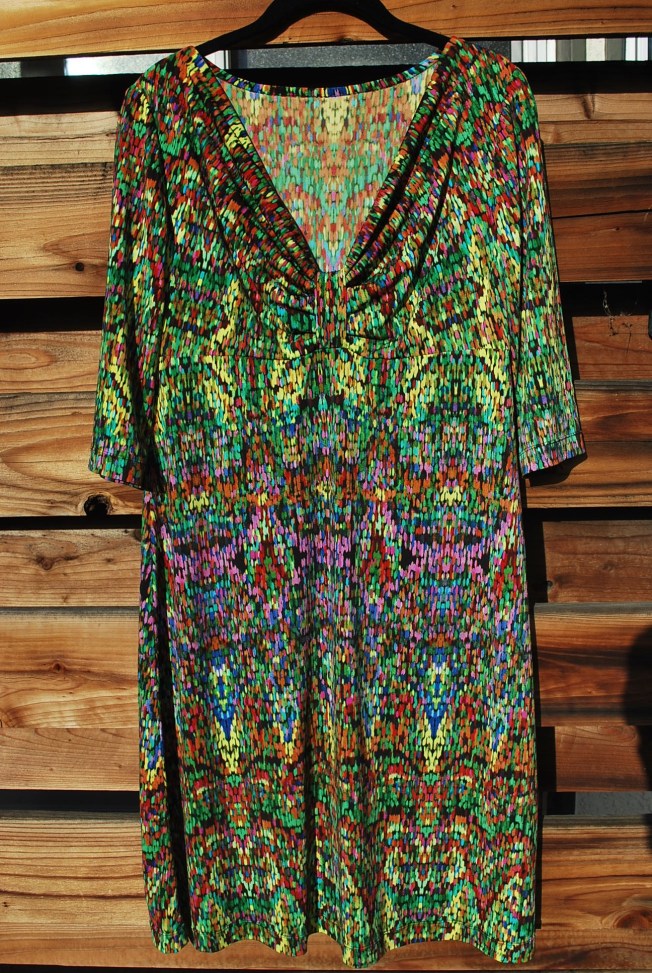
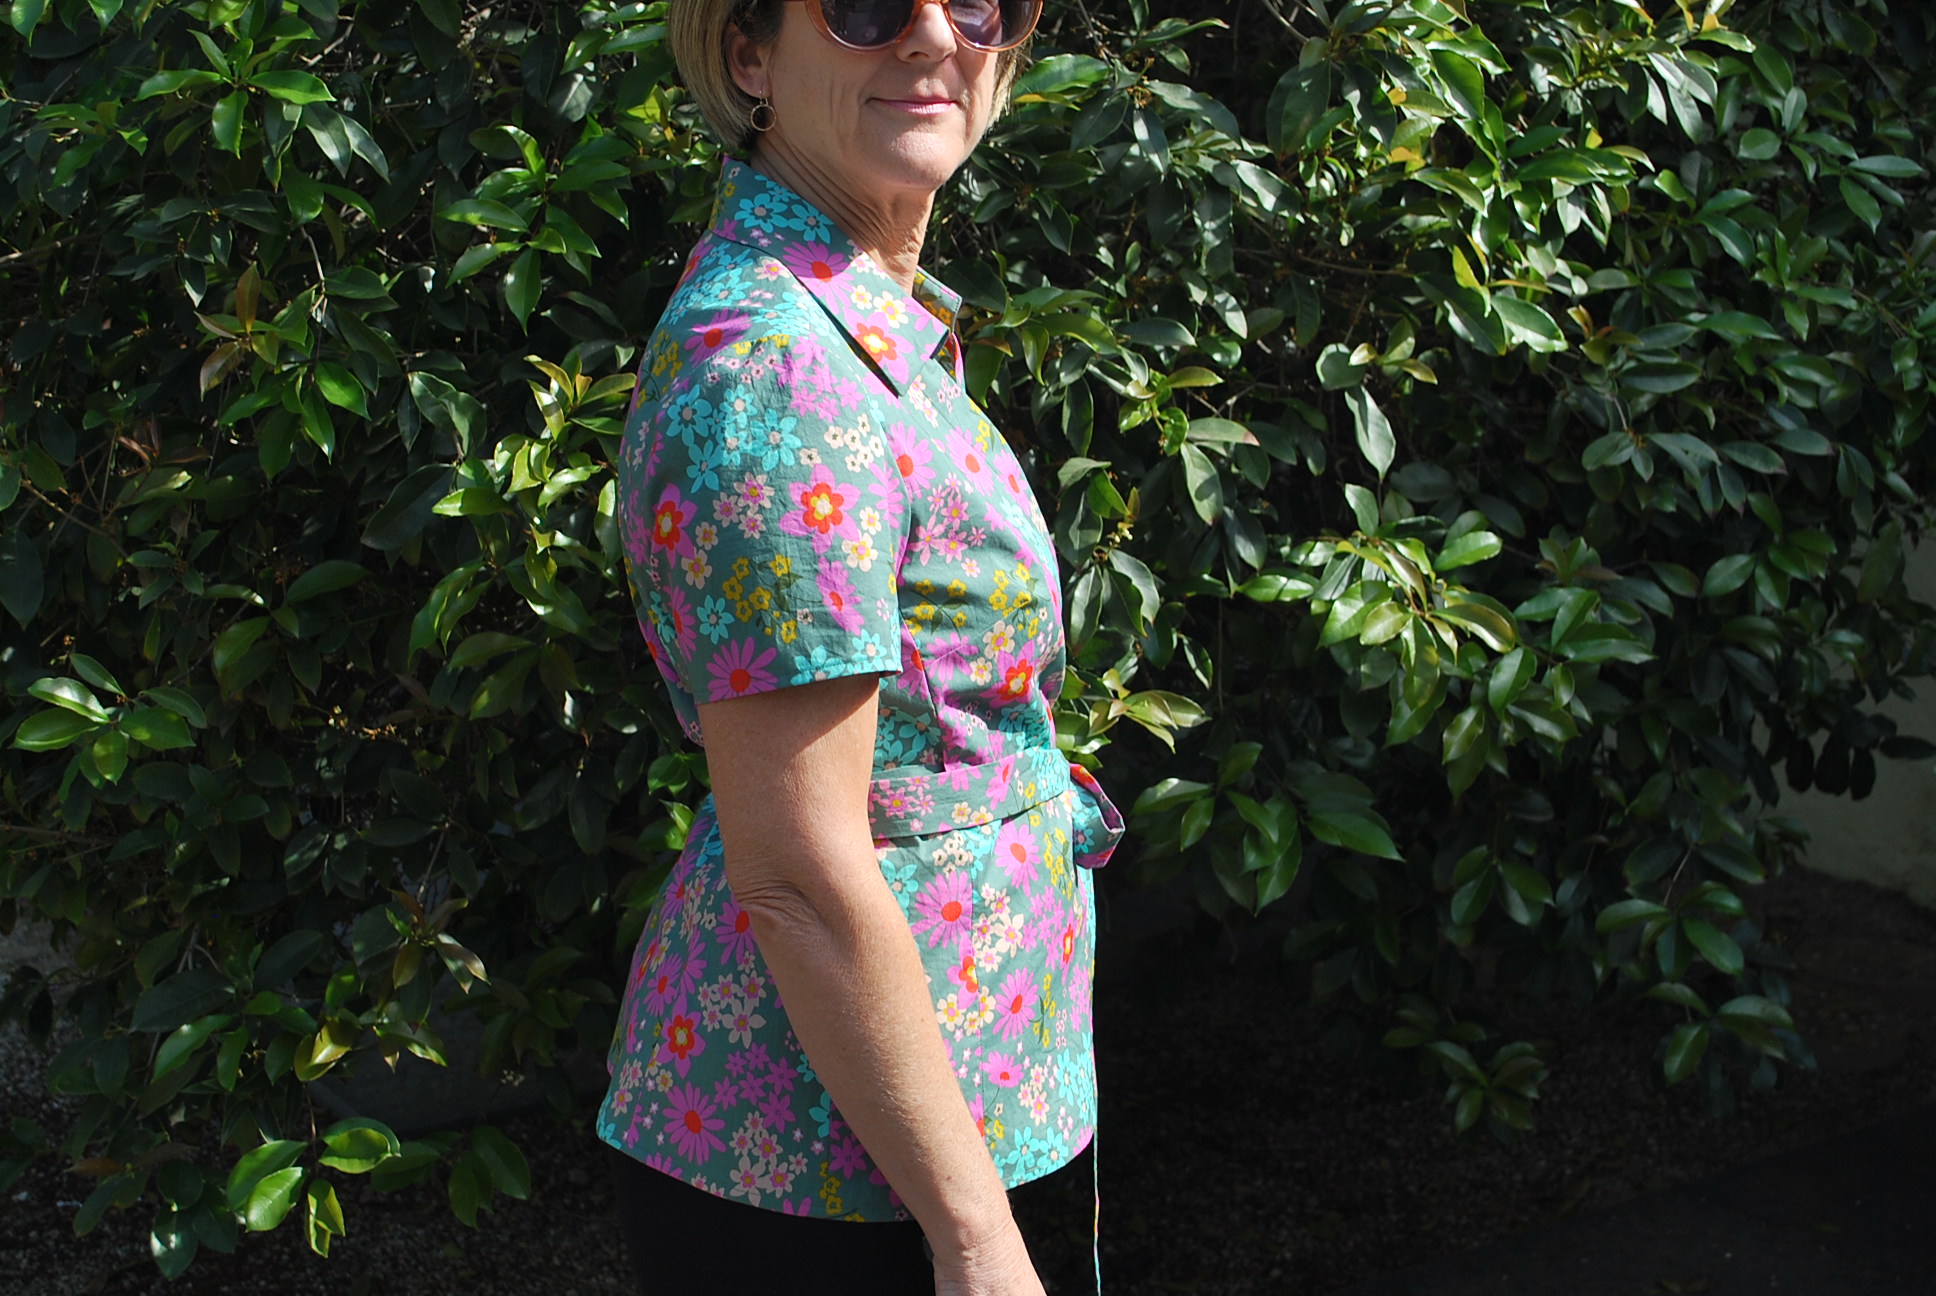
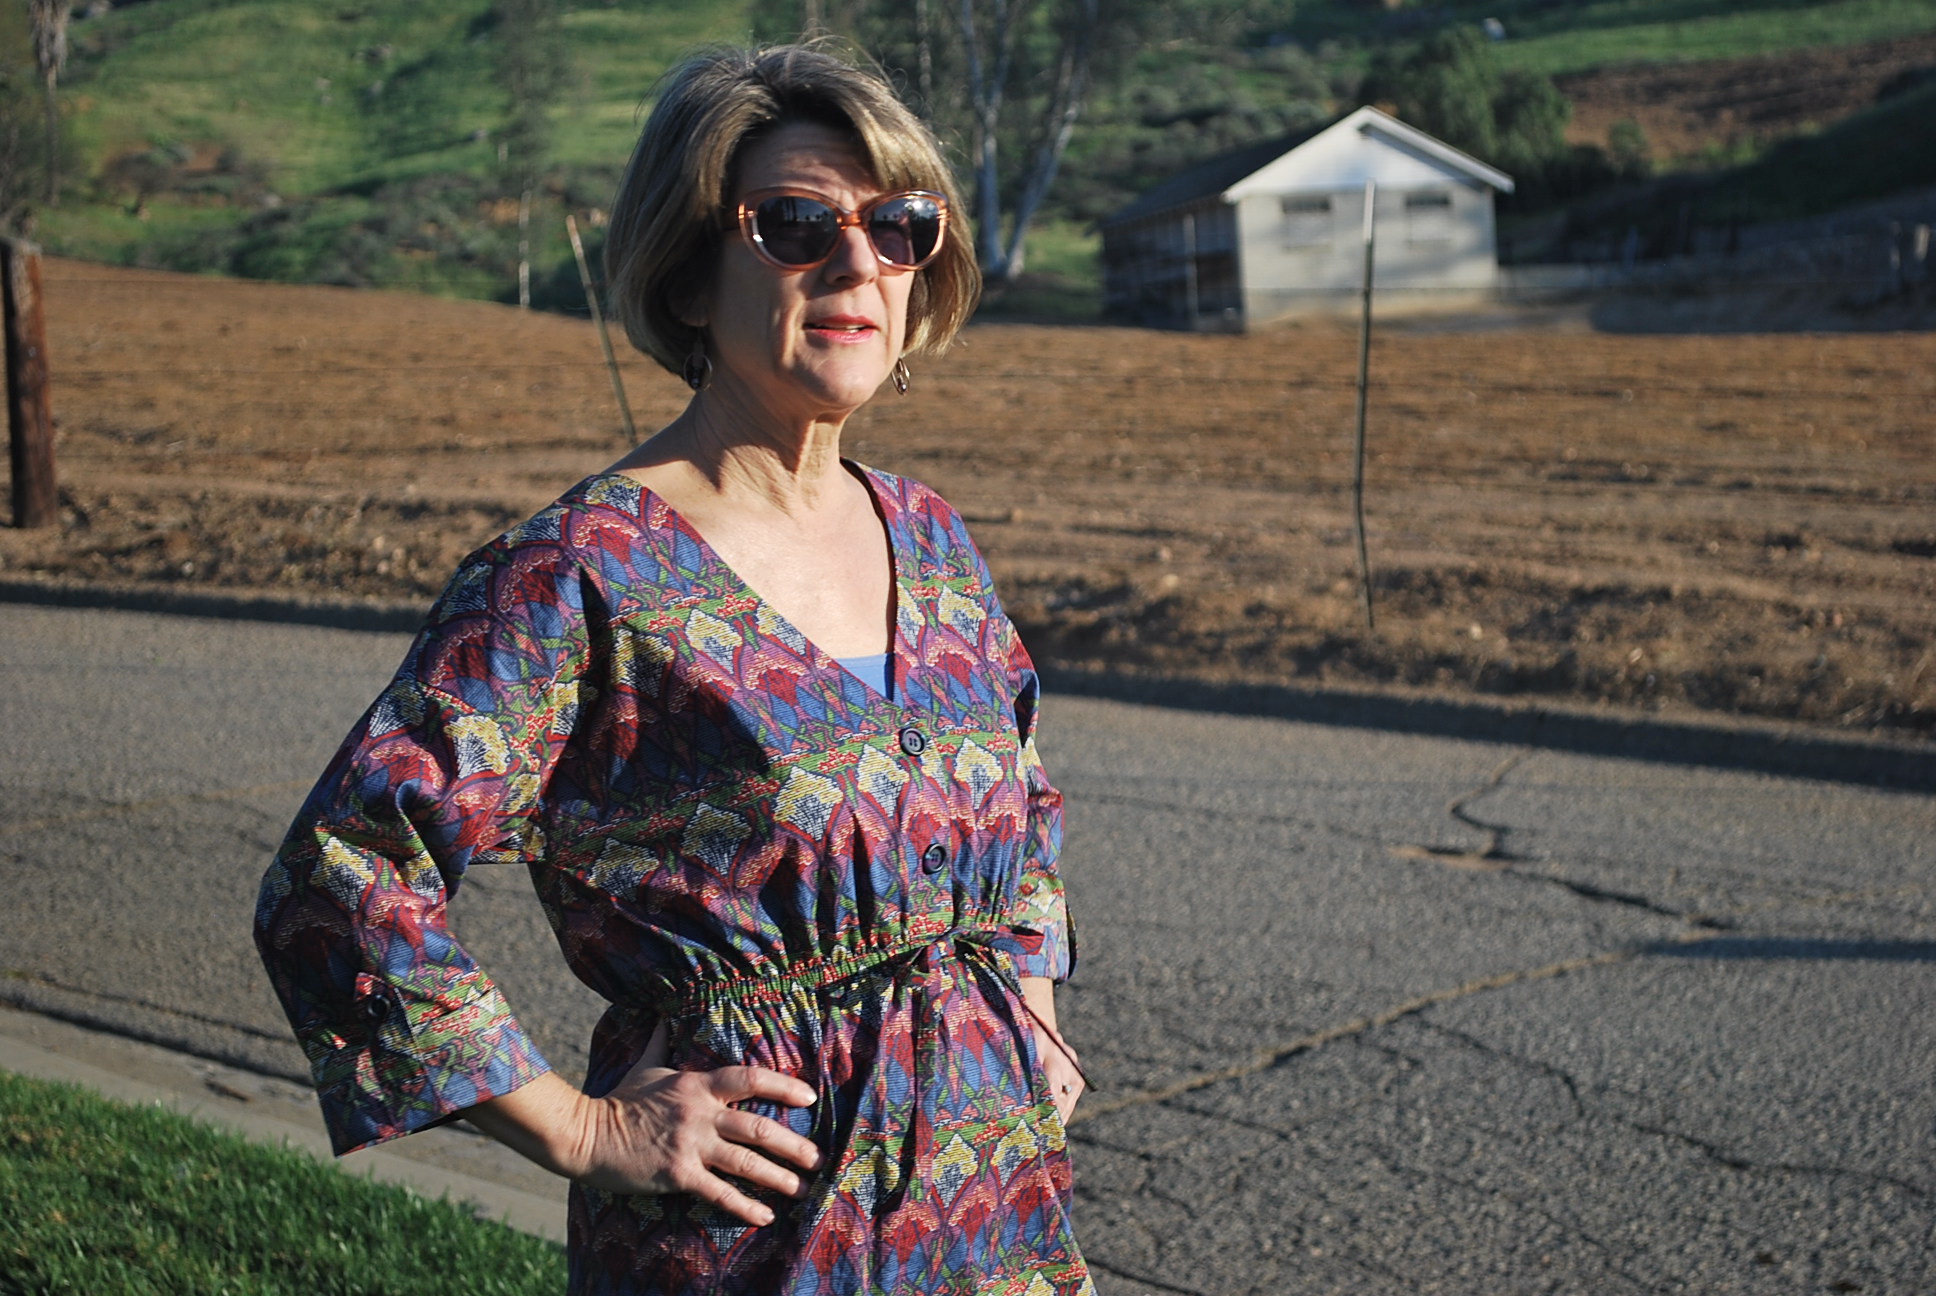
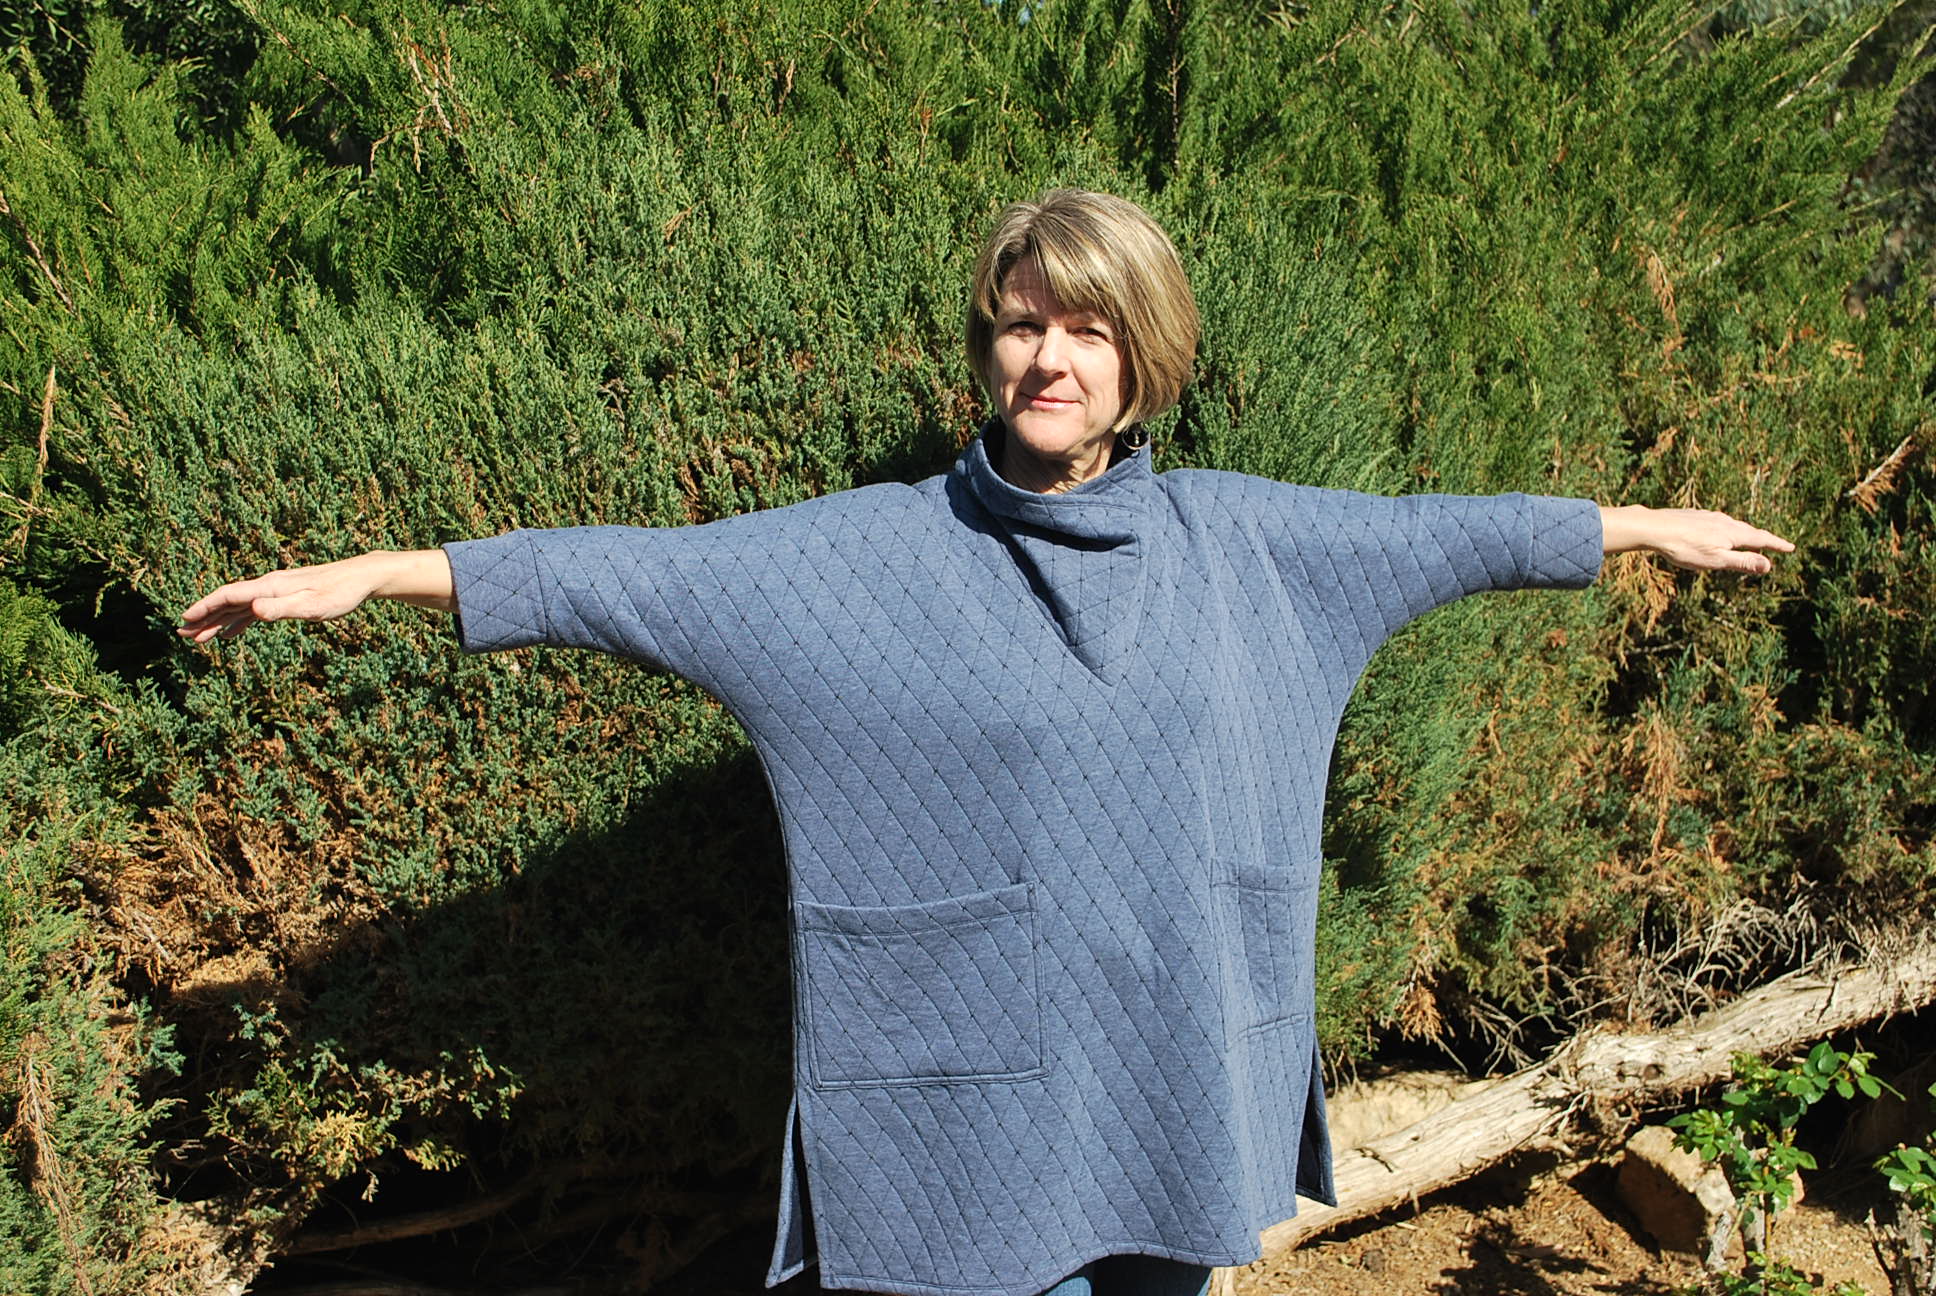
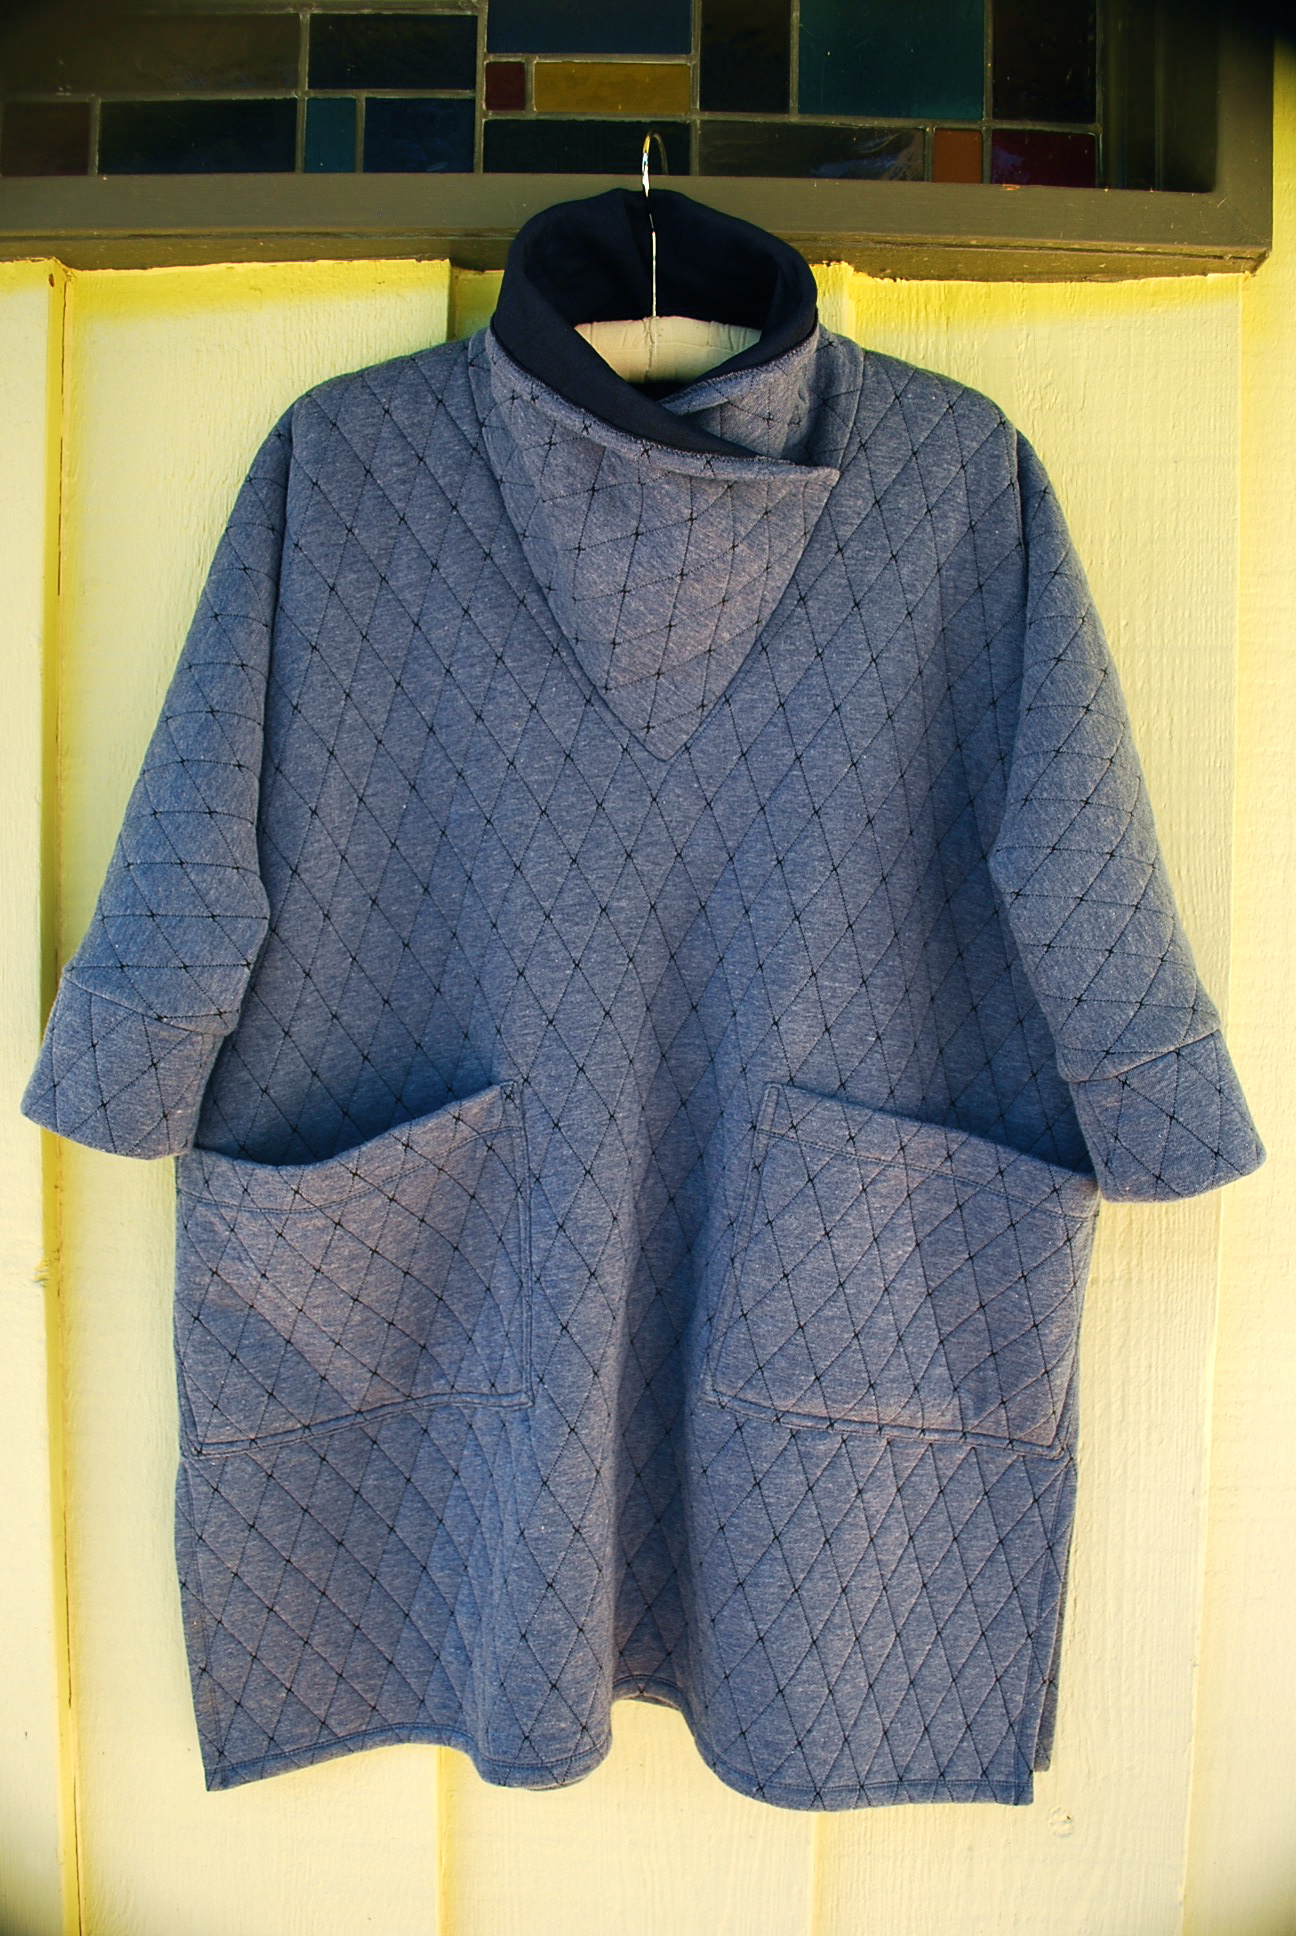
I have felt a desire lately to put more craft and creativity into my Fresh Makes. I recently purchased the book “Lotta Jansdotter Everyday Style.” Putting a spin on one of her patterns was a perfect way for me to the get back into touch with my artsy side.

DSC_0336

That is my dog, Spright, peeking under the fence.

619Hpzge3-L._SX258_BO1,204,203,200_

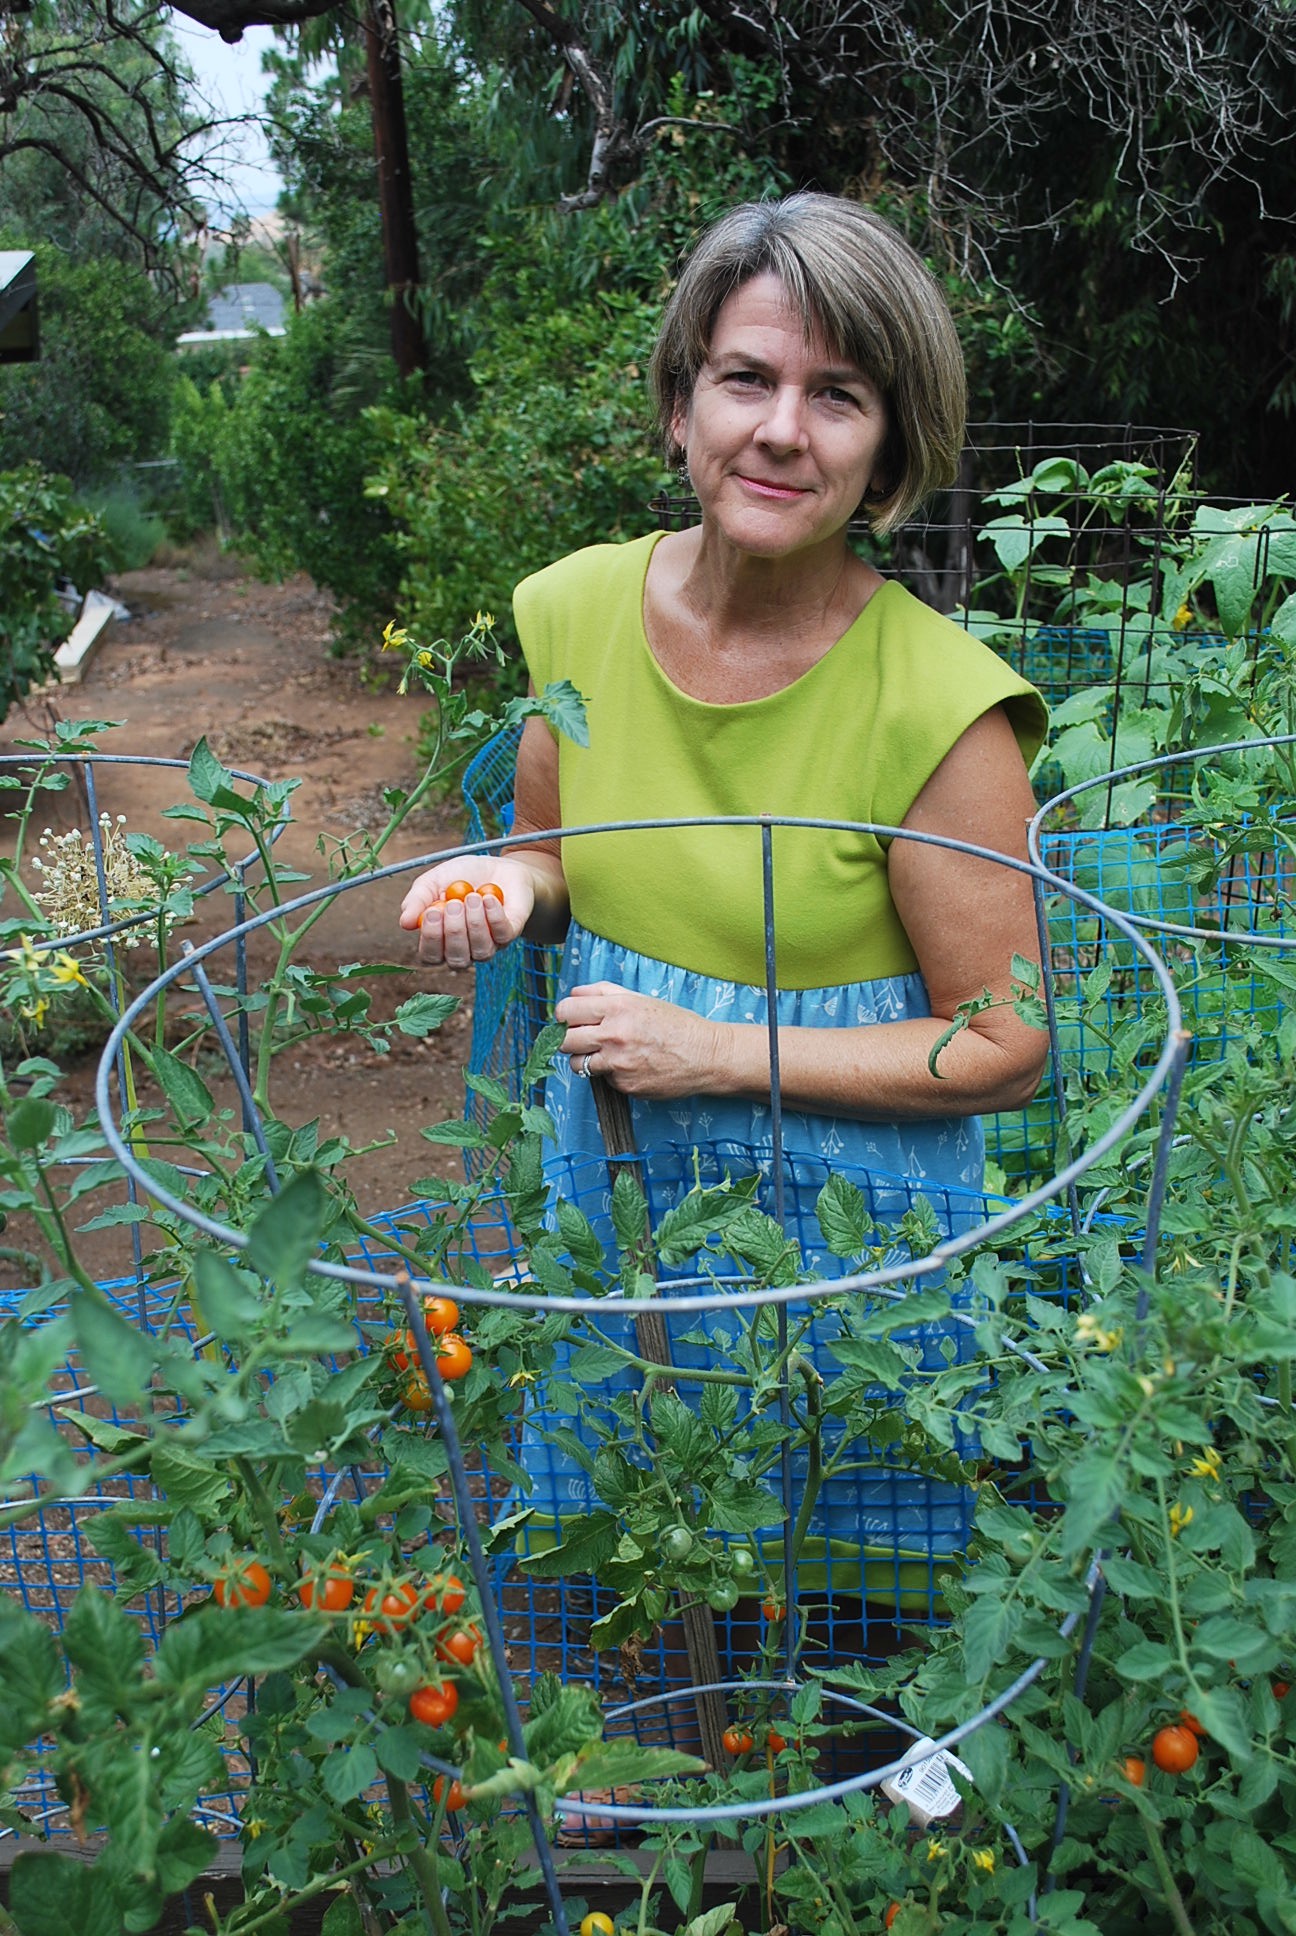
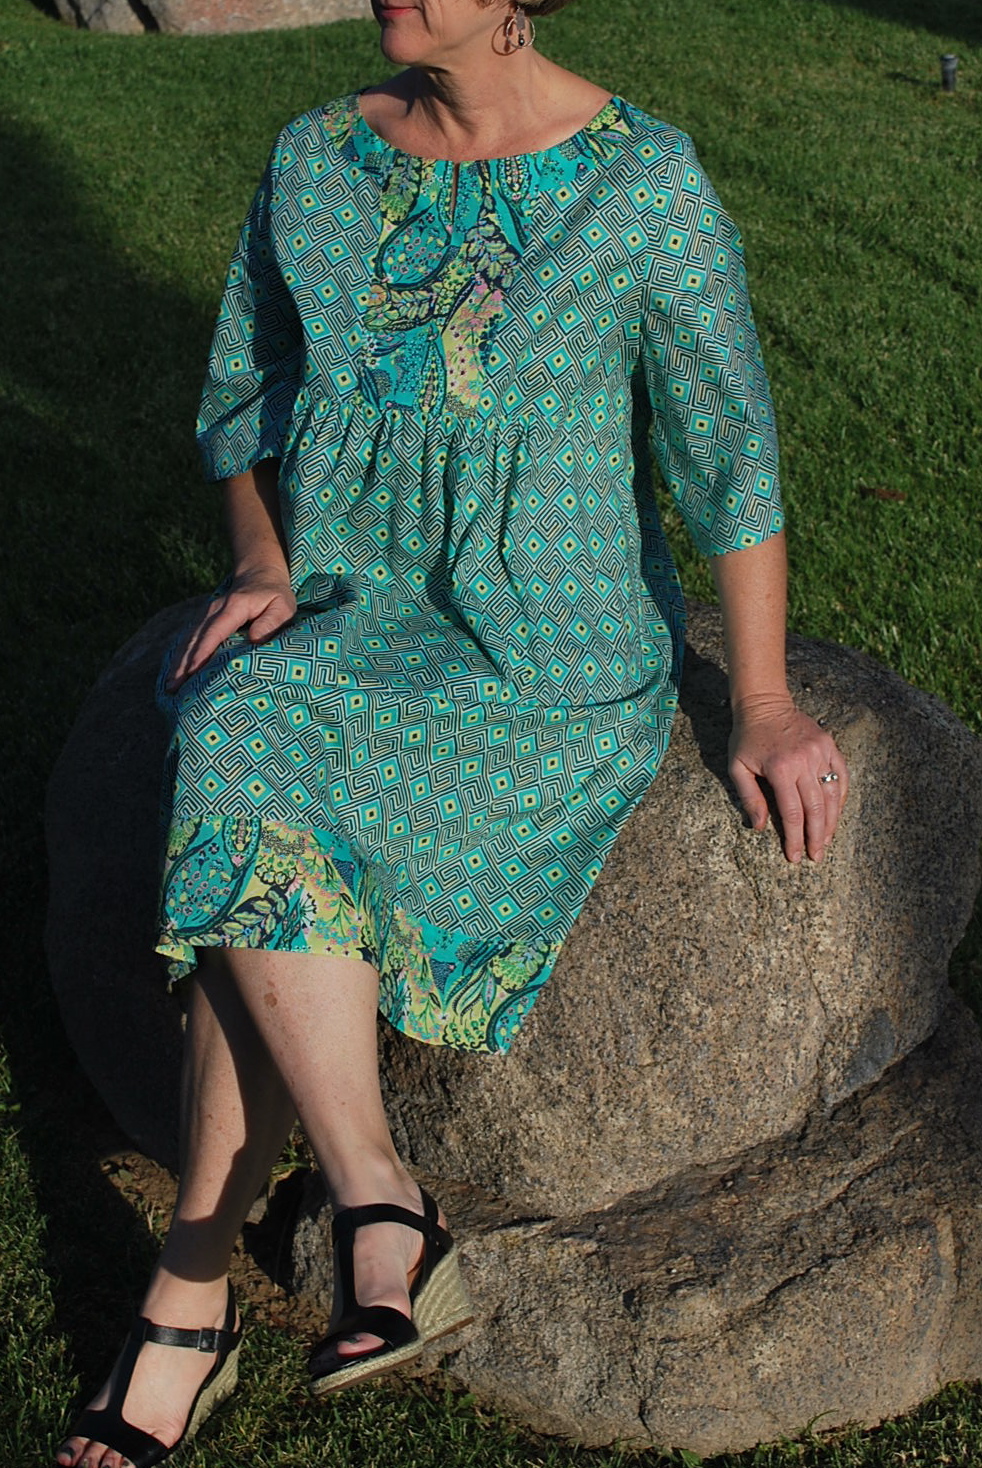
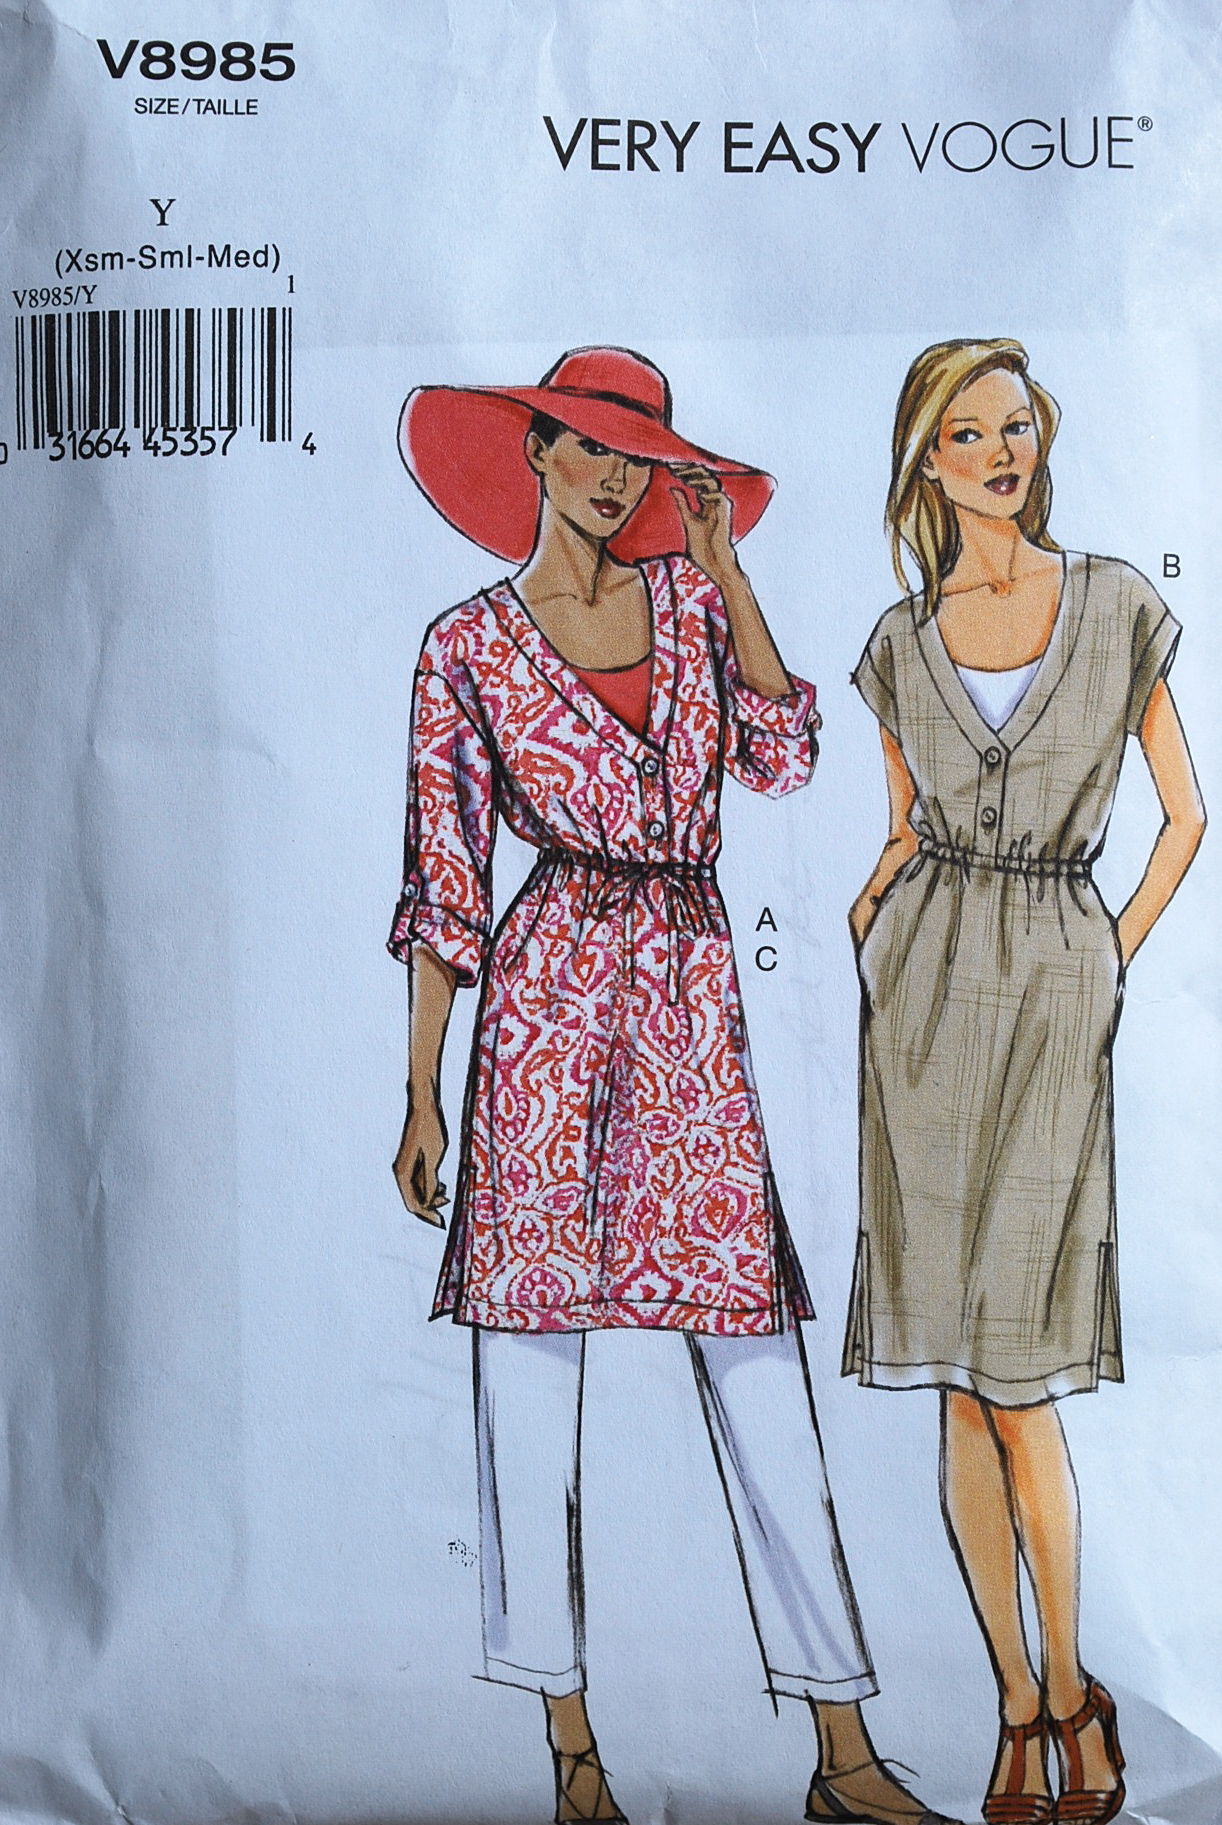
The book includes patterns for five basic garments. This is the Esme Tunic. The Esme includes two other versions, a hip length top and kaftan.

photo-17

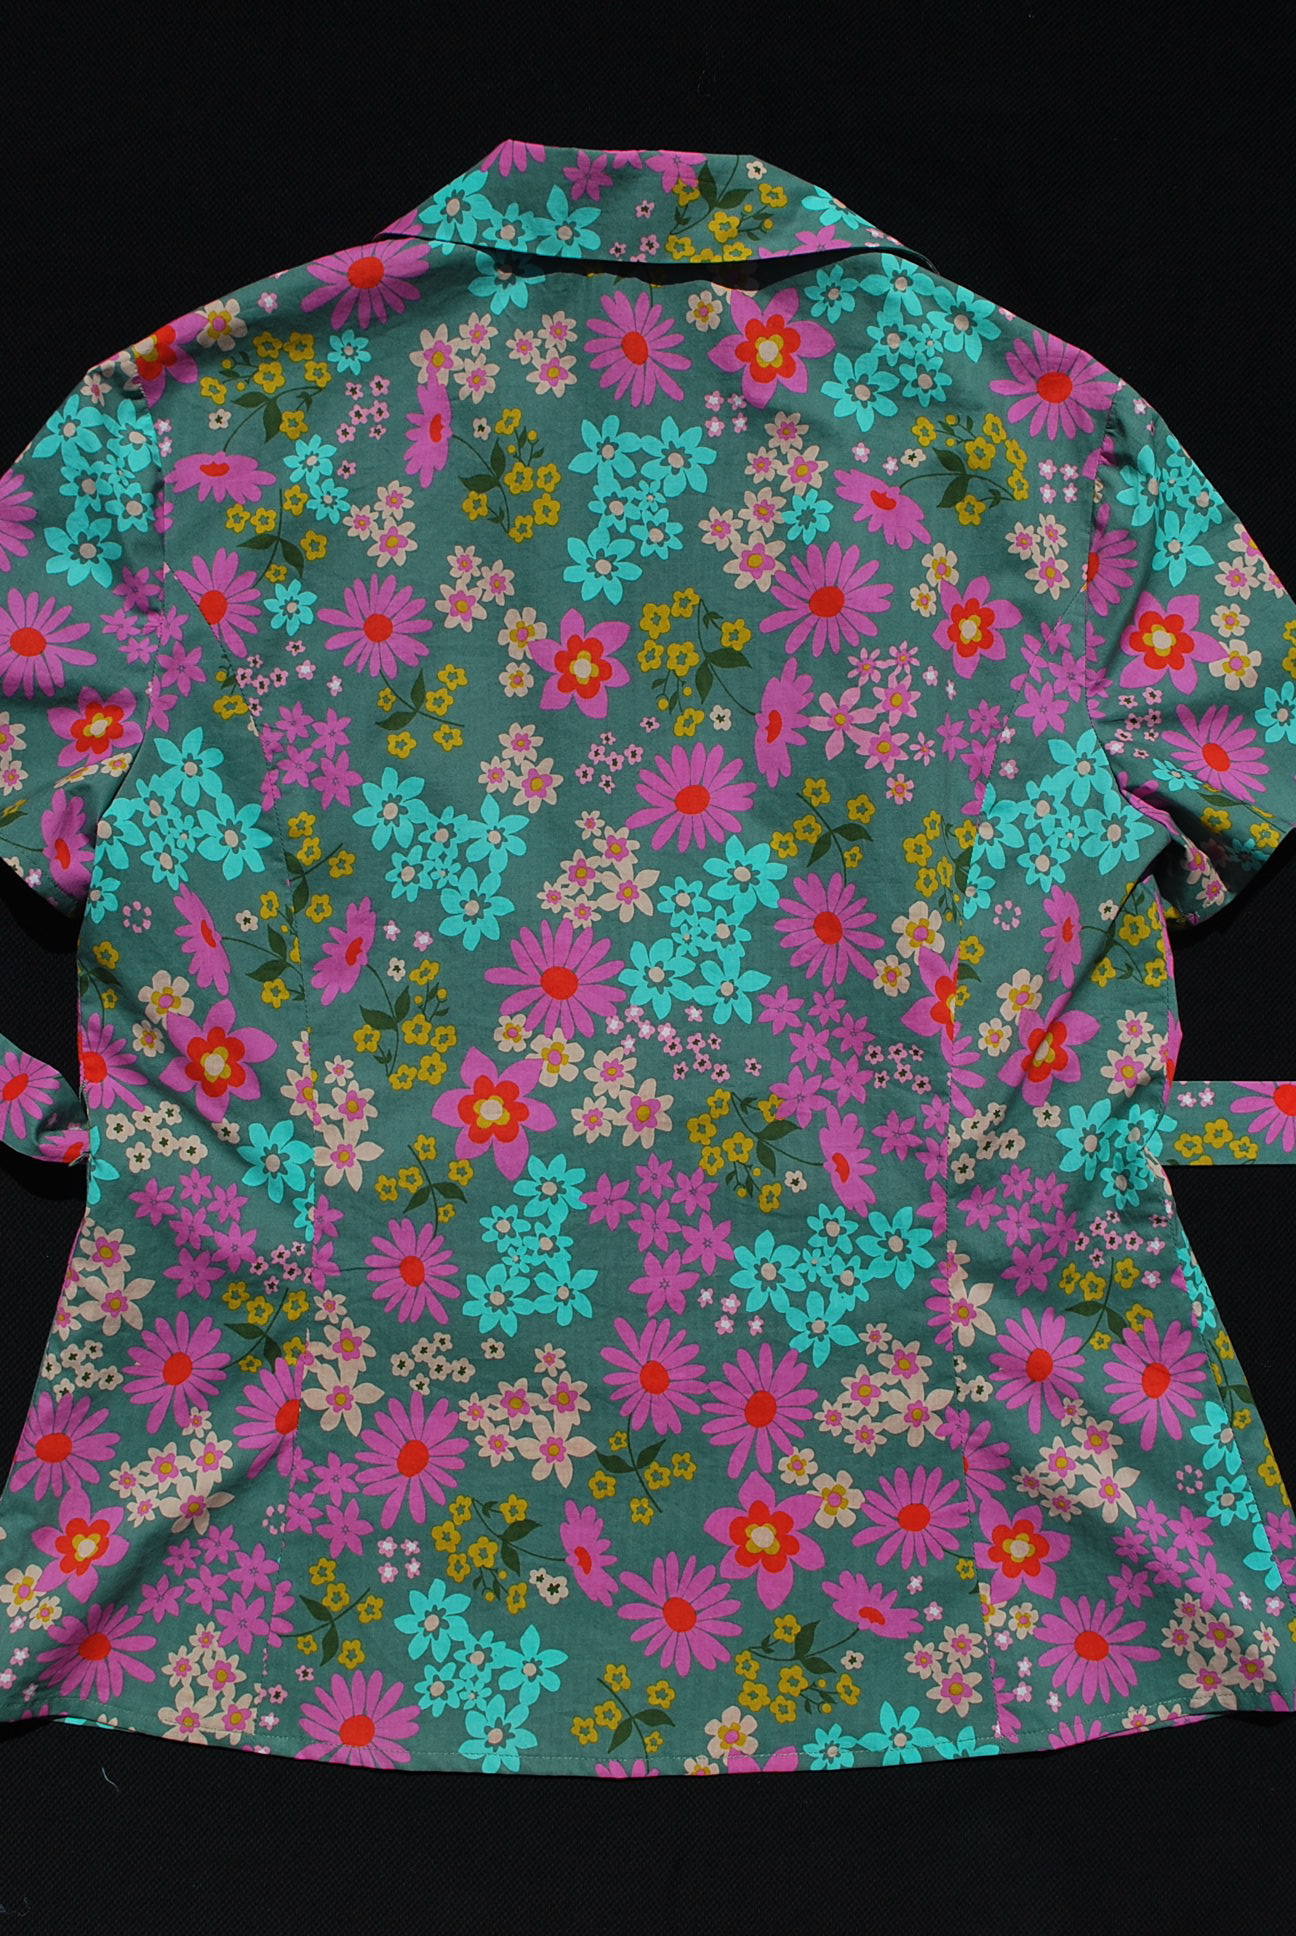
The fabric I used is Alison Glass Knits in Indigo. I purchased it online at Harts Fabrics for $15.99 per yard. It is also available at several other online fabrics stores. I had already made two simple shirts with Alison Glass Knits, and thought this would be a perfect fabric for this simple tunic. I love this knit fabric! It is very stable, substantial weight jersey knit, that after a few washings, feels like flannel. (Beware: It shrinks a lot! I prewashed this the Indigo twice because my first two projects with this fabric shrunk more in the first wash after completing and wearing.)

DSC_0340

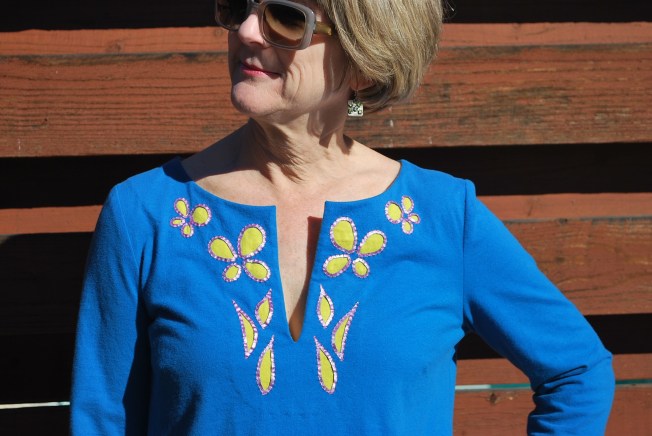
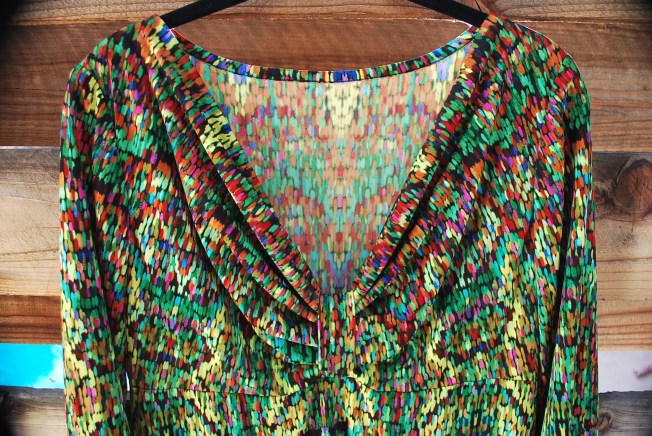
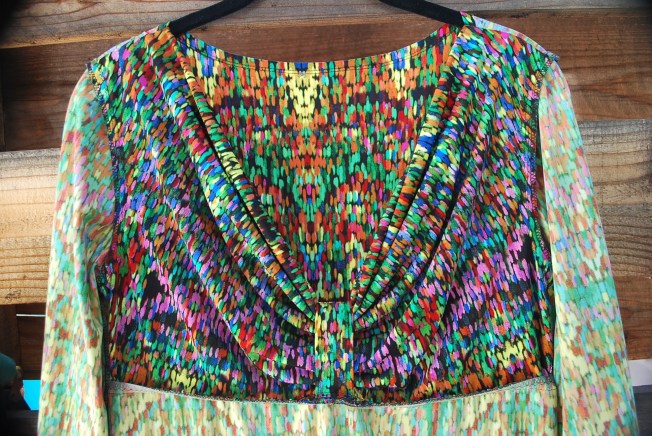
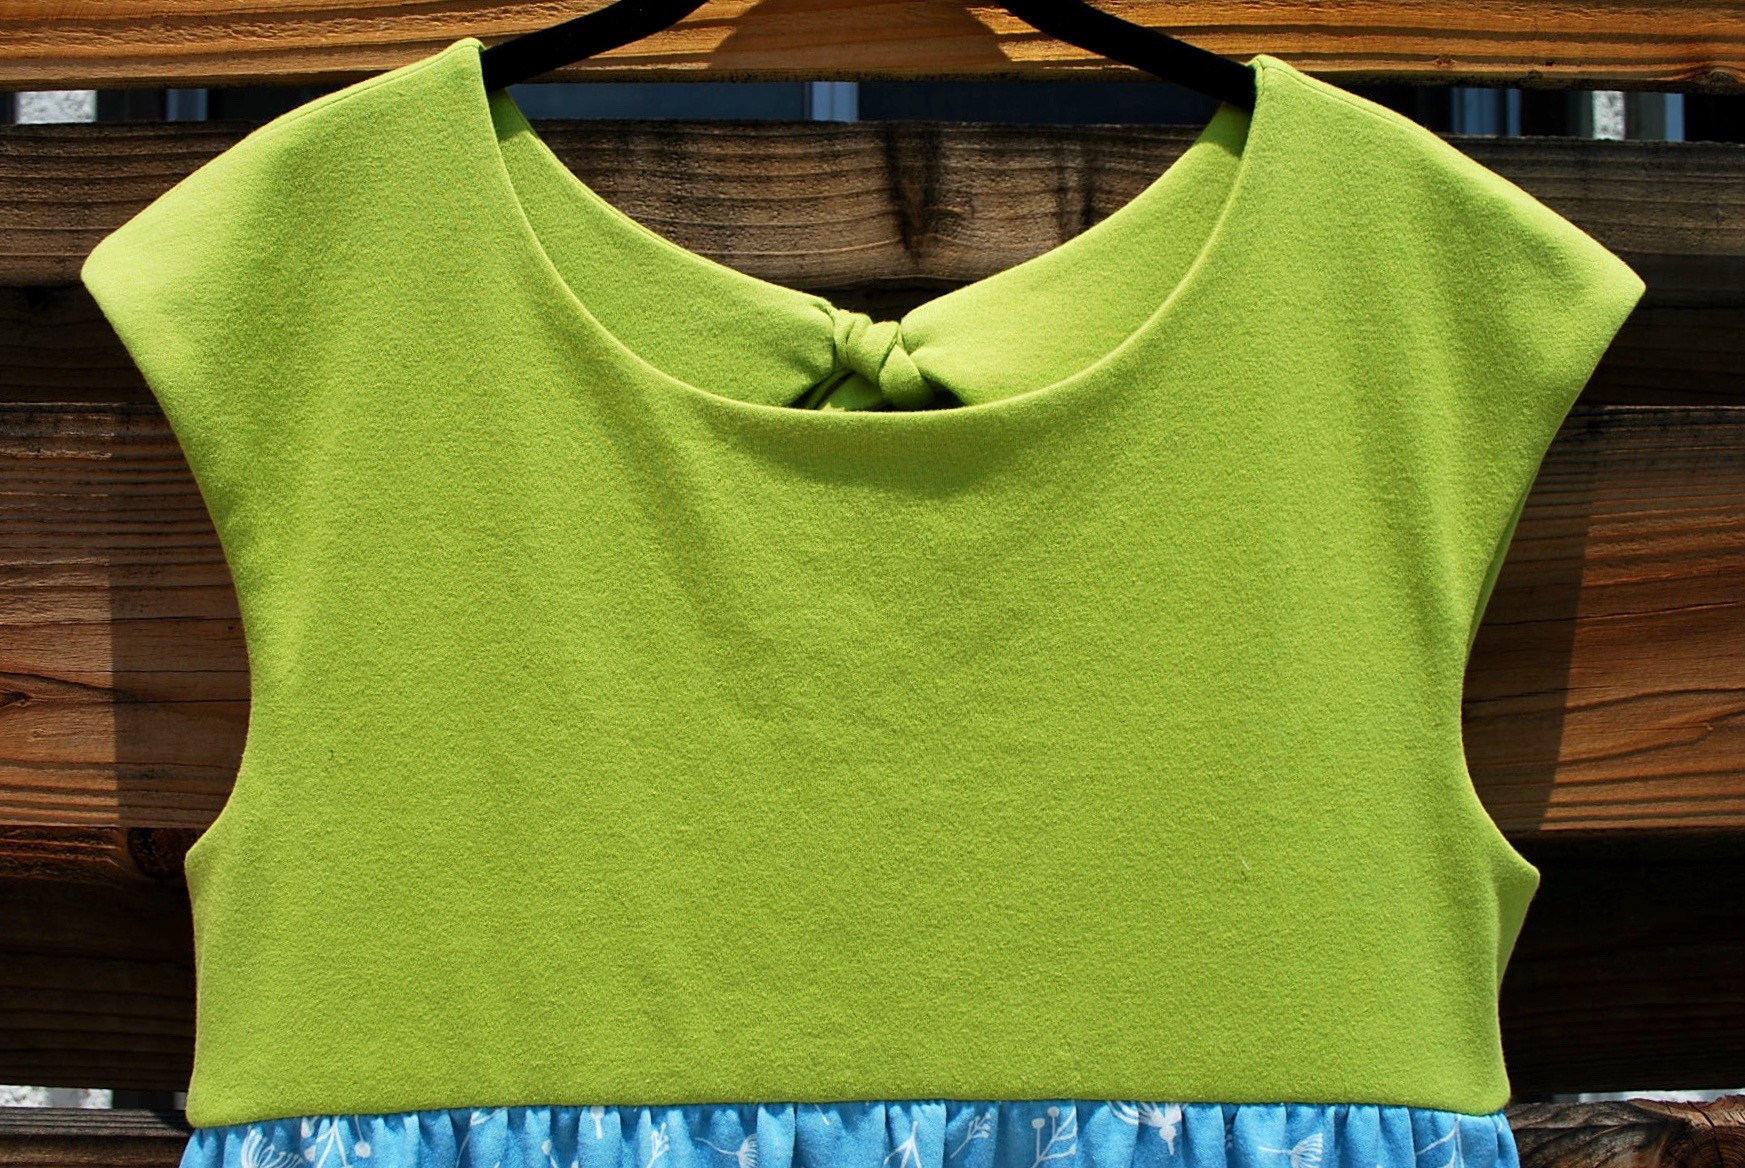
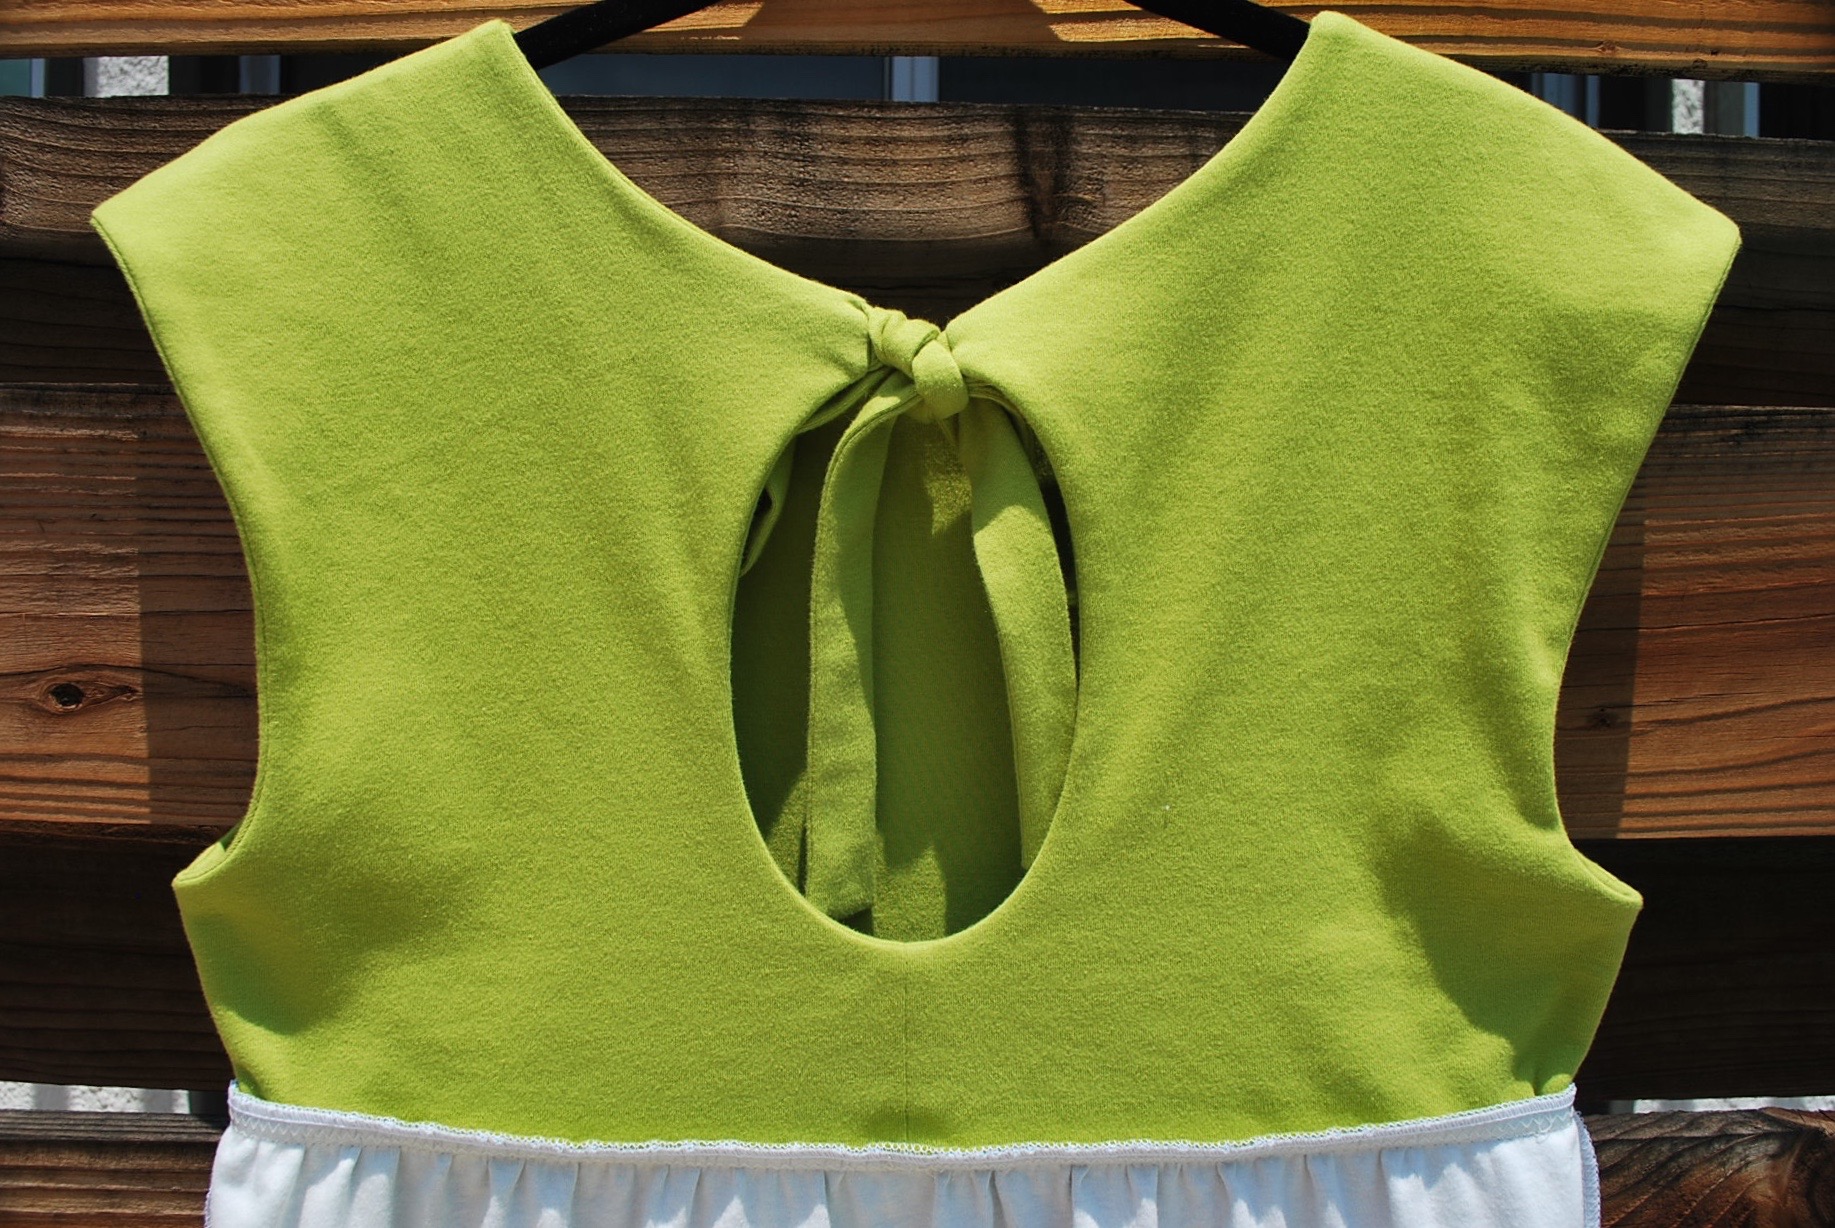
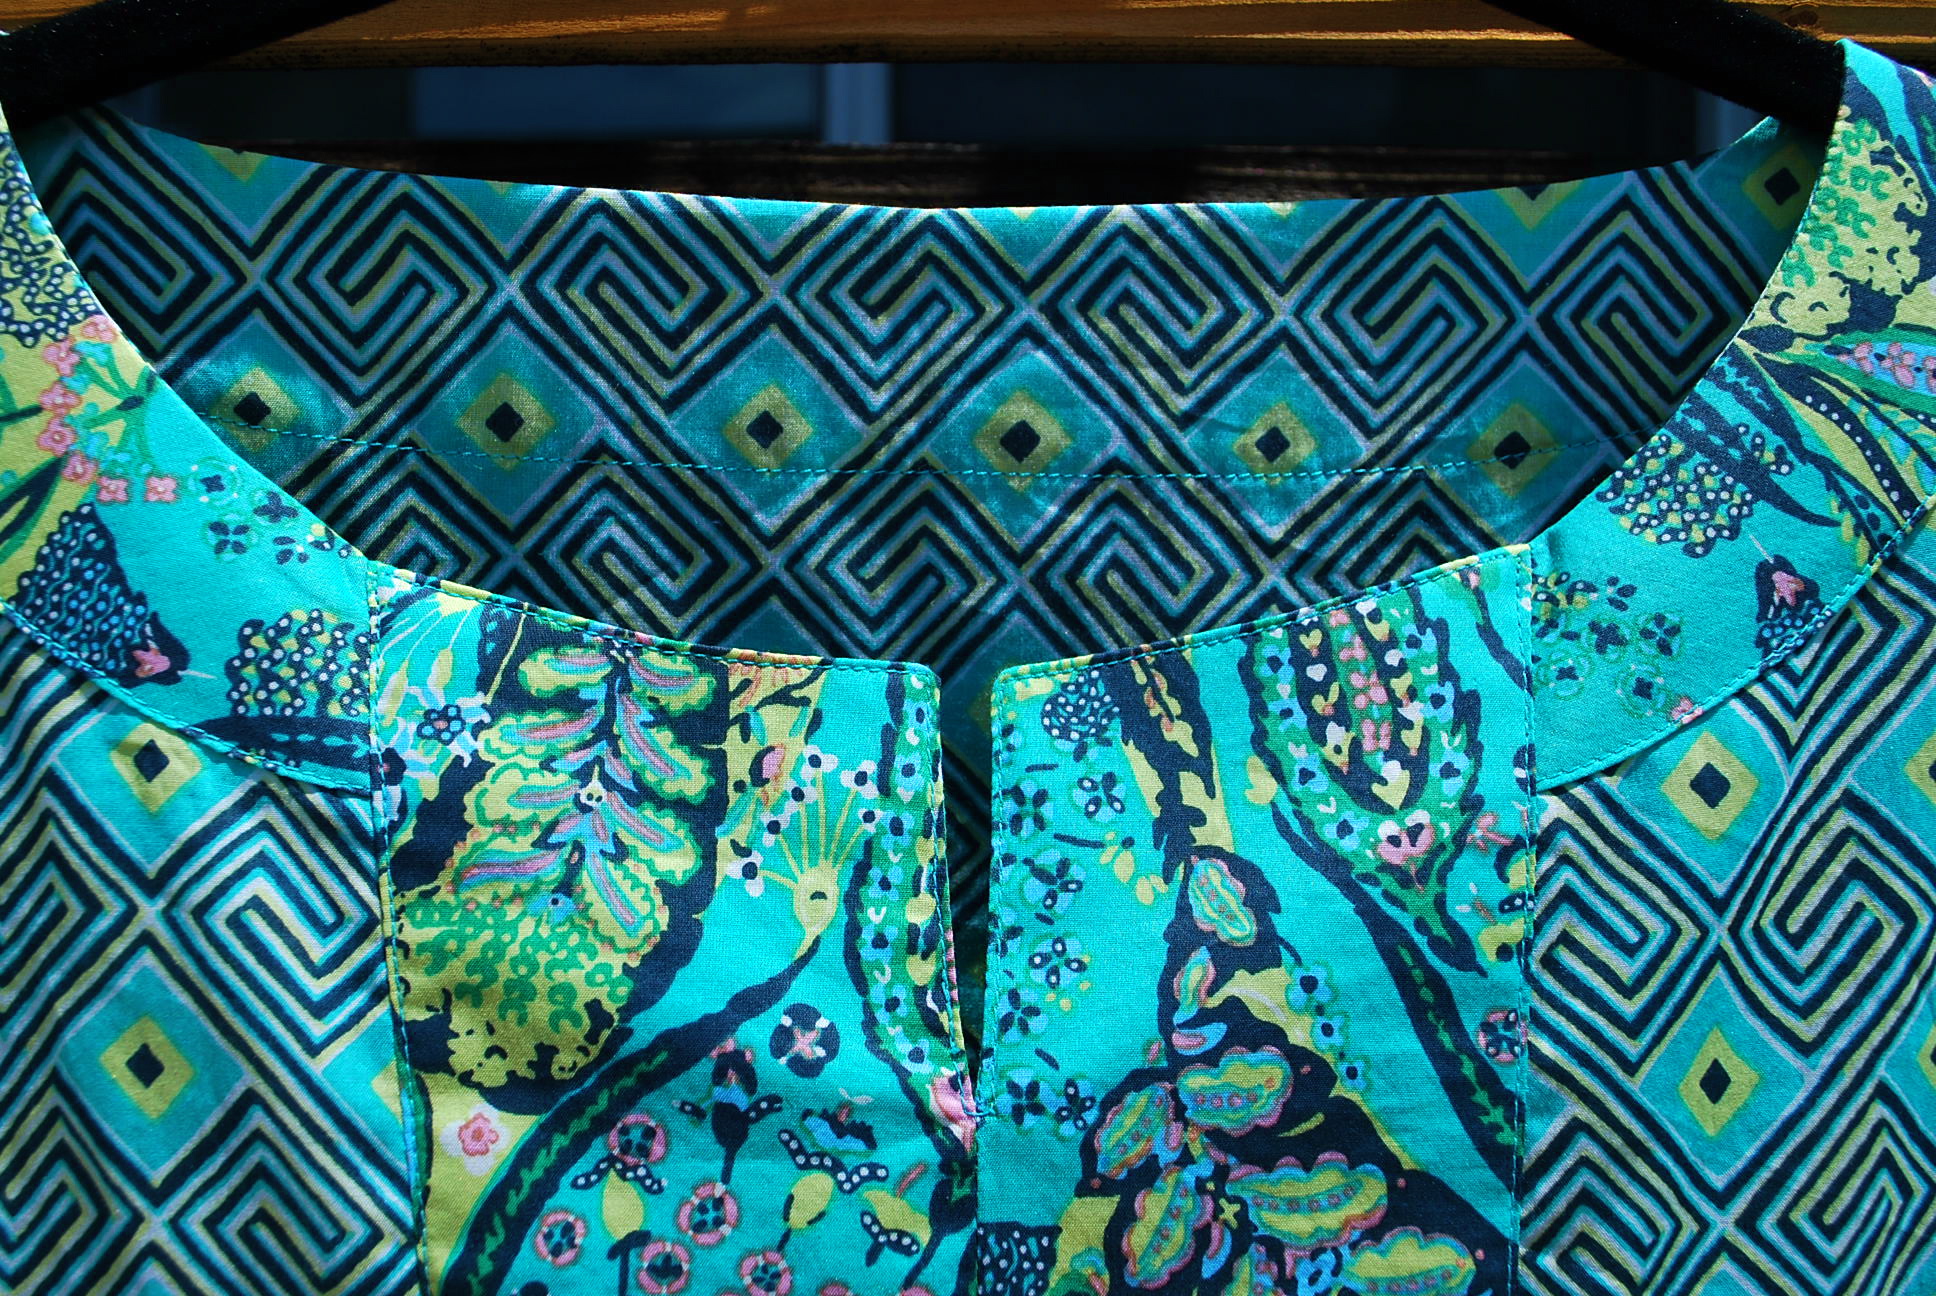
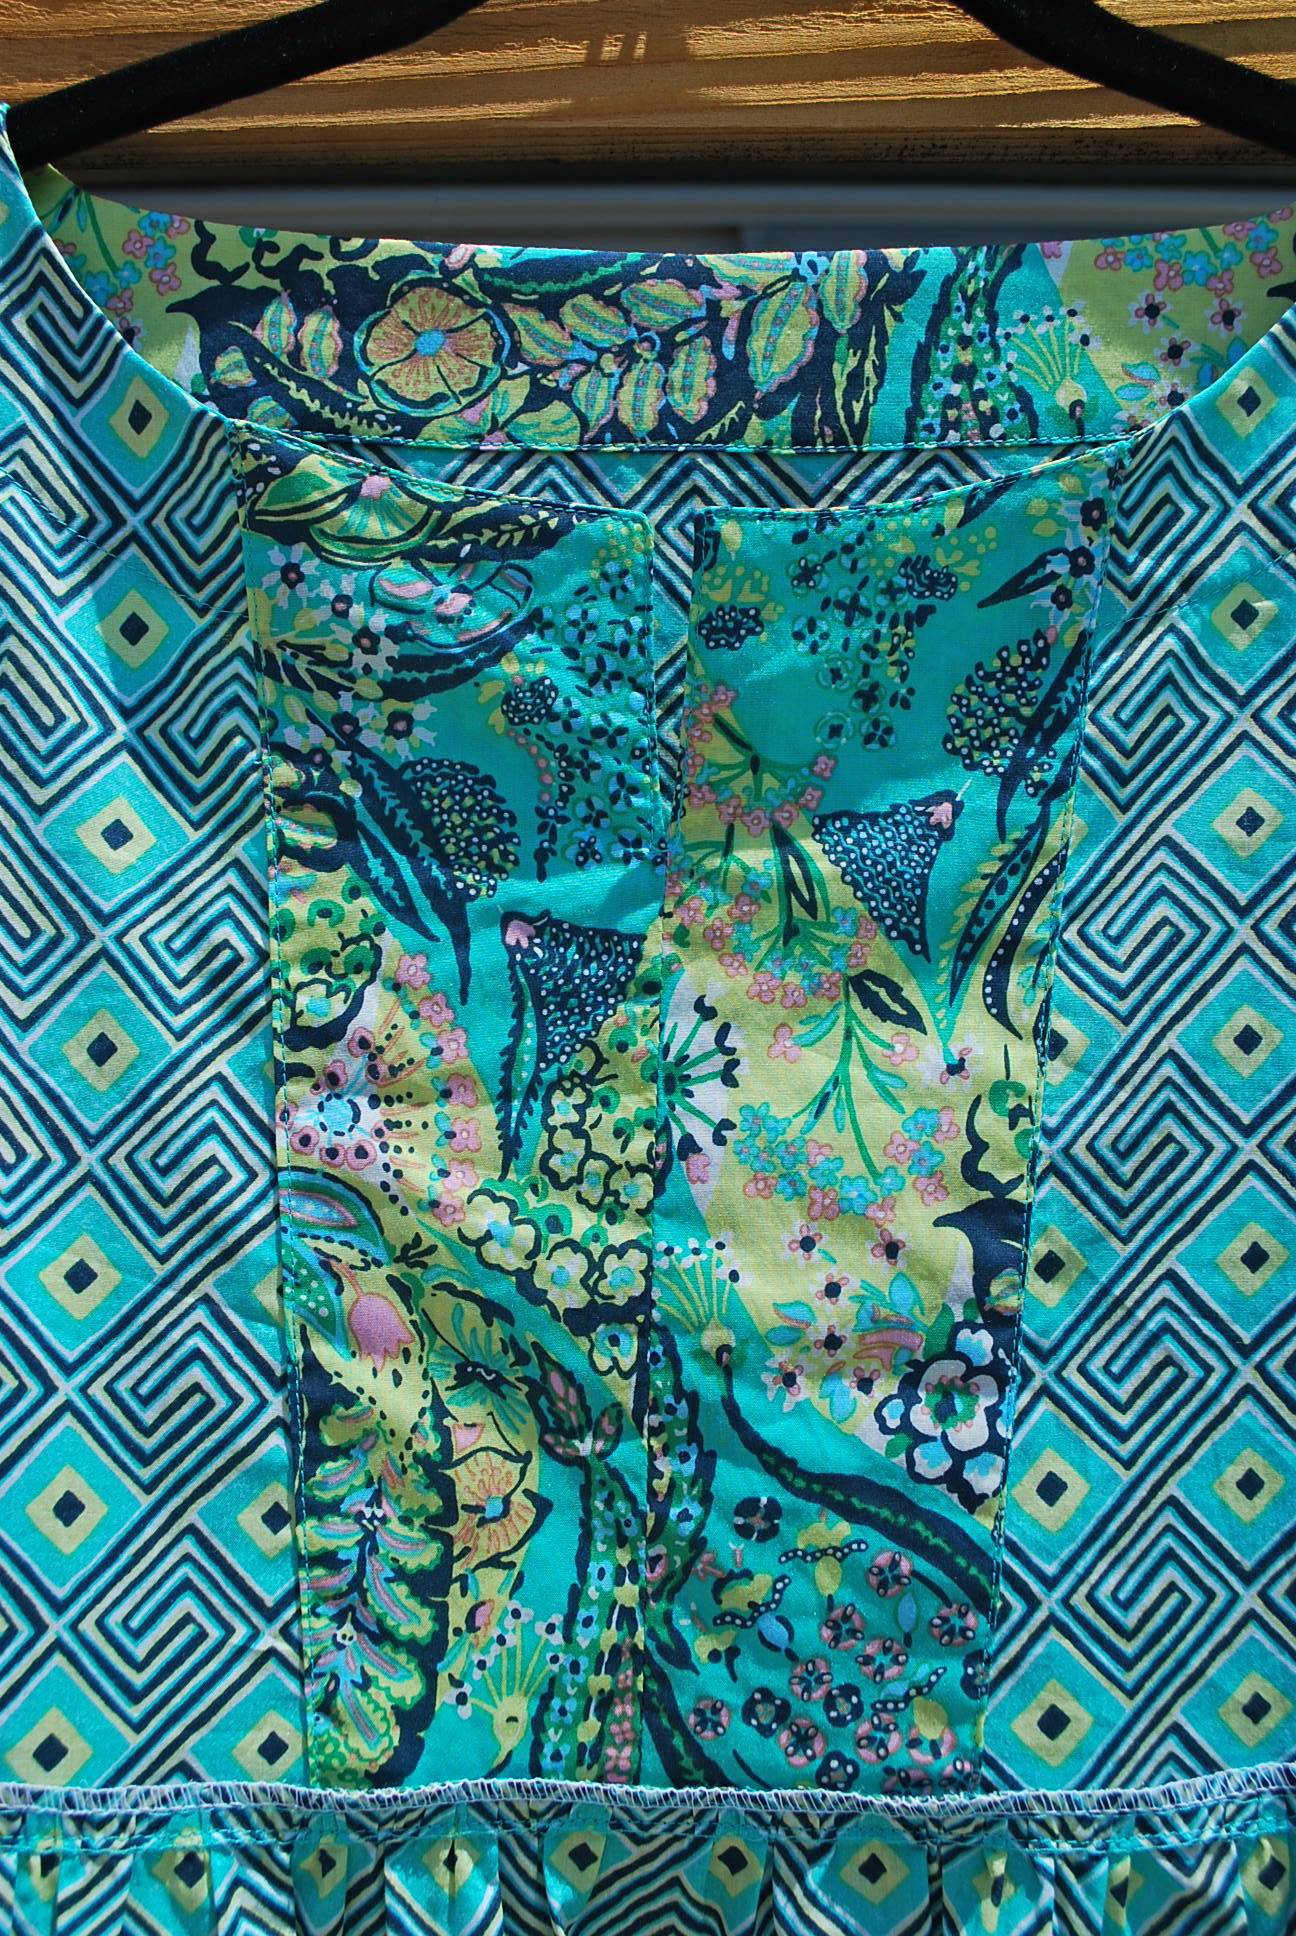
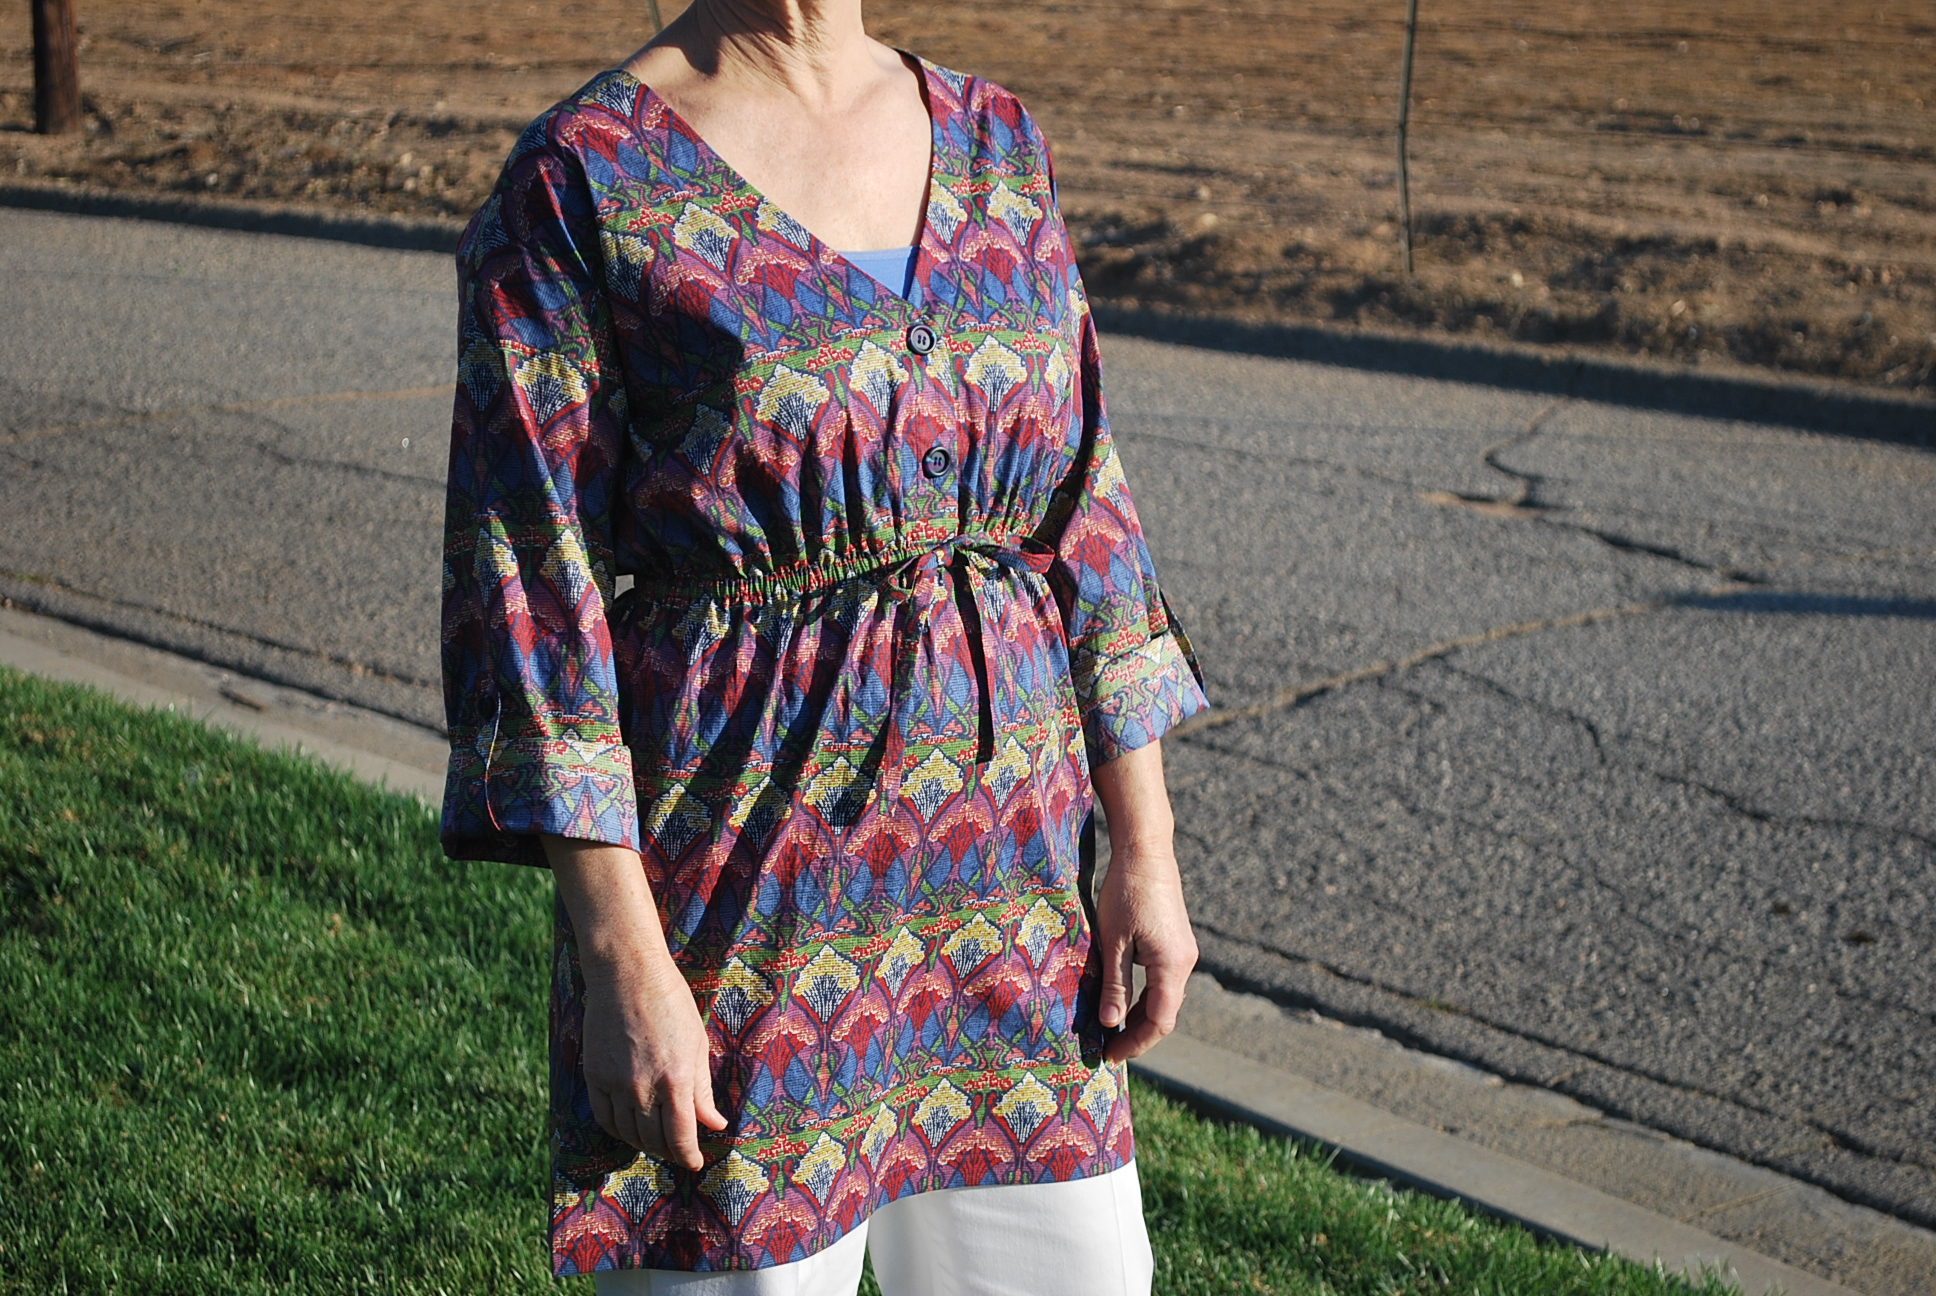
I added a reverse applique design at the neckline inspired by Alabama Chanin. When the Alabama Stitch Book came out in 2008, I was obsessed with the techniques and garments from the book. I made countless projects for a year or two. Then time marched on and I focused on other things. But recently I felt a yearning to do some handiwork, and thought this neckline would be perfect for some embellishment. (The stencils are of my own design, not from the book.) The paint I used is Jacquard Lumiere, Pearl Megenta.

DSC_0341

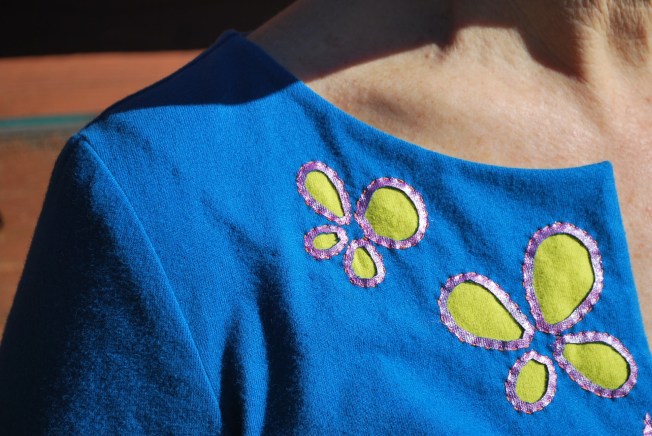
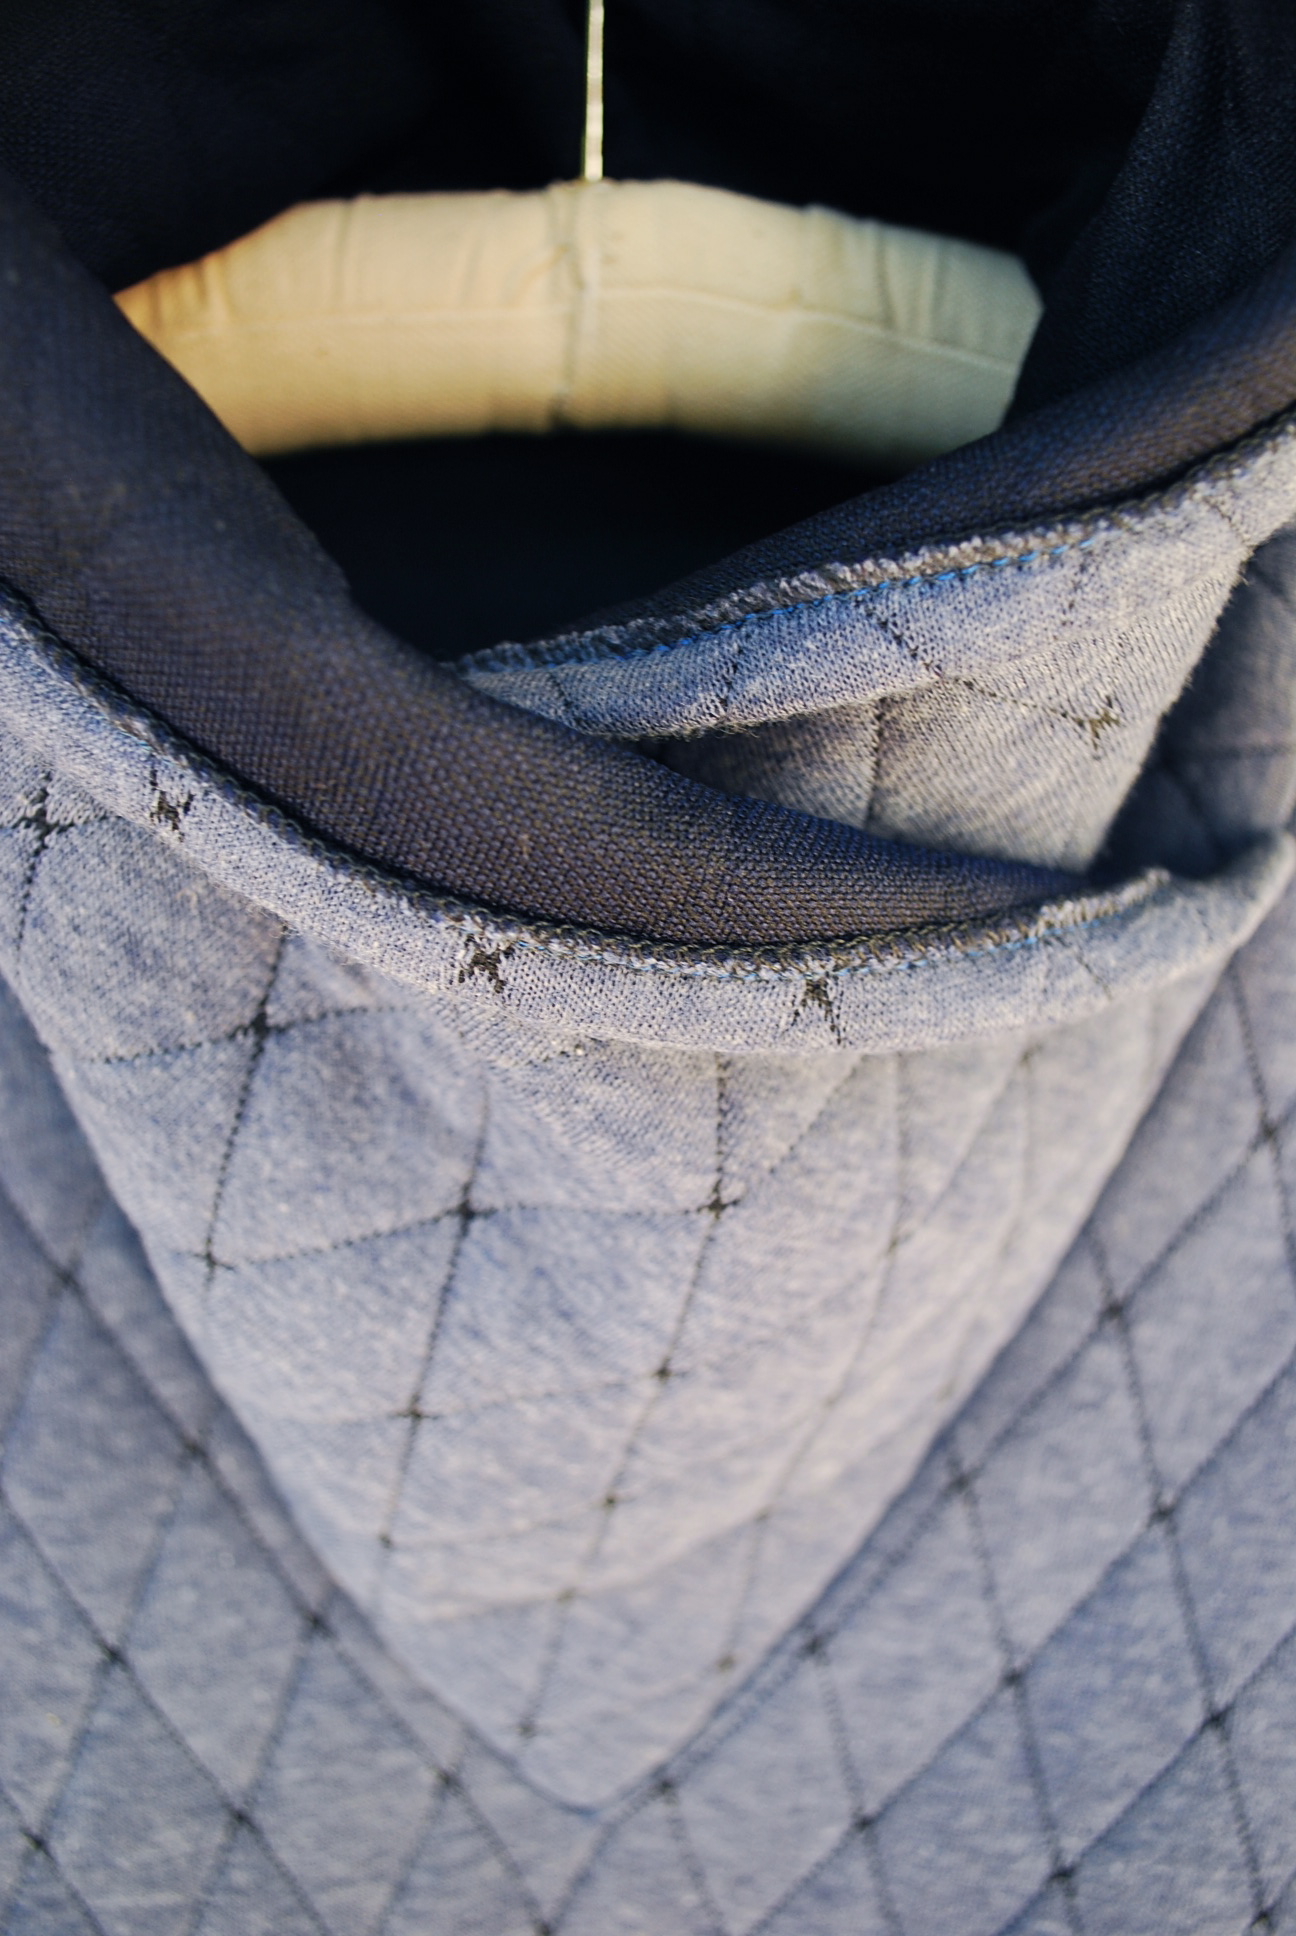
The underneath fabric which is also the facing, is Alison Glass Knit in Lime, leftover from my prior project.

DSC_0304

The lime colored facing was attached so the right-side of the fabric shows through when the blue fabric is cut away.

DSC_0305

DSC_0317

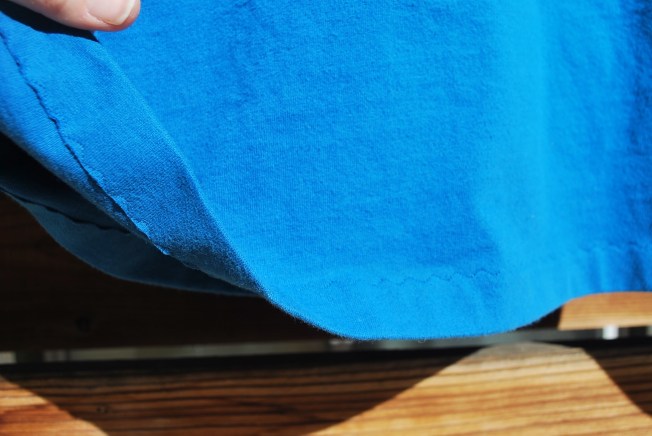
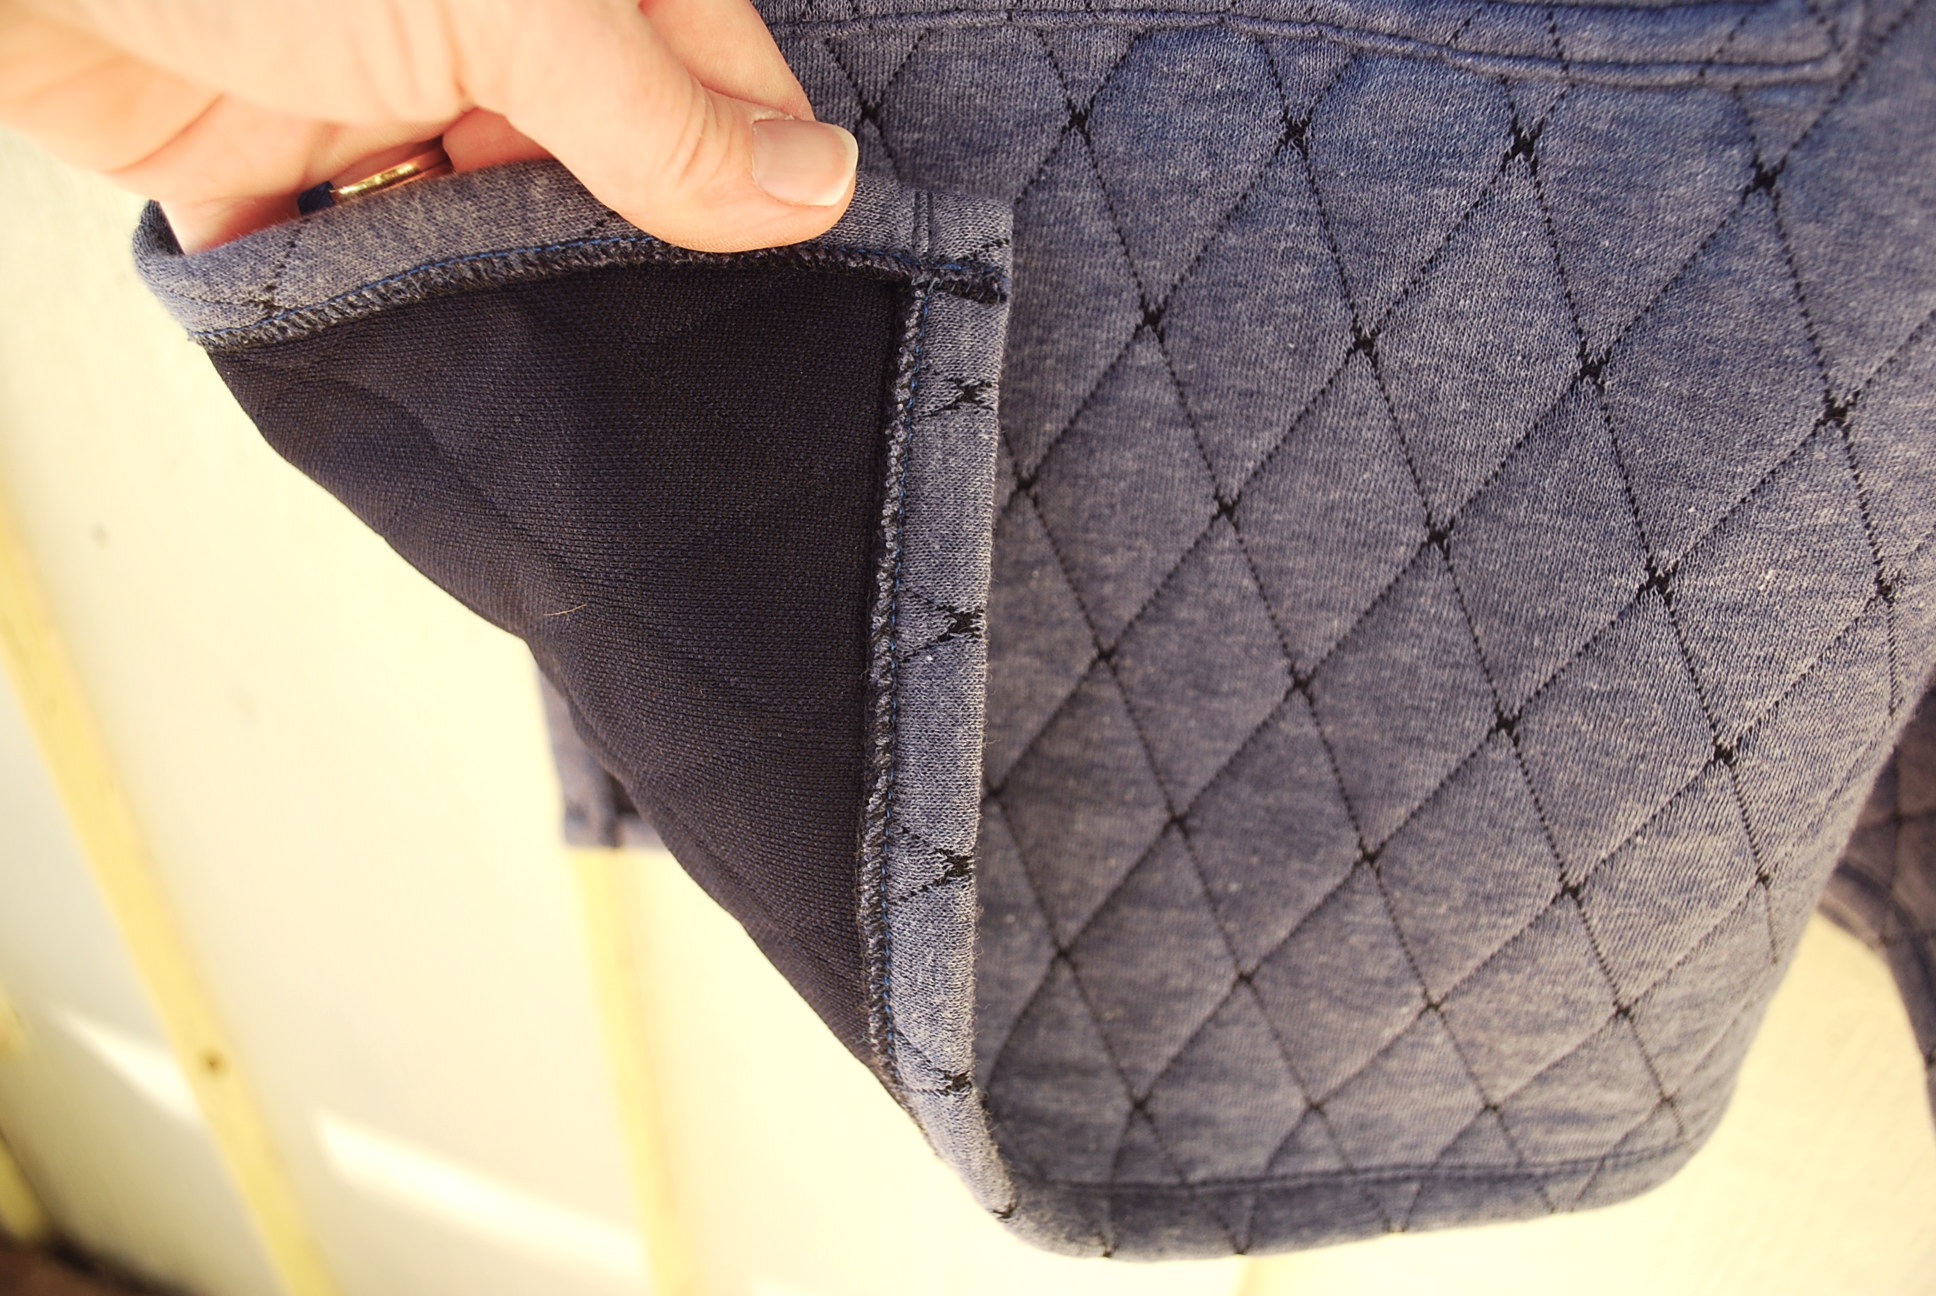
I used a rounded zigzag stitch for the hem. I normally use a double needle straight stitch on knits, but I thought this would look better with the folksy style of the tunic. I leave the edges raw and cut closely to the stitching. That’s all you need to do!

LET’S BE HONEST:

1. I traced and cut a pure size medium without any alterations (except for the length). The flair was significant enough to accommodate my larger hip to smaller bust ratio.

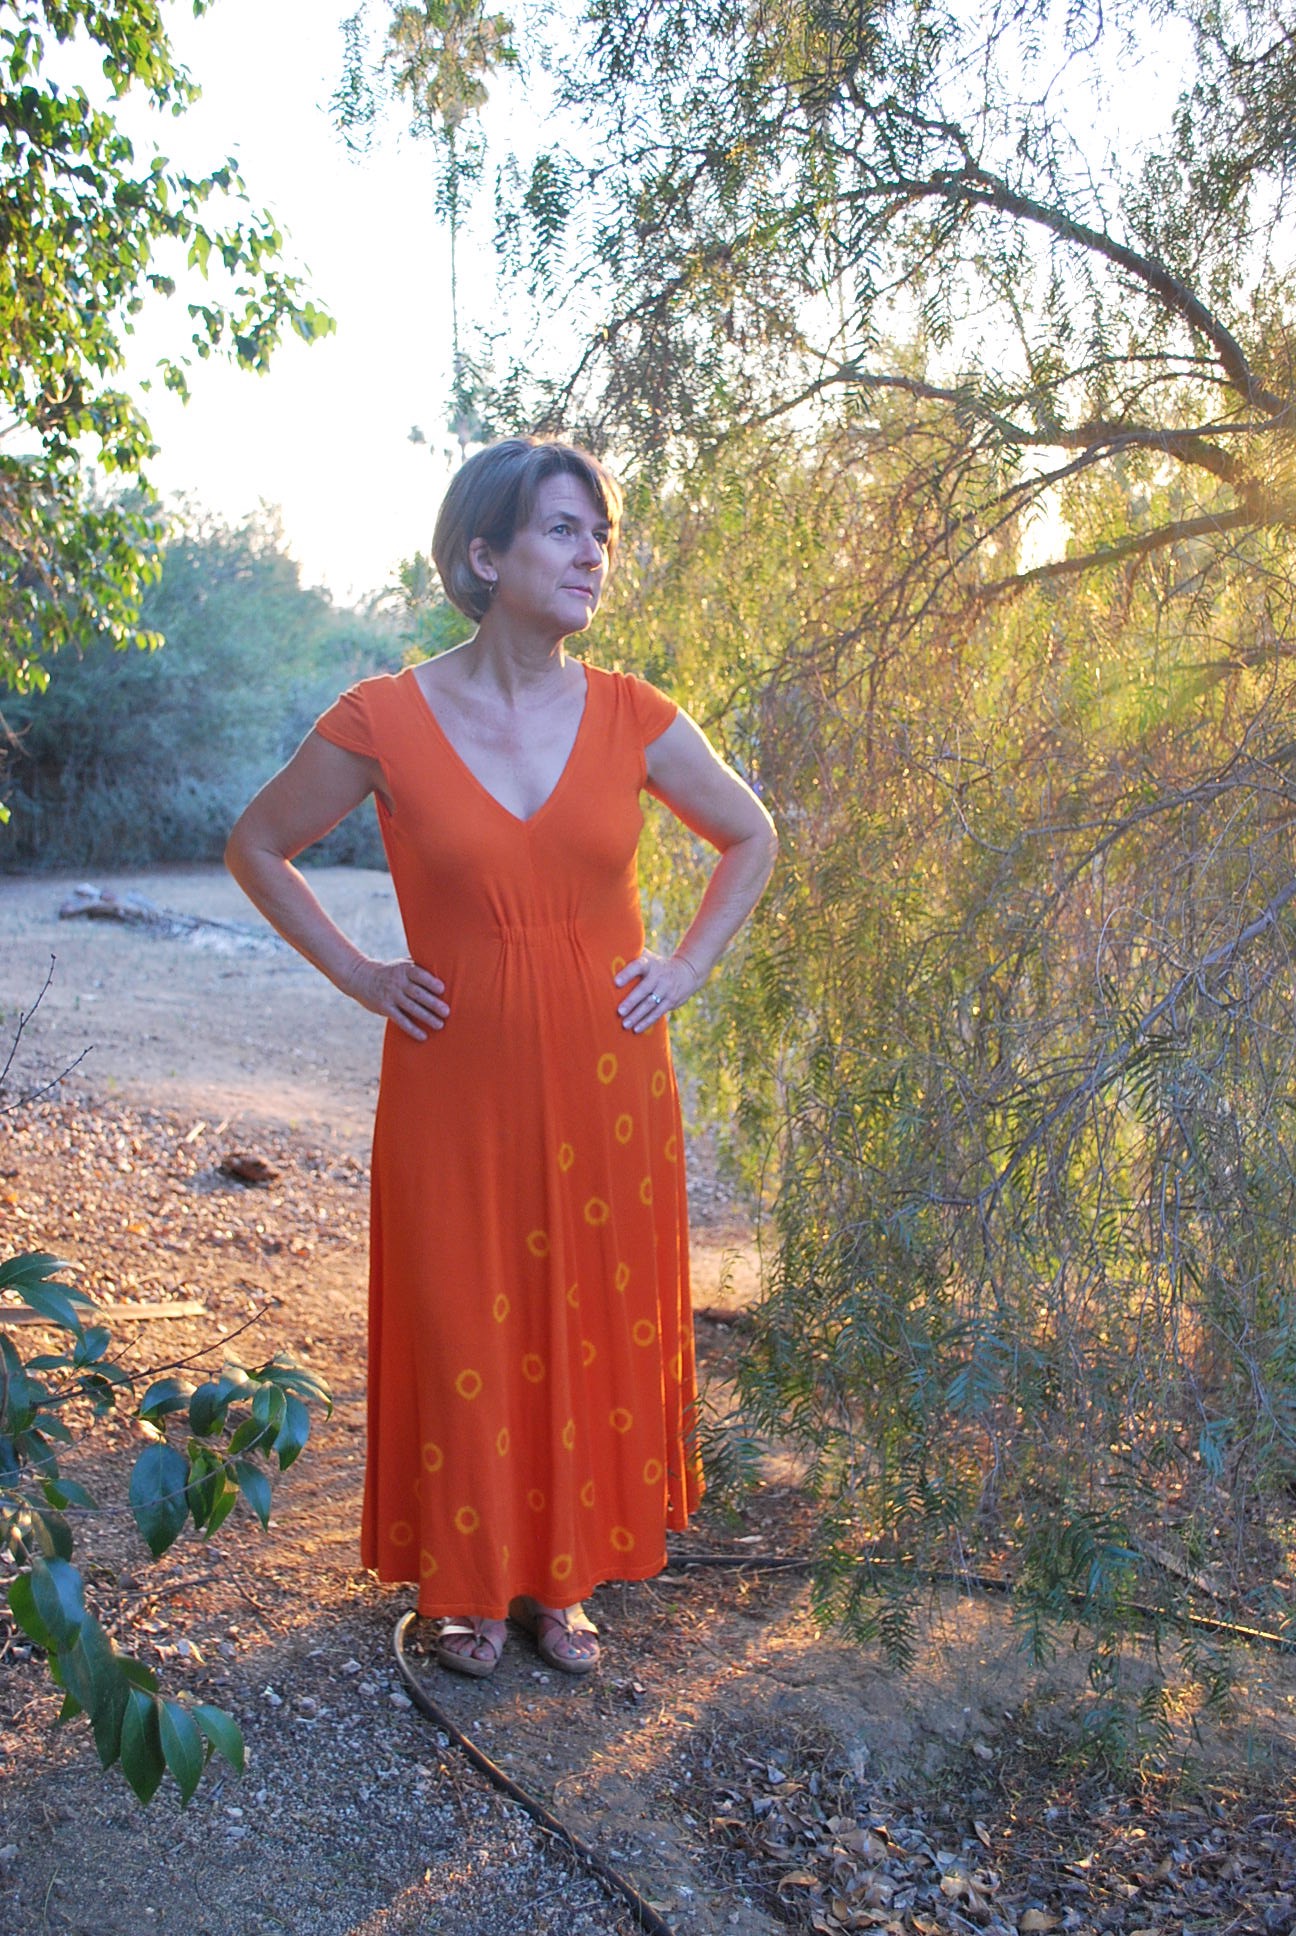
2. I took off two inches from the length before cutting because I thought I would make it a just below hip length to wear with jeans. I tried it on and asked my 20 year old daughter for her opinion as to whether I should keep it long or make it shorter, and she said keep it long. So I did! If I knew I was going to do this, I might not have taken off the two inches. I feel perfectly comfortable in it, but, I’m old!

3. The Esme Tunic is a simple pattern that a beginner could sew. BUT not solely with the instructions provided in the book.

4. I bought this book out of curiousity and because it seems to be getting a lot of hipe on social media (or at least the stuff I follow). I have always liked Lotta Jansdotter’s asthestic and the fact that she’s Swedish. I’m part Swedish and have visitied Sweden many times. But I have to be completely honest, intially, I thumbed through it pretty quickly and thought it was a waste of money. The accessory projects are so easy, I definitely didn’t need a book to show me how to do them. But I realized I am not the target audience for this book, and it is comforting and inspiring for someone who is non-crafty to make projects from a curated book from lifestyle icon.

5. BUT, I thought, I spent money on the book, I need to make something from it. AND, I have to admit, I LOVE the cut and fit of the Esme Tunic. I might even make another one!

DSC_0343


Advertisement

Pack n Party Dress

A few months ago I flew out of state to attend my nephew’s wedding. I was flying one of those budget airlines where every amenity, even water, is an extra cost. I paid for one carry on bag for a four day trip, so I needed a wedding guest dress that could be rolled and stuffed into a small suitcase. A comfy, wrinkle-free polyester jersey knit dress fit the bill perfectly.

DSC_0272

The pattern I used is Simplicity 2580, which of course I bought the only way to buy big four patterns, on sale at JoAnn’s for about $1.00. I was attracted to the neckline of View C and the slightly A-lined silhouette. I traded out the short, petal sleeve for a straight, 3/4 length sleeve (from McCalls 6697).

2580

While JoAnn’s is my go to stop for patterns and notions, I rarely buy fabric there. But I was limited on my fabric shopping opportunities for the project, so I forced myself to make a selection at JoAnn’s, and I rather like this out-of-the-box choice for me. The colors are fun, and there’s plenty of pattern to hide bulges that can so easily show on a slinky knit.

DSC_0273DSC_0275DSC_0276DSC_0279

The front bodice is self-lined and is actually folded at the front neckline which creates a nice, smooth finish. I finished the back neckline with a double needle and trimmed the raw edge close to the stitching.

DSC_0286

I added clear elastic on the seam where the bodice is attached to the skirt. This is a technique I first learned making the Moneta Dress and have used it several times since.

DSC_0283

I am not a big fan of machine hems on dresses, but I think a double needle on a super stretchy knit is a safe bet.

LET’S BE HONEST:

1. I cut a straight size 14 for the bodice and the sleeve (from McCalls 6697). For the skirt, I graded to a size 16, and then additionally added a slight bit of flair which totalled 8″ of width at the bottom. I wanted to make sure the fabric draped nicely over my mid-section, hips, and thighs. I am very happy with the fit.

2. I have wrestled with skipped stitches for years using the double needle on slinky or thick knits. I finally bought a STRETCH double needle (had to order it online) and, oh my gosh, it has solved all my problems. Had I known what a difference it makes, I would have bought one 30 years ago!

3. I love the neckline on this dress! I think it is probably universally flattering on women of all bust sizes.

4. This pattern sews up easily for a seamstress experienced with sewing on knits.

IMG_4116

Here I am sitting with my dad and my son’s girlfriend, Ryley. Ryley is wearing a Alder Dress by Grainline Studio that I made for her!


The Factory Dress

It’s still blazing outside, and I’ll be starting my part-time teaching job in less than two weeks. Therefore I was very motivated to sew up some practical work wear that can take me from end-of-summer through fall. The Factory Dress by Merchant and Mills fits the bill perfectly.

DSC_0213

DSC_0215

DSC_0206

I have coveted the Merchant and Mills patterns since discovering them some time ago. When I calculated that it would cost me approximately $46 to purchase a pattern directly from the UK based company, I figured I would never own one. When I learned that I could purchase one domestically through Fancy Tiger Crafts, I took the plunge. I still paid $20 + $7.95 shipping, much more than I normally pay for patterns. I do splurge very once and a while to sample patterns outside the Big Four. The Factory Dress is “inspired by working women, with a dash of the Twenties.” I found the notion of elevating a working class uniform to something more sophicated intriging.

factb2-203x300

The fabric I used is once again from The Fabric Store on La Brea Avenue in Los Angeles. I hit their summer sale and scored this beautiful linen for $12 per yard. I purchased three yards, but could have done with a little less. Might I add, the sweet employees always measure the yardage very generously. I prewashed it in the machine “at my own risk” and also partially dried it in the dryer. I wanted to soften it a bit and give it a slight laundered linen look.

I accidently put the pocket on the wrong side. I think I make mistakes like this because I'm left-handed.

I accidently put the pocket on the wrong side. I think I make mistakes like this because I’m left-handed.

I top-stitched around the collar by hand.

I top-stitched around the collar by hand.

Inside peek - I serged all the seams. It has side seam pockets.

Inside peek – I serged all the seams and did a hand hem on the sleeves and bottom. It has side seam pockets.

DSC_0217

Gosh, that morning sun is bright.

LET’S BE HONEST:

1. The pattern ranges from size 8 to 18. I cut a straight size 10, even though, according to the chart my bust is a size 12 and my waist and hips are a size 14. I read other reviews, looks at images of the dress online, and also notice how loose fitting the dress is on the model on the pattern envelope. I “get” the loose fitting style aesthetic, but what also know to be true is that style only looks flattering on very slim people. I was aimming for comfortable wearing ease, and the size 10 turned out perfect. I made no adjustments.

2. This is a well drafted pattern. The paper the pieces are printed on is like a lightweight brown bag with a smooth, shiney backing. The directions, printed on heavyweight paper, are done in vintage graphics and hand illustrations.

DSC_0218DSC_0221

I must confess, I really only looked at the illustrations while sewing. I suspect that the written instructions are probably not quite adequate for a beginning seamstress. But I’m done nit picking pattern instructions, because I certainly wouldn’t want to write them and my hat’s off to anyone who does.

3. When wearing, there is a marked difference between the distance from the hem to the ground in the back and the front. It scoops up in the front and dips in the back. It could just be me, but I don’t completely think so. I did not engage my husband to mark the hem with my old fashion hem gauge, but I did a gradual trim before hemming, making the back 5/8″ shorter. I realize many people don’t notice or care when hems aren’t parallel to the floor, but it’s one of my pet peeves. I can thank my mother for that.

I really had no issues sewing up this dress. I can’t wait to wear it and honor those hard working women of the past!

What are your pattern buying habits? Are there patterns you have been eyeing, but cost is preventing you from buying? Do you have a price limit just on principle?

Thanks for reading my post! Cheers, Lori

The Mid-Summer Dress

I always sew for the season that we are actually in. I like the instant gratification of wearing my new make the next day. Here in inland So Cal, the weather will be warm until October, so I am still in the market for easy wearing summer dresses. I am sharing with you my new Fresh Make that will help get me through the dog days of summer.DSC_0187
DSC_0179

The pattern I used is Butterick 5456. I purchased this pattern at least a year ago at JoAnn’s during a pattern sale which means I paid less than $2 for it. The year on the envelope is 2010. I hope it’s still in print because I think it is a timeless, wearable pattern.

DSC_0503

The fabric I used was purchased online at Fabricworm originally for a Marianne Dress for Round Two of the Super Online Sewing Match. (I was eliminated after that round, but it but it was great fun while it lasted!) I ended up using some other fabric for the contest, so I still had this fabric on hand screaming at me to sew it up. The blue and white print is an organic cotton interlock knit by Charley Harper for Birch Fabrics. It was $13 per yard and 45″ wide. Honesty time: I don’t think I will purchase from this collection again. While the weight of the interlock was substantial and as expected, the blue ink stiffens the fabric and does not soften with a machine wash and dry. Also the ink application is a slightly uneven and blotchy in places. Fortunately, the green Birch Organic, Mod Basic Solid, is a completely different story. It is super soft and dreamy, and the touch of Lycra is genius for an interlock, a weave that can stretch out easily. It was $12.80 per yard and 60″ wide. This collection will definitely become a “go to” solid for me.

DSC_0487DSC_0489

The bodice is fully lined. It would have been optimal to use a thinner knit for the lining instead of the green interlock, but there was enough and I wanted to use what I had on hand. I used the method for a clean, machine armhole finish from the Moneta Dress by Colette.

DSC_0488

I think the keyhole back and tie add an interesting detail to a simple dress. And I really like that the opening is high enough that you can still wear a regular bra.

DSC_0491

I shirred the skirt with clear elastic, also a method from the Moneta Dress by Colette.

DSC_0493

After attaching the bottom band, I decided I didn’t like the way it hung as a single layer and futhermore did not want machine stitching at the bottom since there was no machine top stitching anywhere else. I went ahead and folded the band and “stitched-in-the-ditch.”

DSC_0496

LETS BE HONEST:

1. The pattern is labeled “Fast & Easy.” That it is. However, there is no differentiated instruction for knits which could cause frustration for someone who has not sewn on knits before. I basically glanced at the illustrations and used my own knit techniques as well as the two from the Moneta Dress mentioned above.

2. I cut out exactly between size 12 and 14, taking into consideration that knit ease should be less. I still misjudged and the bodice turned out a little big. The armholes are particularly large. Don’t get me wrong, I am still going to wear it! If I were to make it again, however, I would probably cut a size 10.

3. I like the double thickness of the bottom band, but proportionally I think the original width of the band looks better. So if I were to make the dress again I would cut a band of double width, fold and stitch-in-the-ditch again.

I really do like this dress. It was simple, no hassle sewing. And it is as comfortable as can be.

What about you? Do you sew a season ahead or squeeze in a few end-of-the-season makes?
DSC_0184

The Goddess Dress

I was super excited to make, and then blog about this dress. But when all was said and done, my vision of how it would look on me was far from what I saw in the mirror. So in the closet it went. Maybe to never be worn and/or blogged about. But I’ve had a change of heart. I thought a lot lately about what blogging is all about. What I want my blog to be. Is it just to show off a perfectly crafted project? Or is it to share a story and maybe some imperfect truths. I think the later is far more interesting. So here is my Fresh Make #28, a drapey, rayon maxi dress.

DSC_0086DSC_0089

The pattern I used is McCalls 6074, purchased on sale at JoAnn’s for $1.40. I bought it several months ago thinking it would be a great pattern to add to my summer dress stash. I was attracted to the gathering under the bust which adds a bit of fullness to the body of the dress. I thought this would lessen the possibility of showing bumps and lumps under a stretchy jersey knit.

DSC_0076

I love to dye fabric as much as I love to sew. For this dress, I began with a beautiful, white rayon jersey from Dharma Trading Co. I have used this fabric for other projects and actually had several yards left in my stash. This fabric is a nice weight, drapes beautifully and looks like new after every washing. I lay it flat to dry, and the wrinkles disappear while it dries! I dyed it twice with procion dyes, again from Dharma Trading Co. I won’t go into the dyeing techniques on this post. But if you’re interested, just ask!

DSC_0469DSC_0482DSC_0483
I finished the neckline, sleeves caps, armholes, and hem with a double needle. I sewed the dress with 100% cotton thread so it would dye also. You can see the polyester thread in my serger does not take the dye.
DSC_0476
I first dyed the fabric “Tangerine” while it was tied with marbles and rubber bands. Then I dyed it in “Deep Yellow.”
DSC_0472 (1)

LET’S BE HONEST:
1. This pattern is labeled Easy, which it is if you are experienced with sewing on knits. There is no differentiated instructions for sewing with knits in this pattern. Generally, there never is with big 4 patterns. You, as a sewist, would just need to know what techniques would be appropriate for the knit you choose.

2. I cut a size 14. The only change I made was adding 5/8″ around the neckline. I did this on a hunch that it might be too low for me, and I’m glad I did.

3. I choose to make version with the sleeve cap just for a little variety. But I not sure I’m a big fan of the actual result. At least on me. I would like them to lay flatter on my arm. This fabric is extremely stretchy, and it stretched at the edge when I hemmed it with the double needle. I steamed it back to shape as best I could, but there is still some extra fullness.

4. The sewing of the elastic casing and attaching the elastic on the design feature under the bust is not my proudest sewing moment. Sewing a little stretchy casing on an equally stretchy larger piece is not easy. Even though I wasn’t satisfied with how the stitching looked, I didn’t want to take it out for fear I would poke holes in the fabric.

5. So here’s why I don’t like this dress, it shows all of my curves, good and BAD. The dress is not too small. The problem is the fabric is very stretchy and smooth, and with the weight that is created by the maxi length, it clings to every curve and bump of my body, and every ridge or line, no matter how small, of the undergarments I’m wearing. Previously, I have used this fabric for loose fitting tops, and it is perfect. The finished garment is lightweight enough, that it floats freely around my body. I would like to make this dress again. I will give up the elegance, and use a cotton knit with less stretch. I still think this would make a great, versatile, summer dress.

I offered this dress to my young adult daughter who has no “bad” curves. She responded very politely that she was not the maxi dress type. Oh, I don’t know. I still might wear it somewhere at night where the lights are low. How about you? Have you made something that seems to be the right size, but the fabric choice makes it unflattering?

DSC_0083

Japanese Dress Y

I have now become a big fan of Japanese pattern books. I bought my first book, Simple Modern Sewing, on sale, with a gift card, and as a skeptic. After two big wins from that book, I was compelled to buy another one, Stylish Dress Book, Wear with Freedom by Yoshiko Tsukiori. For Fresh Make #27 I chose a loose fitting, easy wear dress. Perfect for the hot summer that’s just around the corner.
DSC_0074DSC_0087
While the decision wasn’t easy from the 26 patterns, I chose Dress Y. Mainly because I wanted a pattern that combined two fabrics, and also the construction didn’t look to fussy.

This book has 26 adorable patterns to choose from.

This book has 26 adorable patterns to choose from.

Here's Dress Y. Those are the complete instructions! More on that later.

Here’s Dress Y. Those are the complete instructions! More on that later.

The fabrics I used are from Amy Butler’s Glow Collection, Maze Voile in Grass and Jolie Voile in Grass. I purchased them online at Hawthorne Threads for $13.50 per yard. I needed a total of three yards. I have been coveting the cotton voiles that have recently become a part of designer collections that traditionally have only included quilting weight fabrics. There’s no turning back once you start making blouses and dress with voiles and lawn cottons – so light weight and luxurious.
DSC_0079

DSC_0087

The neck trim is attached by sewing right and wrong side together at the neck edge so the seam allowances are tucked inside, and there is no need for a facing.

The neck trim is attached by sewing right and wrong side together at the neck edge so the seam allowances are enclosed inside when you fold the trim over to the front, and there is no need for a facing.

The pattern called for a single layer yoke with a bias tape trim at the top. I  made a double layer for a facing instead.

Here’s the inside. The pattern called for a single layer yoke with a bias tape trim at the top. I made a double layer for a facing instead.

The hem band is a single layer. I did a 1 1/4

The hem band is a single layer. I did a 1 1/4″ machine blind hem.

LET’S BE HONEST:
1. The pattern size range is from 6 to 16. Obiviously this is a very loose fitting design and the bust is the main measurement needed to gage your size. I cut a 12 with no alterations.

2. The width throughout the bodice and where it meets the skirt is wider than it appears in the photograph on the very skinny model in the book. It almost A-lines from the armhole. I am considering this a surprise design feature (I didn’t study the pattern pieces), rather than a misfit, because the shoulders and neckline are perfect. I feel it might not be the most flattering thing, especially from a side view, for me to have all that width floating around me.

3. Ok, after making three Japanese patterns, there is no denying they are well drafted. And also fit well, at least for a relatively narrow size range. BUT, the instructions are inadequate. (Enlarge the photo of the book above.) Beginner beware! Stay away. I because of my sewing experience, I can make a basic dress without instructions, but I try to look at what is presented from a beginner standpoint. I definitely would not attempt one of these patterns without a body of sewing knowledge.

4. I would like to question one method in the instructions. They show laying the garment out flat and sewing the sleeve in before the side seams. I usually save this technique for knits and/or sleeve caps with a straighter curve. The sleeve cap in Dress Y has a fairly high curve and I think would ease in better insetting it after the side seams are sewn. At least that’s what I did, and it work well.

Overall, despite the slightly tent-like sillouette, I love this dress. The fabric is soft, smooth and lighter than air. Dress Y like a pair of shoes that are super comfortable the first time you try them on – I know I’ll reach for it over and over again.

Have you tried any Japanese patterns? Which ones? Are you a skeptic or fan?
DSC_0093

The Truly Perfect Blouse

Ok, I broke my New Year’s resolution and got behind on my blogging. Taxes and a wonderful spring break vacation got in the way. I am always envious of other seamstresses who, no matter what, are so prolific all the time. What is their secret? Boundless energy? Hyper disciplined? No day job? Anyway, I have been anxious to share Fresh Make #26 with you because I am so pleased with it turned out. I have made a wrap blouse perfect for work or a fun spring event.

DSC_0037

I was inspired to make another wrap top after my success with the second try of The Every Woman Top. Unlike RTW, I discovered a custom made wrap top can actually look decent on me because I can adjust for my bust to hip ratio.

DSC_0044DSC_0073DSC_0054 The pattern I used was Vogue 8833, which I purchased on sale at JoAnn’s for $4.99. (I always mark the sale dates for Vogue patterns on my calendar.) I choose this pattern because of my new enthusiasm for the wrap design and my constant need for verstile, causal professional wear. Additionally, I am a big fan of the patterns that have the A,B,C,D cup size options.

vogue blouse

The fabric, which I ordered online, more than met my expectations. It is a smooth, lovely lawn cotton from Hawthorne Threads. Here are the specifics: Melody Miller, Playful Lawn, Vintage Flora lawn in Aqua. I love the fresh, modern color palate. It also comes in a couple of other colorways. I purchased 2 1/2 yards at $13.95 per yard.

DSC_0074

It has princess seams both in both front and back which add to a flattering fit. There’s an opening in one of the princess seams for the tie to go through. I added a thread loop on the opposite side seam at the waistline to hold the tie in place.

DSC_0084 DSC_0078

Because the lawn cotton sews up and irons so beautifully, I decided not to top-stitch the edge of the collar or facings.

DSC_0085 Here’s an inside peek so you can get a better idea of how it all goes together.

LET’S BE HONEST:
1. I think I say this everytime I make a Vogue pattern, but I feel I need to keep making this comment – this pattern is labeled “Easy.” I believe this rating is relative to other Vogue patterns, not sewing in general. This pattern has a collar with a band, set-in sleeves, and some other features that wouldn’t be appropriate for a beginning seamstress to attempt independently.

2. I cut a Size 12 on top and graded to a Size 16 on the bottom. I choose the B cup option. Overall I was very pleased with the fit and did not make any adjustments after trying it on while sewing.

3. The only thing I added that wasn’t suggested in the instructions, was a thread loop at one side seam to hold the tie in place.

4. Honestly, I have nothing more to say about this pattern, except it sews up exactly like it looks. I am very happy with it. I truly think it would be great on all figure types.

REFLECTIONS, REVELATIONS, AND CONFESSIONS:
I’m just anxious to publish this post. Even when I’m on a fabulous vacation, I miss sewing and blogging. I still look on Instagram and scan through other blogs to keep up on what others are doing. How about you? How do you feel when you don’t have time to sew….even when you’re having a fabulous time doing something else?

DSC_0025

Fresh Makes, Take Twos

I have made 25 garments since starting this blog, and I have probably mentioned in most of my posts, “When I make this again, I’m going to…….” So how many have I actually made again? I will admit that 90%+ of my makes are one-time adventures. Mainly because with the limited time I have to sew, I find the most enjoyment out of trying a new pattern from my large pattern stash each time I make a garment. But there are two that I have been compelled to revisit, and I’m excited to share these Take Two makes with you.

The first Take Two is The Jean Skirt, Fresh Make #1.DSC_0001Sometimes the garments that “wow” the least are the ones we grab the most because they are a great basic. And that is the case with The Jean Skirt, Simplicity 1616. I really like how it fits, lays flat across the stomach, yet has plenty of width through the hips and thighs. AND it is quick and easy to make. I wanted to make another as soon as I finished the first and what finally spurred me into action was, sadly, I tore my first Jean Skirt.DSC_0005DSC_0016 The fabric, which I ordered online, was disappointingly thin. While wearing it, it got caught on something, I don’t even remember what, and now it’s wadded up on the top shelf of my closet.

I learned my lesson that you usually “get what you pay for.” So for Jean Skirt, Take Two I shelled out the big bucks for 2 3/4 yards at $14.50 per yard for Anna Marie Horner’s beautiful, thick, soft, interlock knit, Mary Thistle, in navy, from my favorite online fabric store, Hawthorne Threads.DSC_0004This fabric goes through the washer and dryer beautifully. The dark blue with a black print acts like a neutral. You can really pair it with almost any color. A true grab and go skirt.

My second Take Two is The Every Woman Top, Fresh Make #21.DSC_0011
I was initially drawn to this pattern for it’s potentially figure flattering variation of a basic knit top.

My first version of The Everywoman Top, Vogue 8151, was a fit fail from the waist down. The biggest fit fail of my 25 Fresh Makes. I describe this all in my original post, but basically the fabric was too thick and the fit was too loose, resulting in one big belly sag instead of flattering, fabric folds created by the side ruching. BUT I loved the fit from the waist up. The small bust adjustment I did worked well and neck band laid perfectly in front and back.

Through the waist and belly, it's a bit of a blob silhouette. Go ahead and click to enlarge to see what I mean.

Through the waist and belly, it’s a bit of a blob silhouette. Go ahead and click to enlarge to see what I mean.

Version two, much better!

Version two, much better!

I vowed to redeem myself by making another with a thinner, single jersey knit. I did just that with a 95% cotton, 5% Lycra, Threaded Shreds Knit in Mamey, again, from Hawthorne Threads. I splurged in purchasing 1 7/8 yards at $15.95 per yard. I love this fabric. It washes beautifully, and is super soft and stretchy. It is also thin enough that bulk is not created by the double thickness of the wrap front. This time when contructing the garment, I followed the instructions of making a one inch seam allowance down the sleeves and sides. And after trying on, I even took in the side seams another 1/2 inch to get enough negative ease to form the fabric folds across the belly instead of a sag. I am truly 100% happy with the results of this Take Two. It you would like more construction details of these patterns, just go to the original posts, Jean Skirt and Every Woman Top

There seems to be a lot of prolific sewists in the online sewing community who post new versions of the same pattern frequently. I know it makes sense to perfect a pattern that really fits your lifestyle and can potentially become an integral part of your wardrobe. I just don’t like repetitive sewing. It becomes labor to me rather than a creative experience. What about you? What are your thoughts and practices when it comes to sewing up the same pattern several times?

The Good Life Shirt

I’m a fan of the TV show “What Not To Wear.” I truly have internalized some of Stacy and Clinton’s bits of advice in my quest to put together my daily outfits. One of their favorite pieces of advice is to pull stuff of the rack that you wouldn’t normally grab, and just try it on. You might be surprised. This is how I have approached my pattern selection while sewing myself stylish. Sometimes I choose styles that I like, but think that they might not be “right” for me. Fresh Make #25 is one of those patterns. I tried it, and I like it!DSC_0575The pattern I used is Vogue 8985. I purchased it the only way I buy Vogue patterns – on sale at JoAnn’s for $4.99. I named it The Good Life Shirt because it seems like the type of clothing you would wear while indulging in the leisure arts as such picnicking, wine tasting, strolling through beautiful gardens, dining al fresco at the beach, etc… If you have a reason to wear this tunic, your life is good.DSC_0015The fabric is once again from one of my favorite stores, Mood Fabrics on Brea Avenue in Los Angeles. It is smooth, finely woven lawn cotton. I purchased 3 yards at $14.00 per yard.DSC_0578DSC_0573I also made the pants that were included in the pattern. May I add that this is my first pair of white pants EVER. I have always felt that white would not look good on my bottom half. But I since the tunic is LONG, I went for it. I actually like my first pair of white pants.

The top and the bottom are separate pieces, and the elastic casing is formed with their seam.

The top and the bottom are separate pieces, and the elastic casing is formed with their seam.

The bow is decorative. It does not go through the casing.

The bow is decorative. It does not go through the casing.

The sleeves are long. They are rolled up so the wrong side of the fabric shows and are held with a botton tab.

The sleeves are long. They are rolled up so the wrong side of the fabric shows and are held up with a button tab.

I machine finished both the side slits and the hem.

I machine finished both the side slits and the hem.

Inside peek. I serged all my seams and the facing edges.

Inside peek. I serged all my seams and the facing edges.

LET’S BE HONEST:
1. I do not know how Vogue comes up with their ratings. I think they are rated relative to the other patterns in the book. In terms of the seamstress, I think there is an assumed level of competency. This pattern is labeled “very easy,” but by no means is beginner project in the broader world of sewing projects.

2. I cut a size Small (8-10). My bust definitely is larger than 31 1/2 – 32 1/2, but most of us know that when a big four pattern is “loose-fitting” we know that really means LOOOOSE fitting. And it fit perfectly. I did do one slight adjustment. I added 1/4″ to the side seams because I wanted to have enough ease through my hips and thighs.

3. The pattern had seam pockets. I did not include these as I did not want any bulk added in my hip/thigh region.

4. I am not blogging about the pants. But just an FYI if you want to make them, I narrowed them a couple of inches – tapering from the hips to the ankles. They are just simple elastic waist pants, and I also took out width at the top because I didn’t want more fabric than necessary bunching under the tunic. The fabric is a lycra, cotton twill, so they can stretch over the hips when I pull them on.

REFLECTIONS, REVELATIONS, AND CONFESSIONS:
I have no desire to do sewing “tutorials” on my blog. I do not want to stop and stage photos of my WIP, and then compose instructional text to go along with it. (I actually don’t enjoy writing.) I know all the popular sewing blogs out there include tutorials. So I guess I’ll never be a blogging superstar. But in my my defense, I do include a lot close-up, detail photos of my makes, so it’s not just all “show and tell.” And those photos do get “clicked” on frequently, so perhaps I am helping some sewist in some small way. Don’t get my wrong, I LOVE to teach people sew. I would just rather do it in person. Additionally, if a reader asked me a question about something I’ve posted, I would be thrilled to help them.
DSC_0604
Thanks again for taking the time to read this post. Now I’m going to think of fabulous places I can go to wearing my Good Life shirt. I welcome your comments and questions. Cheers! Lori

My Snuggie Tunic

Do you ever make a random project from your patterns-bought-on-sale stash and you instantly love it so much, you wonder how you survived without it? That’s now I feel about Fresh Make #24. When I put it on I feel engulfed in yummy comfort.DSC_0520DSC_0537DSC_0540The pattern I used is Simplicity 2289. I bought this pattern on sale at JoAnn’s for $1.40, probably about a year ago. It was one of those “let’s stock up” and “who cares if I never make it, it’s so cheap” purchases.2289I bought the fabric at Mood Fabrics at La Brea Avenue in Los Angeles. Prior to cutting the fabric, the saleswoman says to me sort of apologetically, “It’s $20 per yard.” “Oh, I thought is was $18.” “The label says it’s Theory.” She shrugs her shoulders. “Whatever, that’s fine,” I say. So, I purchased 2 3/8 yards which totaled $47.60. More than I usually spend for a random project, but I had a $75 giftcard from my wonderful FIL! I have to admit I was not completely in-love with the fabric on it’s own. But the marriage of the fabric and this pattern is unexpectedly perfect and elevates them both. (I googled “Theory” and it’s a clothing company much hipper than me.)

You can wear the collar turned down if you prefer.

You can wear the collar turned down if you prefer.

DSC_0564The fabric is actually not sweatshirt fleece. It is a quilted knit with a polyester backing; it might even be moisture wicking or some such thing. There a thin, middle layer of a soft, synthetic batting that sheds all over the place on the raw edges. For those of you that might not know, Mood Fabrics sells leftover rolls of fabric from RTW clothing lines, so it’s not possible to get detailed information like exact fiber content on the fabric. DSC_0566 I hemmed the neckline and bottom with a double needle, and finished my seams with a serger after sewing them with a regular stitch on a regular machine. There is not enough stretch in this fabric to warrant any special knit stitches.

LET’S BE HONEST:
1. The pattern comes in size XS – XXL. I cut a size Small (10-12). As you can plainly see, this is BIG tunic and I’m definitely glad I made a Small.

2. Being so loose fitting, there was no need for any adjustments. However, as I often routinely do, I took off an inch off both the sleeve and body length before cutting.

3. I am small busted, and I like the way this garment hangs on me. I did google some other reviews on this pattern and there were some negative comments from larger busted woman about how it made them feel even larger, like a linebacker.

4. Overall this is an easy pattern to sew up provided you are comfortable sewing with knits. I had to do my most “careful” sewing when I was making the patch pockets. I hand basted them in place first before machine stitching them to the body because I thought the knit fabric might pucker and stretch if I just secured the pockets with pins.

REFLECTIONS, REVELATIONS, AND CONFESSIONS:
This blog has forced me to look at myself in a lot of photos and I rarely like what I see. I alway tell my photographer to take lots and lots of pictures so I will find at least three good ones. Even though I am very conscientious about dressing to flatter my body, I always look fatter than I envision myself as being. But, oh well, I’m sort of getting used to that. What I hate even more is seeing the winkles on my face! My 78 year old mother has less wrinkles than I do. Every time I look at my face in a photo, I get why so many women have “work” done.DSC_0560

Thanks again for visiting my blog. I’d love to hear your comments. Or if you have a question about this project, please ask! Cheers, Lori