The Float Top

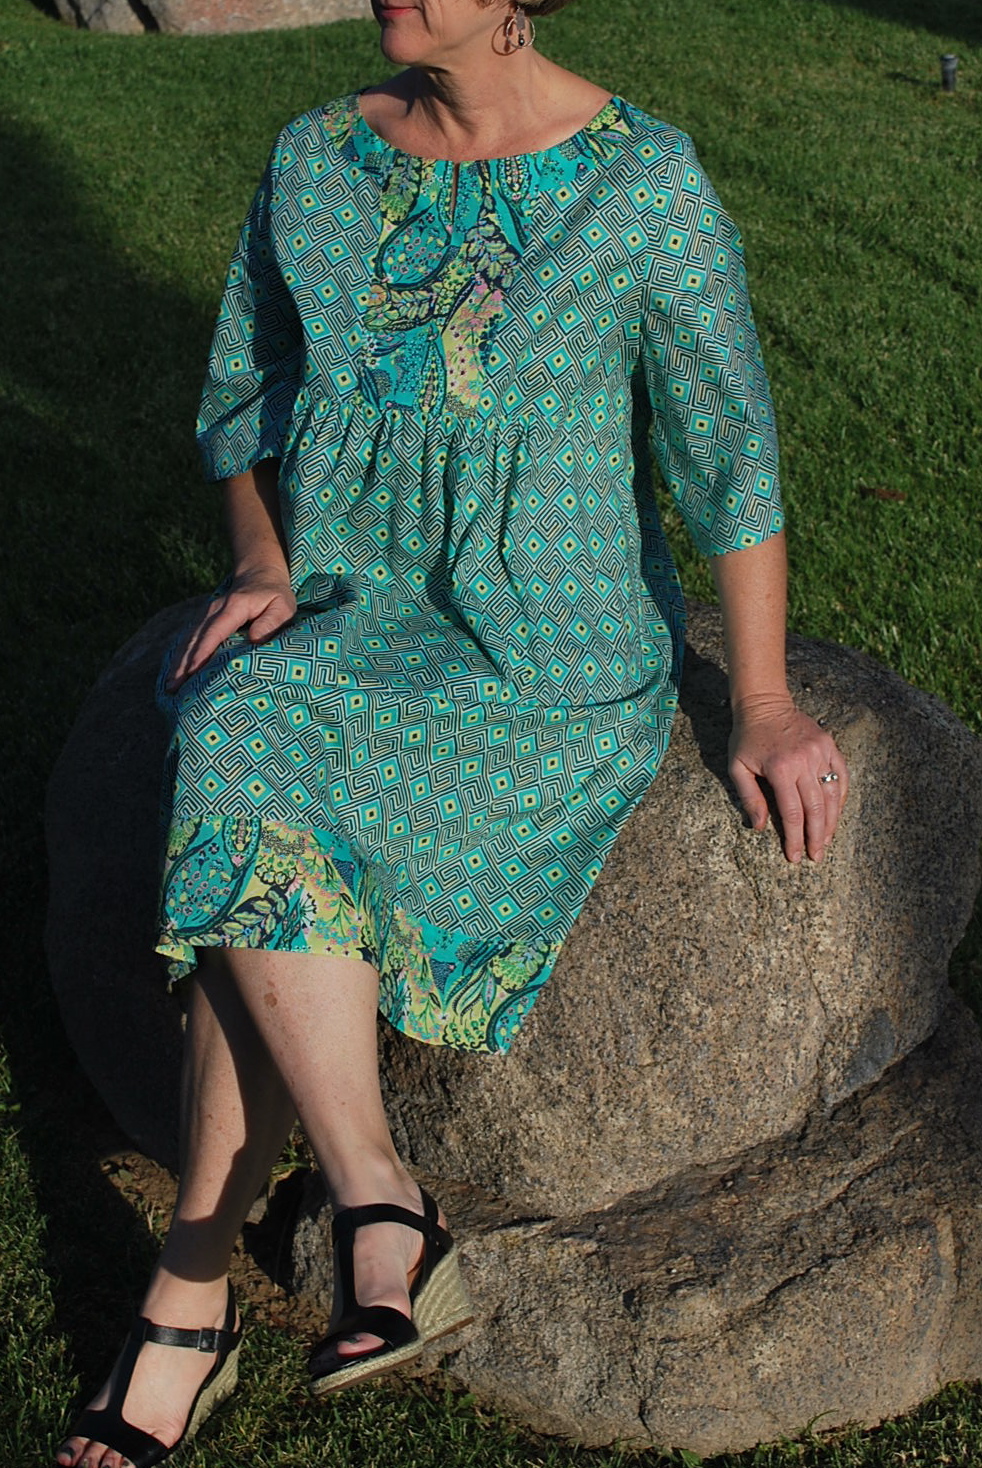
As much as I tell myself dresses for summer are the way to go, I still find myself grabbing shorts for stay-at-home, errand-running kind of days. But I can probably wear less than half of the hot weather tops in my closet. No slinky knit tank tops…yet. Click here for explanation. This has forced me to think outside my normal tank top box and take the time to sew some fun, forgiving, gathered blouses. And I couldn’t be more happy with reconstruction make #5 that I’m sharing here.

DSC_0714

DSC_0711

DSC_0704

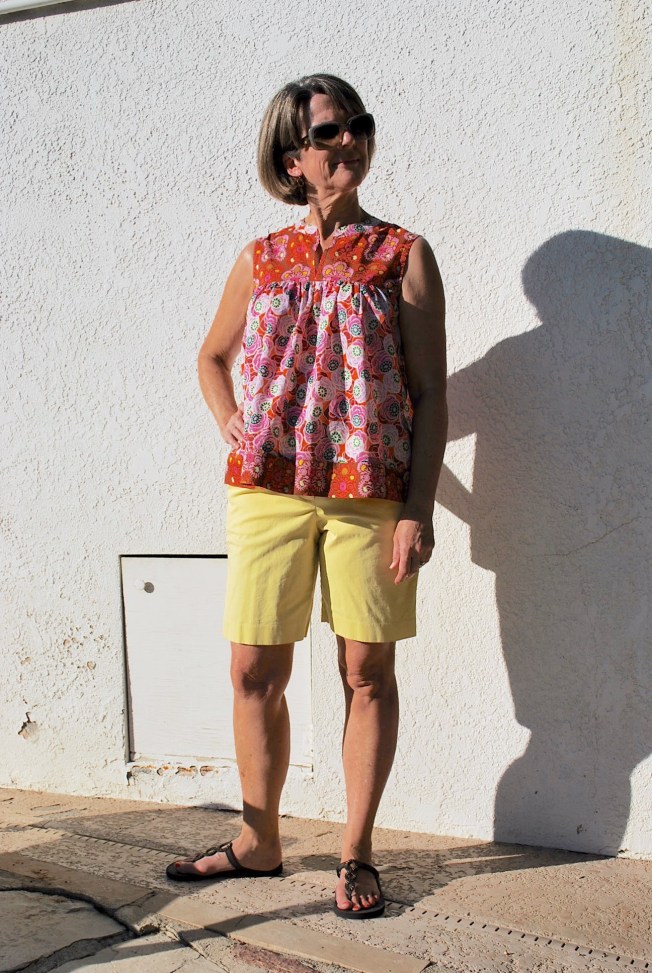
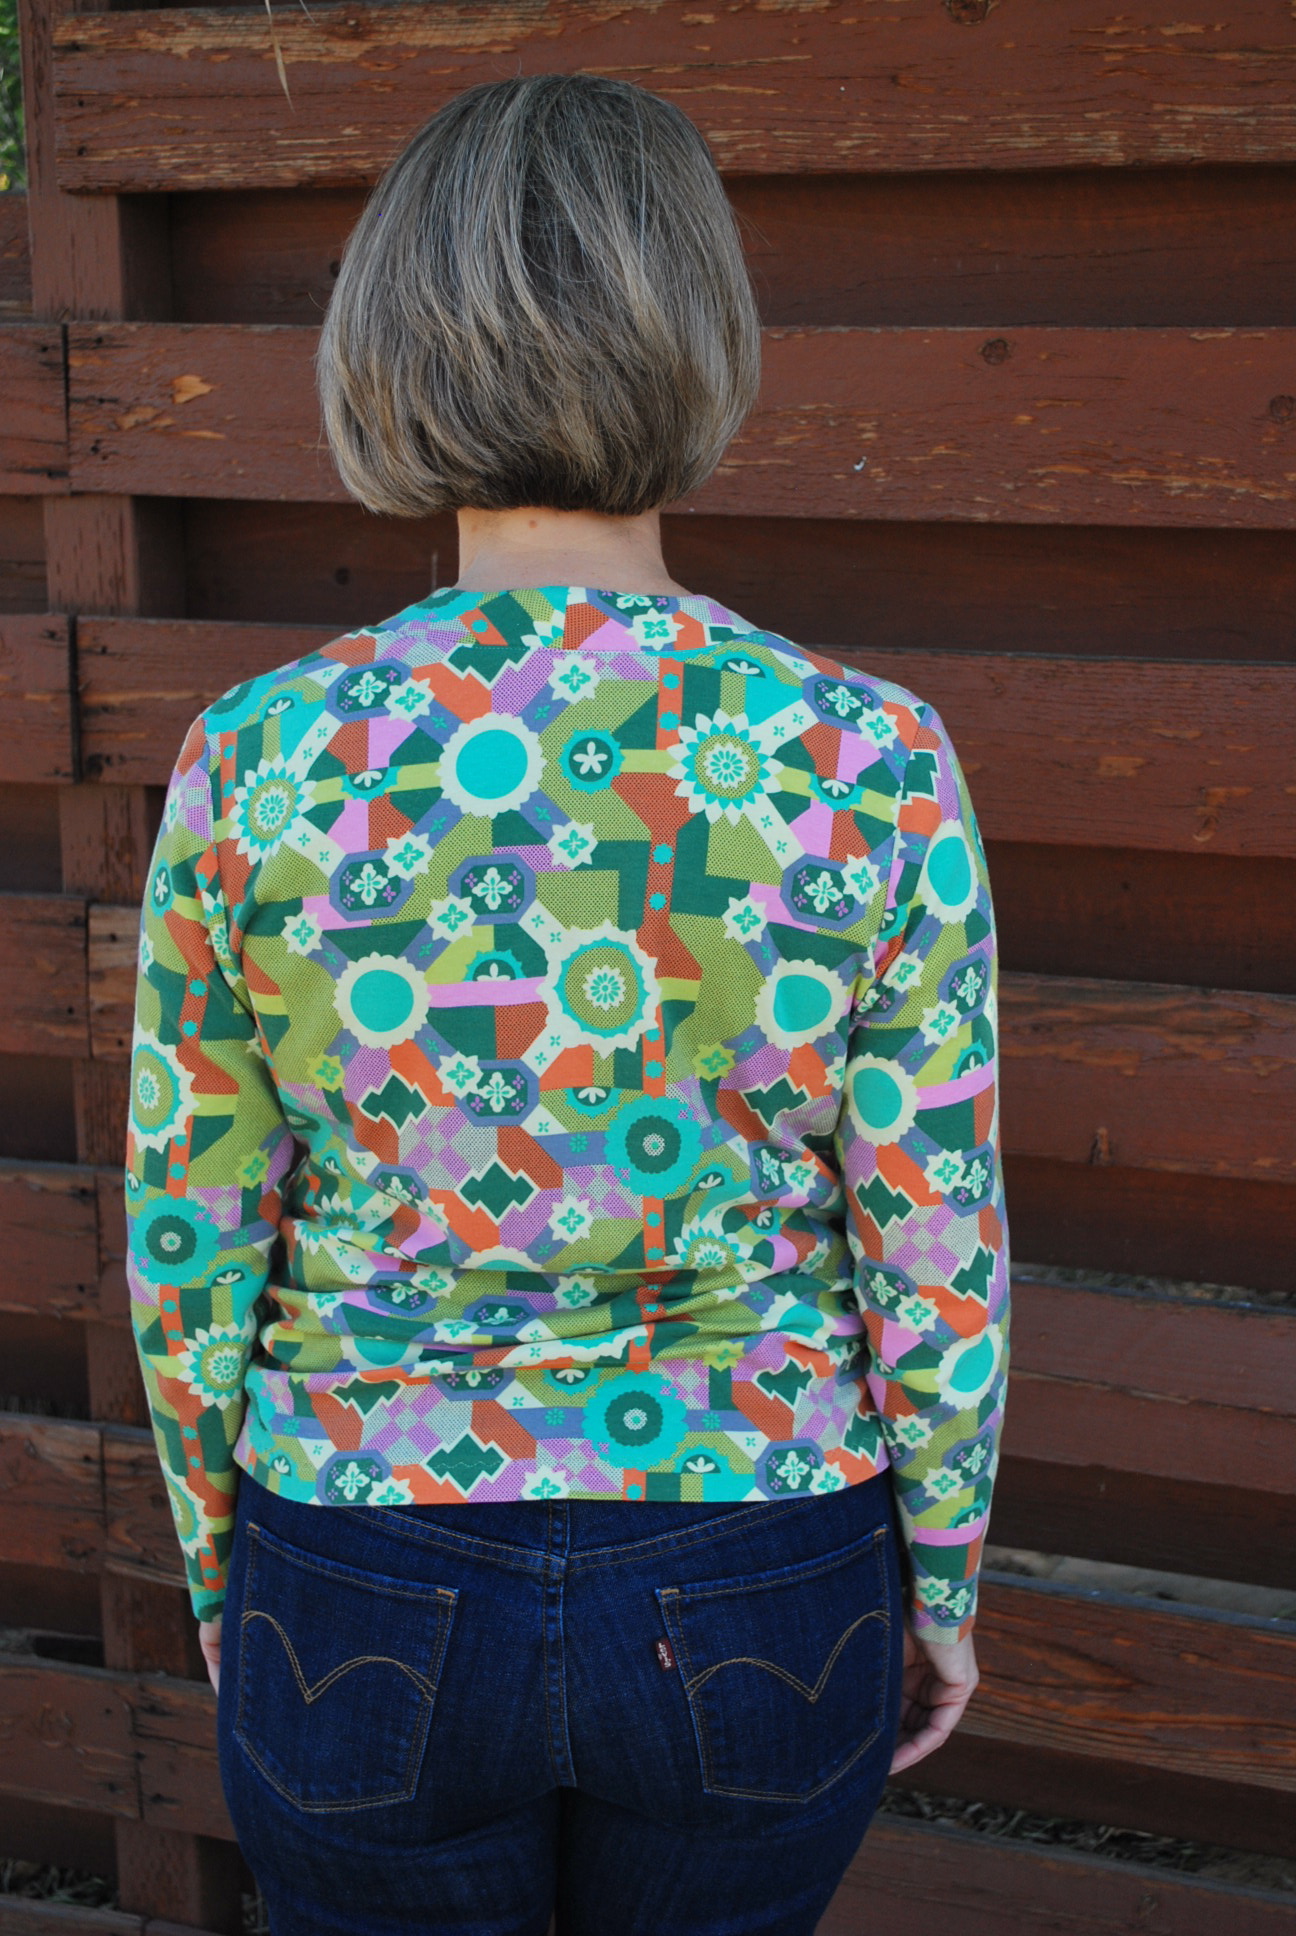
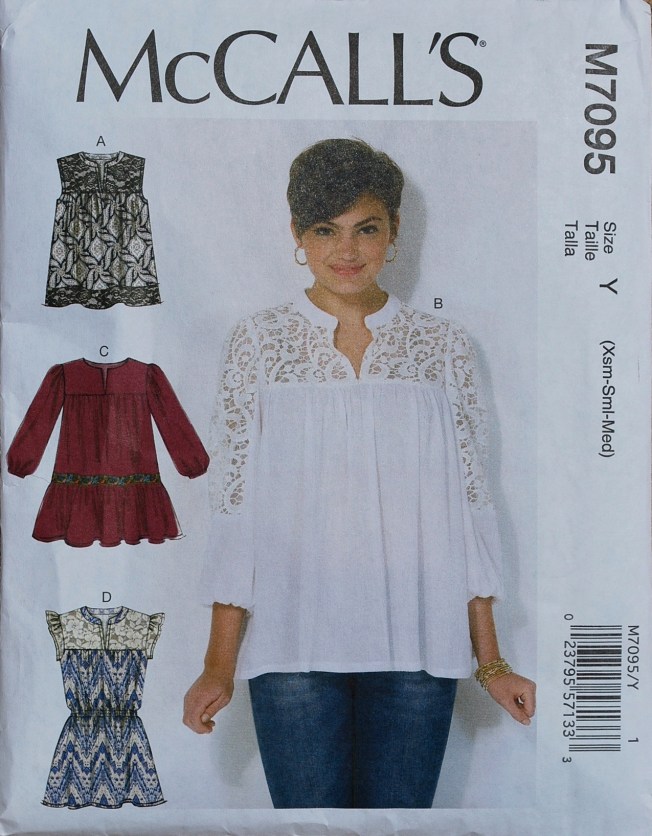
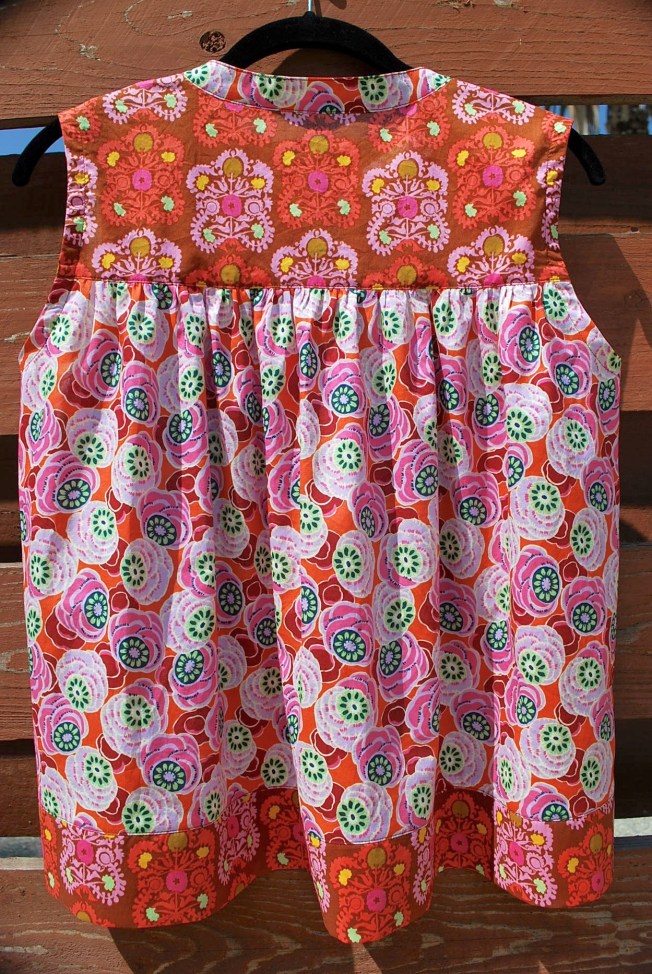
The pattern I used is McCall’s 7095. I grabbed this on sale at JoAnn’s when I was collecting loose-through-the-chest patterns. I knew immediately that this design fit the bill perfectly – above the chest gathers and a high non-revealing neckline, and as a bonus, it is super cute! I made view A.

DSC_0732

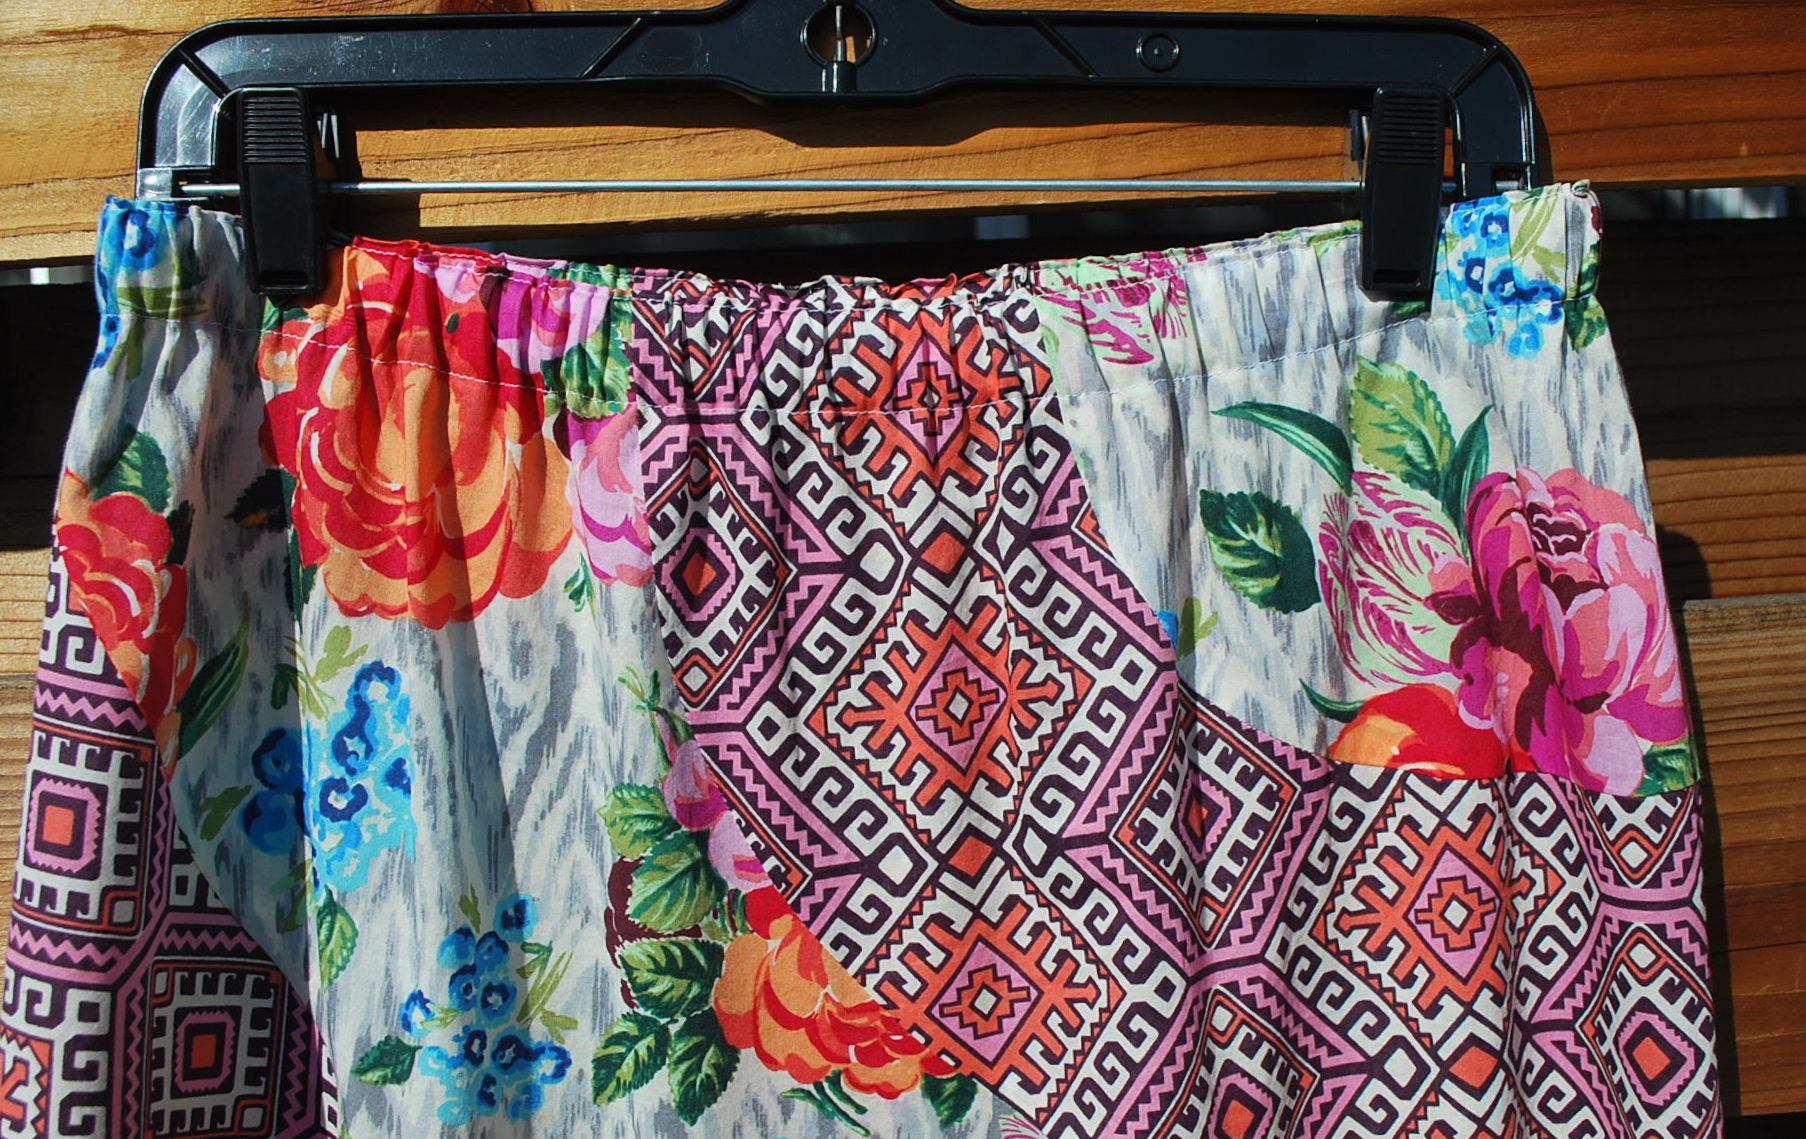
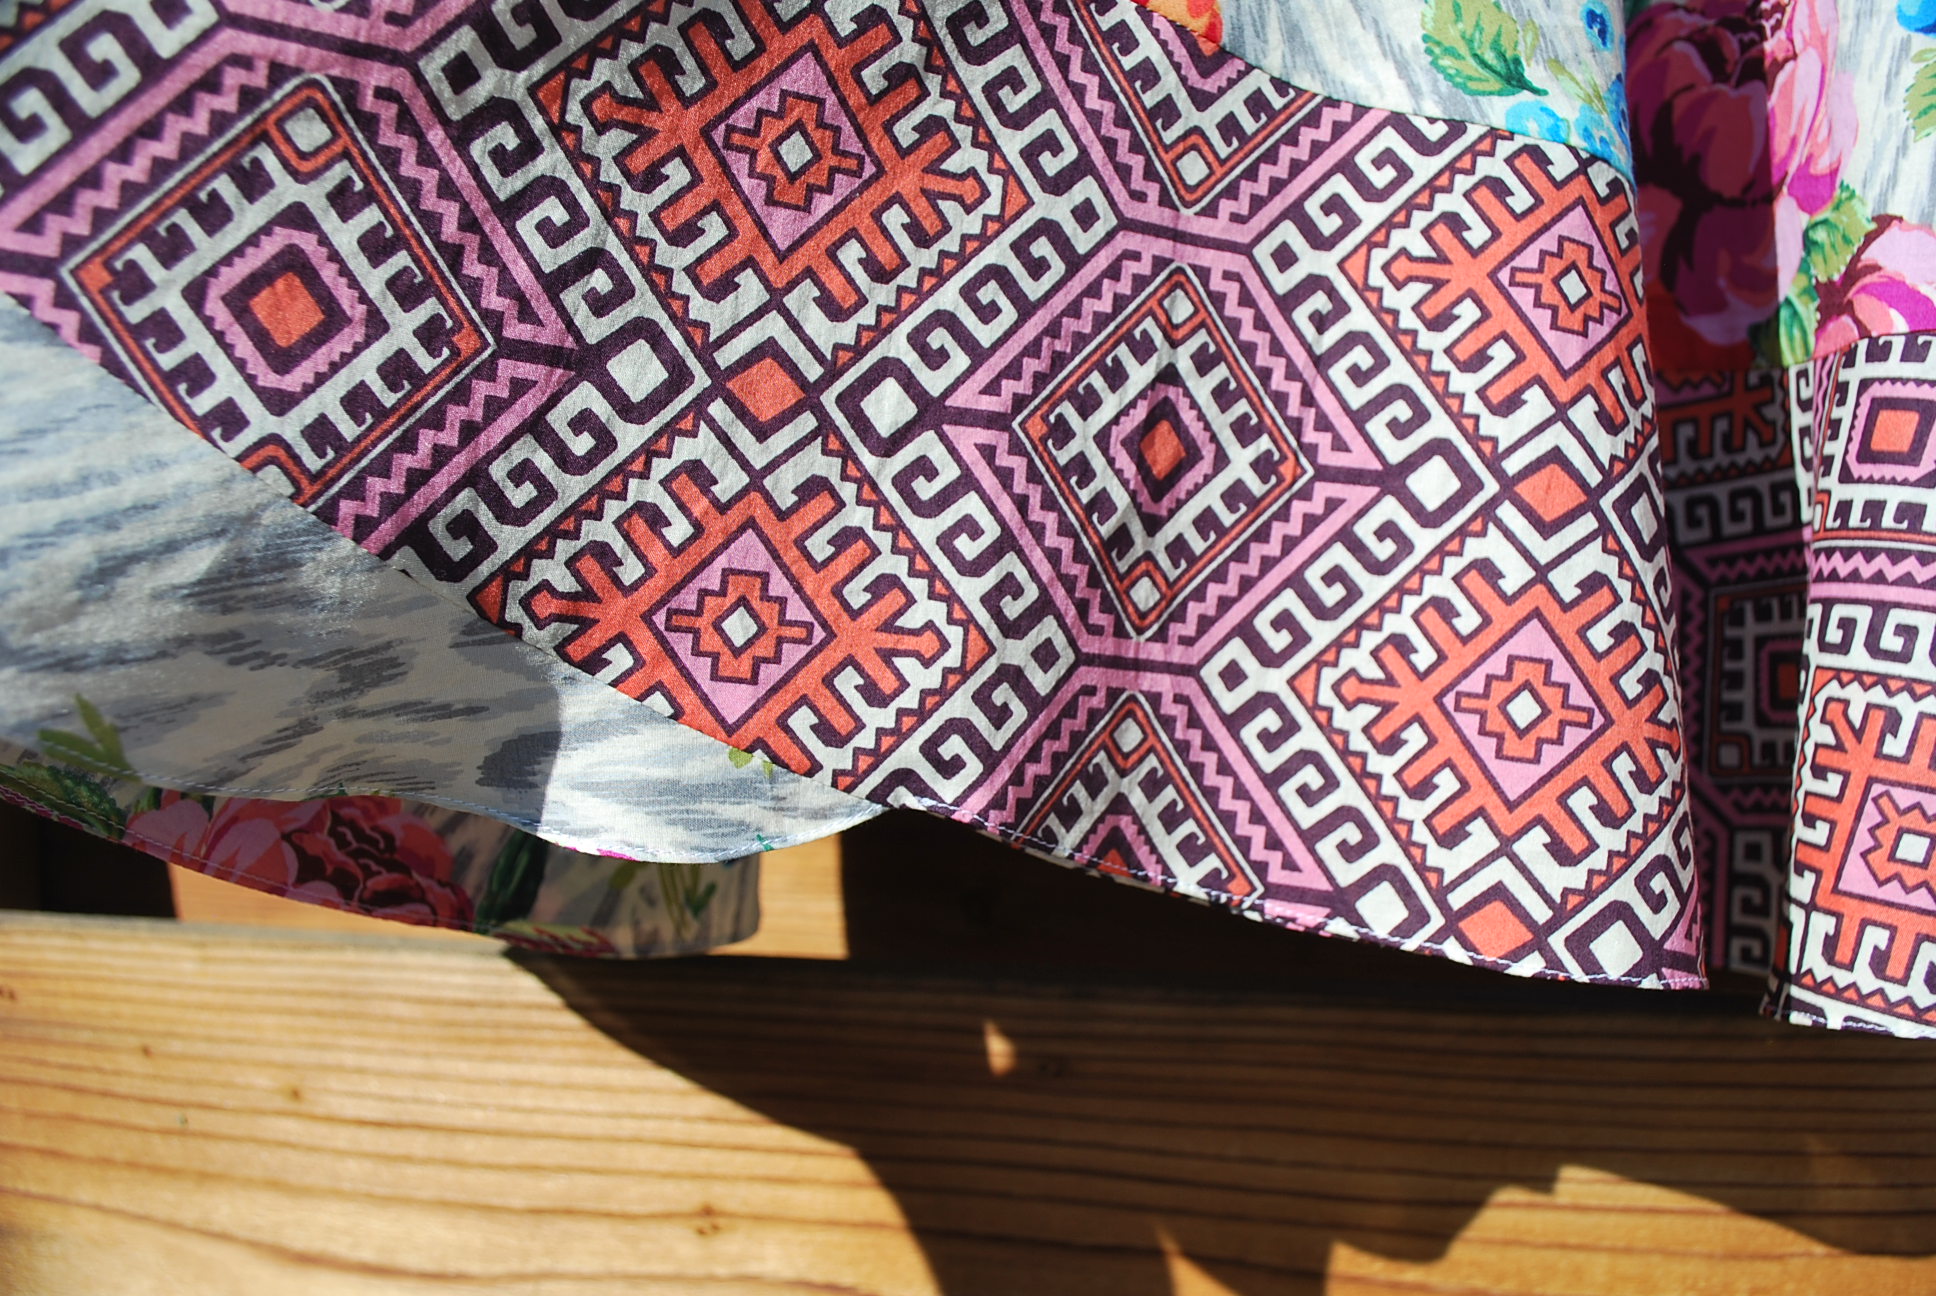
My fabrics are from the Dream Weaver Voile Collection by Amy Butler, purchased online at Hawthorne Threads. The fabric is $13.95 per yard and is 54″ wide. I cannot say enough wonderful stuff about this cotton voile. It’s silky smooth, buttery soft, and light as a feather. You cannot go wrong with an Amy Butler voile. This is my fourth project with this fabric. Amy, please make more voile! I’m running out of designs to choose from.

DSC_0561

DSC_0563

DSC_0565

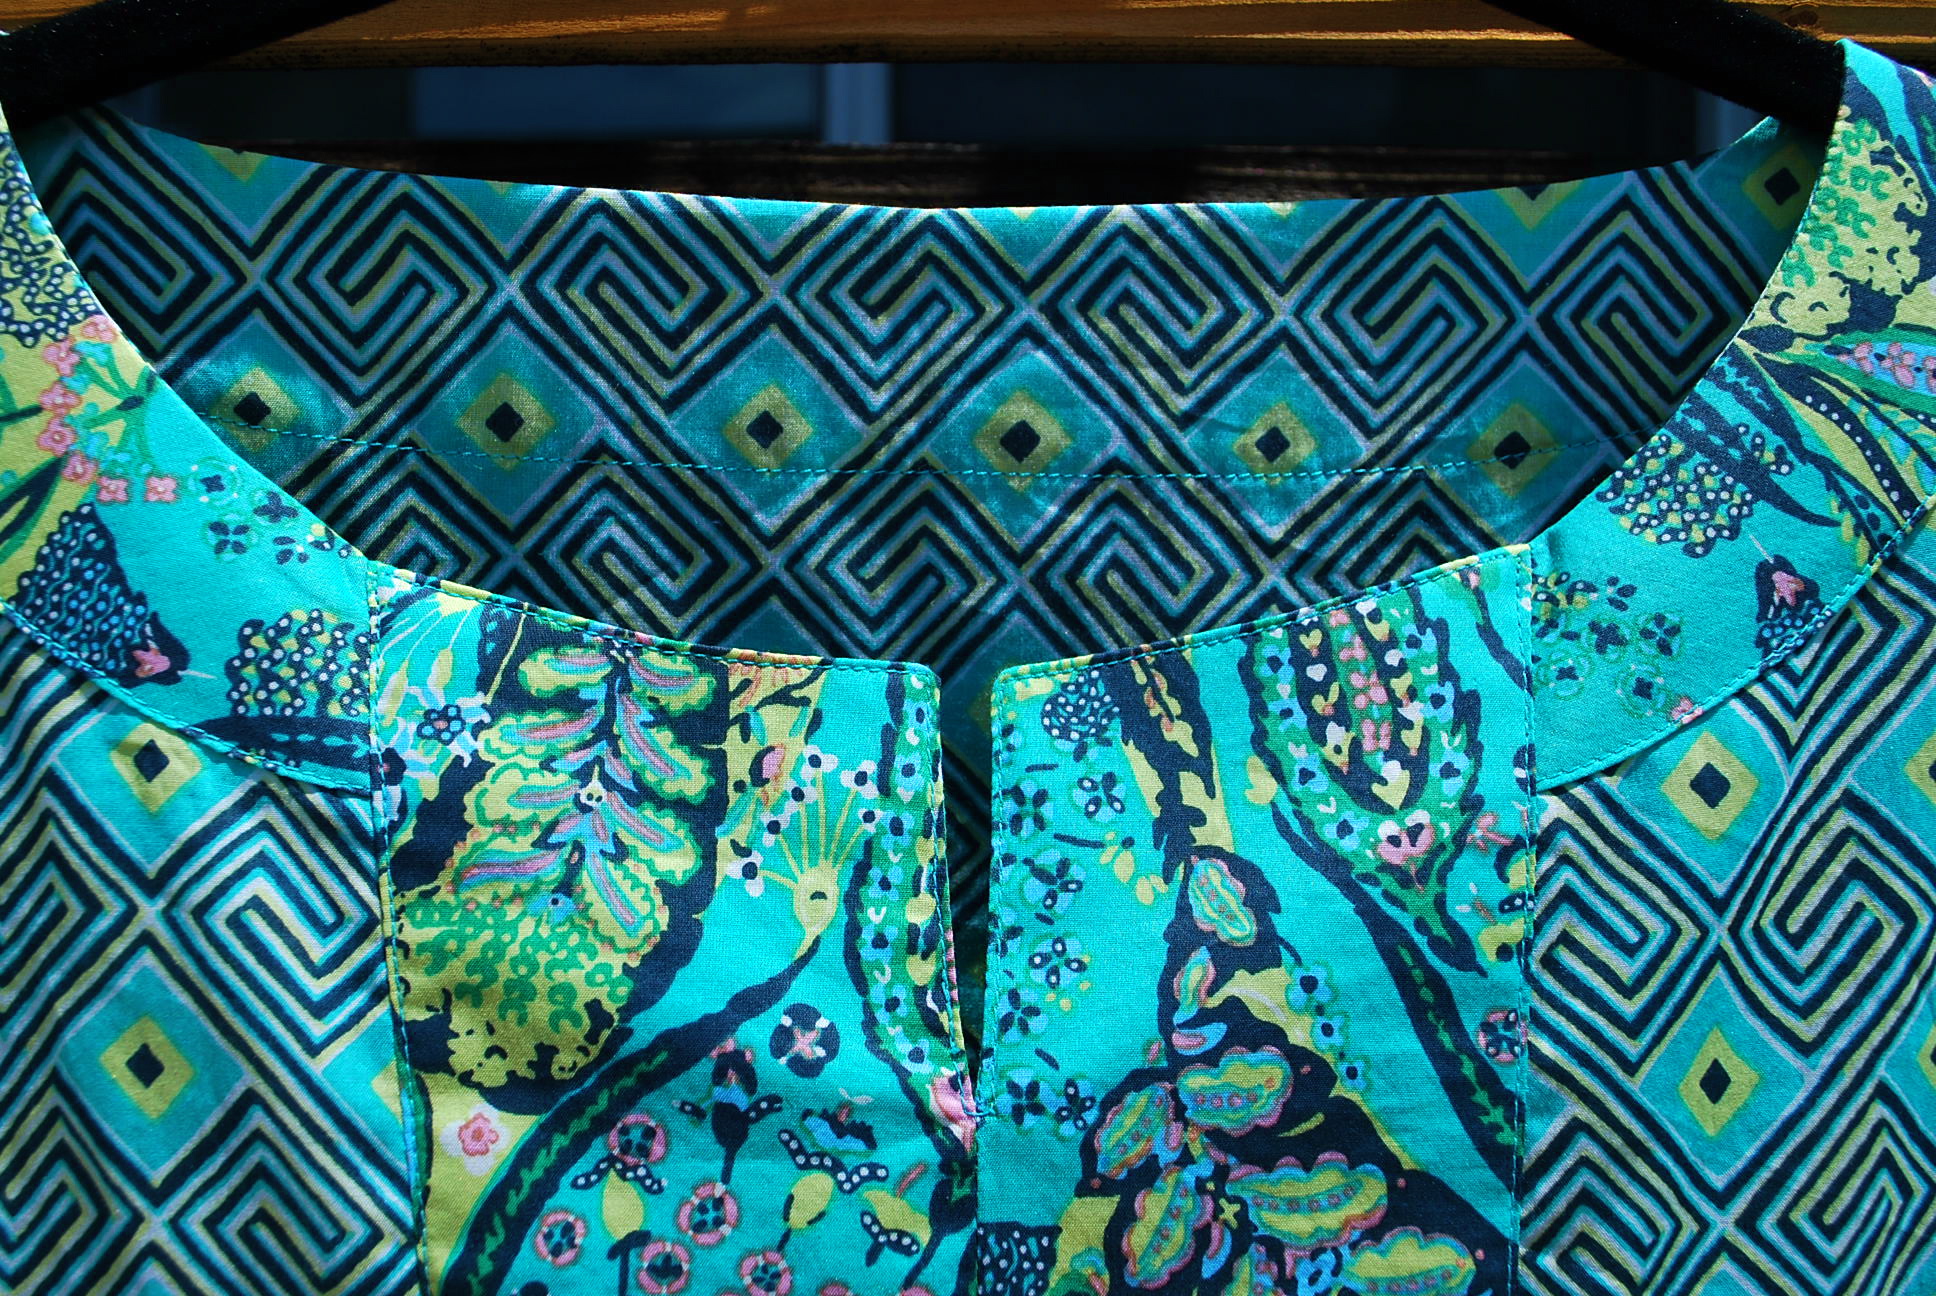
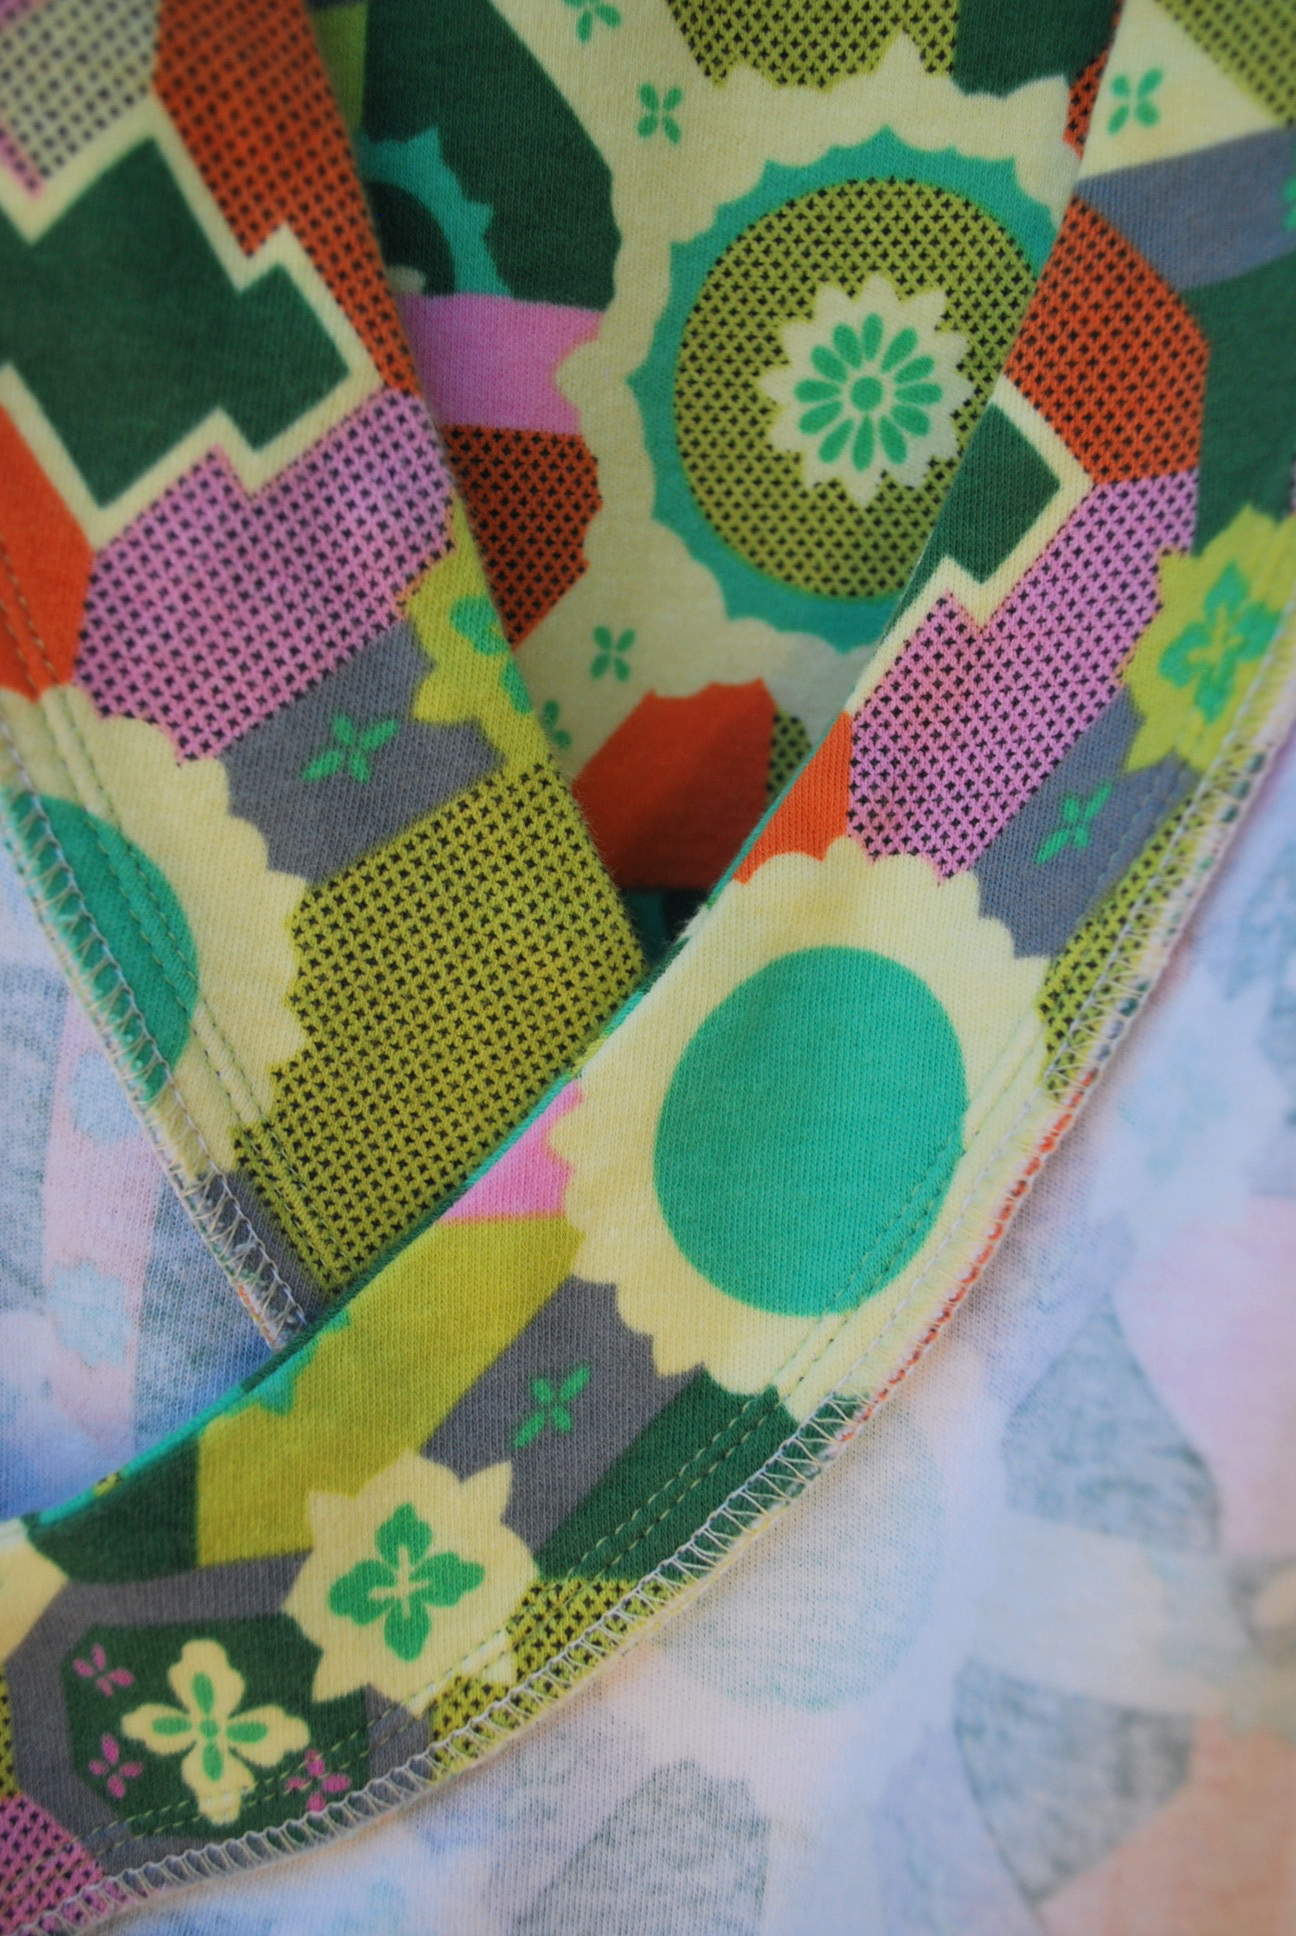
The instructions called for finishing the armhole by turning under the raw edge of the fabric 5/8″ and doing a narrow hem. I thought this would be almost impossible at the curve of the underarm. I finished the armholes with purchased bias tape instead.

DSC_0570

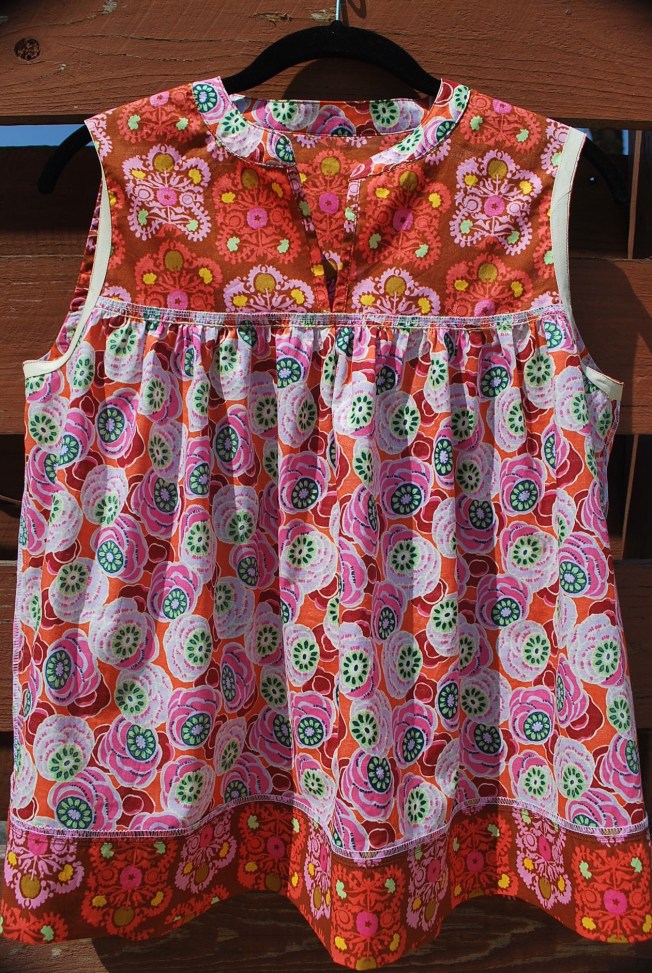
Oops! I didn’t notice the bias tape was turned under at the shoulder when I took the picture.

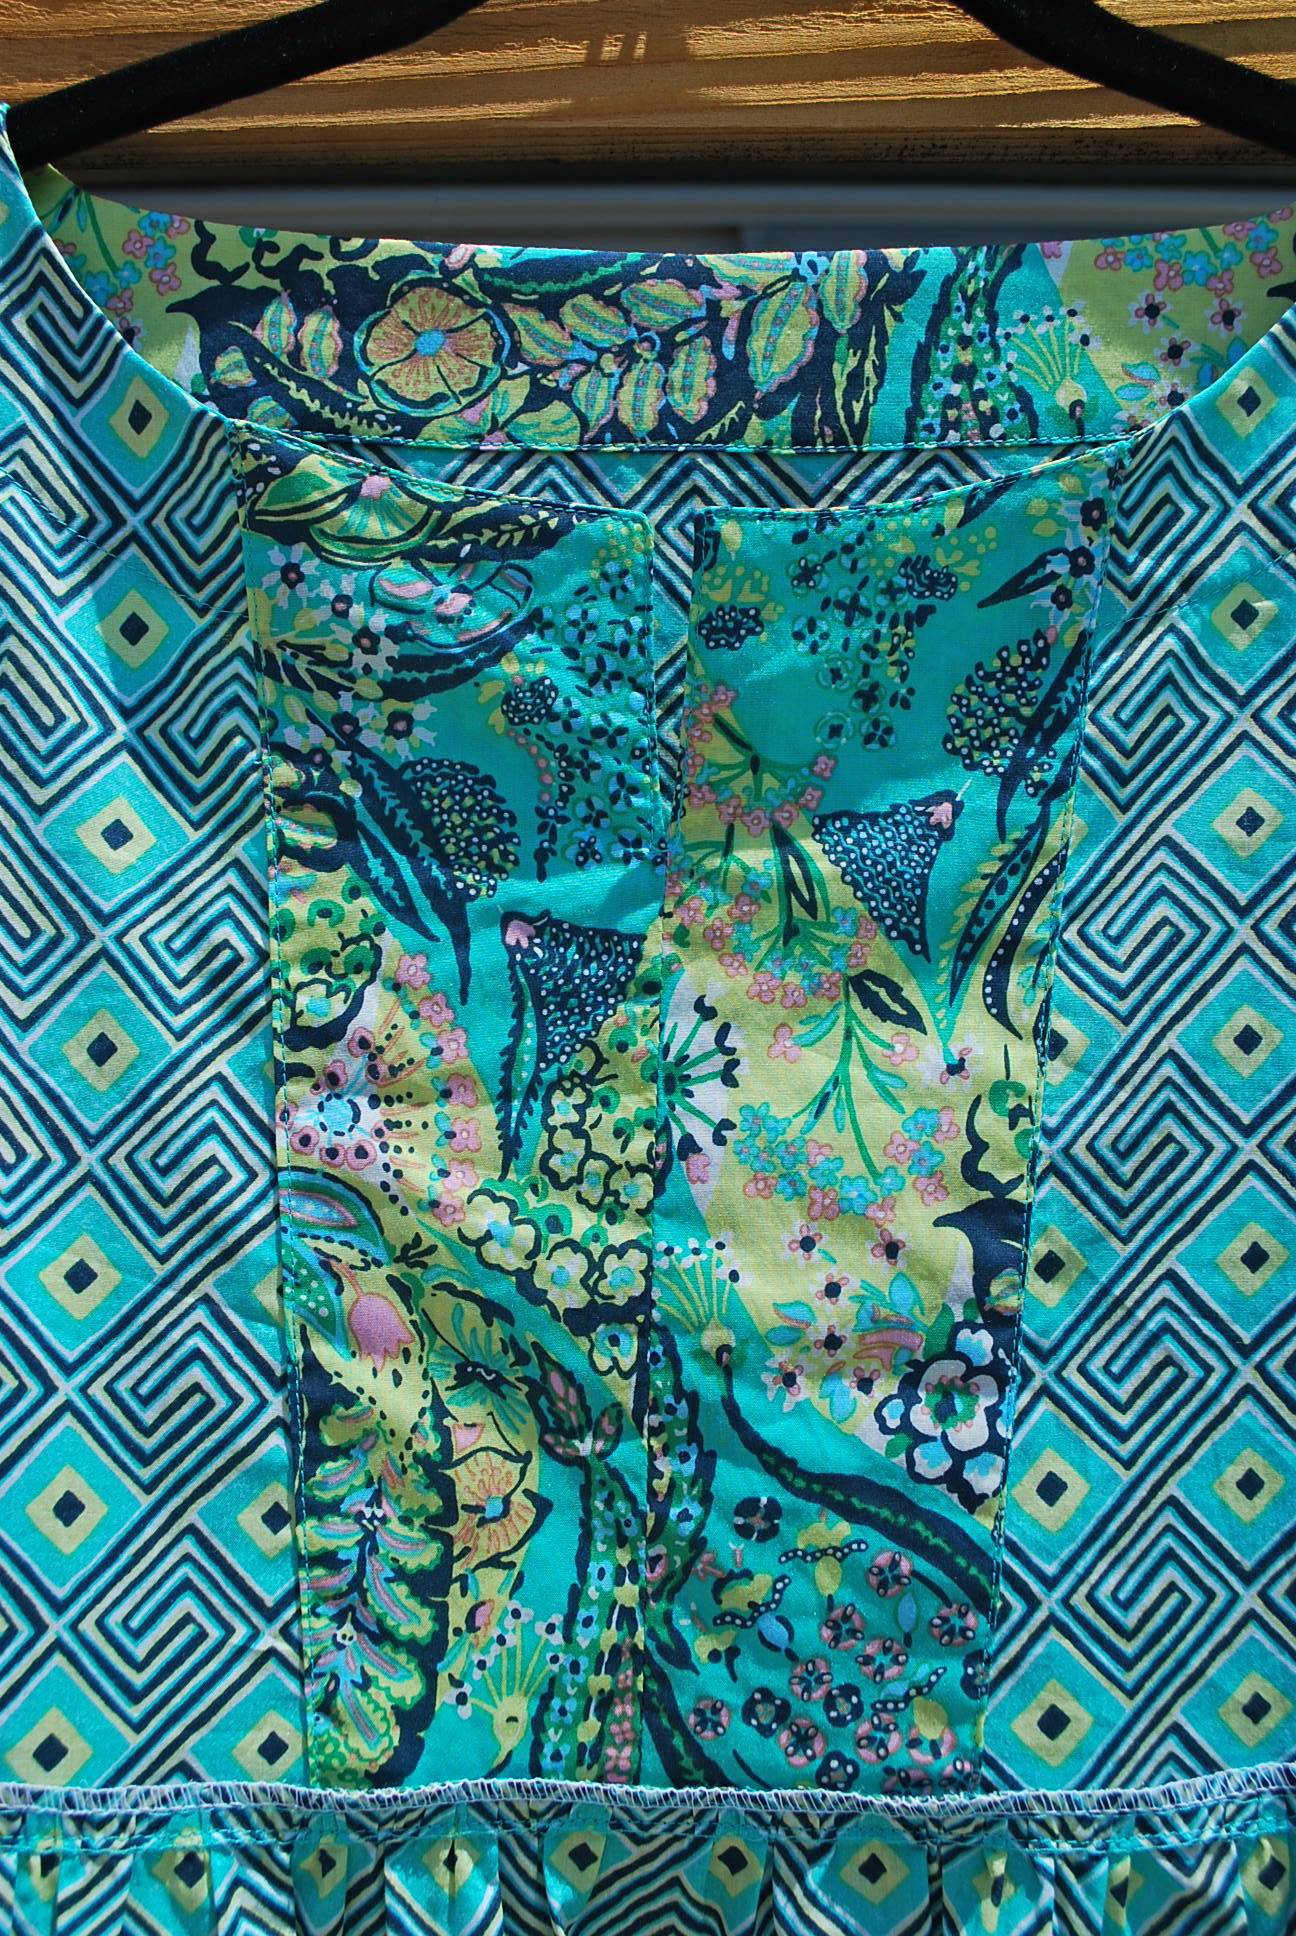
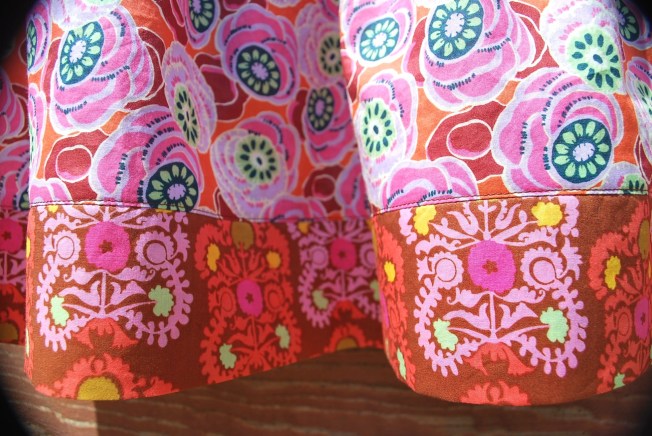
For the bottom band, I doubled the width of the pattern piece, folded it in half and sewed the edges together when it was sewn onto the body. I did this instead of a single layer band with a narrow 5/8″ hem as called for in the instructions.

DSC_0567

LET’S BE HONEST:

1.  I made a size Small (8 – 10) even though that is not reflective of my measurements on the chart. I am bigger. I assumed there would be plenty of design/wearing ease. Fortunately I was correct and it fit perfect.

2. I shorten the body pattern piece by about 2 inches. I often shorten tops as I do not want them to end at my thighs, the widest part of me. I prefer tops to hit a few inches above my thighs.

3. The only deviations I made from the instructions were mentioned above, the armhole finish and double layer for the bottom band.

4. In case you’re wondering, my shorts are RTW from Talbots. I also have these shorts in two other colors.

5. This top is way more billowy and wide than I would usually wear, but it’s just so fun and comfortable, I don’t care!

I love everything about this top. Maybe one with sleeves for fall?

DSC_0715

Thanks for stopping by and taking the time to read this post!


Advertisement

Japanese Dress Y

I have now become a big fan of Japanese pattern books. I bought my first book, Simple Modern Sewing, on sale, with a gift card, and as a skeptic. After two big wins from that book, I was compelled to buy another one, Stylish Dress Book, Wear with Freedom by Yoshiko Tsukiori. For Fresh Make #27 I chose a loose fitting, easy wear dress. Perfect for the hot summer that’s just around the corner.
DSC_0074DSC_0087
While the decision wasn’t easy from the 26 patterns, I chose Dress Y. Mainly because I wanted a pattern that combined two fabrics, and also the construction didn’t look to fussy.

This book has 26 adorable patterns to choose from.

This book has 26 adorable patterns to choose from.

Here's Dress Y. Those are the complete instructions! More on that later.

Here’s Dress Y. Those are the complete instructions! More on that later.

The fabrics I used are from Amy Butler’s Glow Collection, Maze Voile in Grass and Jolie Voile in Grass. I purchased them online at Hawthorne Threads for $13.50 per yard. I needed a total of three yards. I have been coveting the cotton voiles that have recently become a part of designer collections that traditionally have only included quilting weight fabrics. There’s no turning back once you start making blouses and dress with voiles and lawn cottons – so light weight and luxurious.
DSC_0079

DSC_0087

The neck trim is attached by sewing right and wrong side together at the neck edge so the seam allowances are tucked inside, and there is no need for a facing.

The neck trim is attached by sewing right and wrong side together at the neck edge so the seam allowances are enclosed inside when you fold the trim over to the front, and there is no need for a facing.

The pattern called for a single layer yoke with a bias tape trim at the top. I  made a double layer for a facing instead.

Here’s the inside. The pattern called for a single layer yoke with a bias tape trim at the top. I made a double layer for a facing instead.

The hem band is a single layer. I did a 1 1/4

The hem band is a single layer. I did a 1 1/4″ machine blind hem.

LET’S BE HONEST:
1. The pattern size range is from 6 to 16. Obiviously this is a very loose fitting design and the bust is the main measurement needed to gage your size. I cut a 12 with no alterations.

2. The width throughout the bodice and where it meets the skirt is wider than it appears in the photograph on the very skinny model in the book. It almost A-lines from the armhole. I am considering this a surprise design feature (I didn’t study the pattern pieces), rather than a misfit, because the shoulders and neckline are perfect. I feel it might not be the most flattering thing, especially from a side view, for me to have all that width floating around me.

3. Ok, after making three Japanese patterns, there is no denying they are well drafted. And also fit well, at least for a relatively narrow size range. BUT, the instructions are inadequate. (Enlarge the photo of the book above.) Beginner beware! Stay away. I because of my sewing experience, I can make a basic dress without instructions, but I try to look at what is presented from a beginner standpoint. I definitely would not attempt one of these patterns without a body of sewing knowledge.

4. I would like to question one method in the instructions. They show laying the garment out flat and sewing the sleeve in before the side seams. I usually save this technique for knits and/or sleeve caps with a straighter curve. The sleeve cap in Dress Y has a fairly high curve and I think would ease in better insetting it after the side seams are sewn. At least that’s what I did, and it work well.

Overall, despite the slightly tent-like sillouette, I love this dress. The fabric is soft, smooth and lighter than air. Dress Y like a pair of shoes that are super comfortable the first time you try them on – I know I’ll reach for it over and over again.

Have you tried any Japanese patterns? Which ones? Are you a skeptic or fan?
DSC_0093

The Every Woman Top

I waited for months for the weather to change, and then when it finally did I realized I had quite a shortage of professional, casual clothes for cooler temperatures. You know the category – not jeans and hoodies, and also not dress slacks and blazers. These are the clothes I need to wear to my teaching job every weekday morning. So I choose to make this long sleeve, knit, wrap top for Fresh Make #21, not to wow you with my sewing skills (which I confess is sometimes how choose my makes), but because it is a garment that I truly need.DSC_0496DSC_0497

The neckband lays beautifully in the back. The gathers formed by the side shirring are more successful in the back because of the single layer of fabric.

The neckband lays beautifully in the back. The gathers formed by the side shirring are more successful in the back because of the single layer of fabric.

The pattern I choose is Vogue 8151. I bought it on sale at JoAnn’s for $4.99. I’ve been trying to make a commitment to making my own basics. I was attracted to this pattern because the wrap front offers a nice variation on a basic knit top. I was also curious about “Today’s Fit” by Sandra Betzina. The sizing on “Today’s Fit” patterns have a bust/waist/hip ratio more in line with the measurements of real women. I noticed that it was copywrited in 2005, so this pattern has some staying power in the Vogue book. I named it The Every Woman Top because it was designed for all of us. DSC_0510I originally purchased this fabric with the intention of making an easy wearing, short sleeved dress. But the weather turned cooler, and another warm weather dress was not what I needed at the moment. I bought this fabric because I was anxious to try an Amy Butler knit as I know hers is a name I could trust for quality fabrics. There are a lot of bad knits out there. This cotton interlock is Cross Roads in Citrus from Amy Butler’s Glow collection. The weight is substantial and it feels as soft as a favorite pair of PJs. I purchased it from my favorite online fabric store, Hawthorne Threads. I purchase 2 yards at $14.50 per yard, plus tax and shipping. Not cheap but well worth it, I think.
I love the neckline on this top. I usually do not look good in a wrap neckline because of my small bust, but this it cut just right for me.

I love the neckline on this top. I usually do not look good in a wrap neckline because of my small bust, but this it cut just right for me.

Inside peek!

Inside peek!

DSC_0518I used clear elastic for the shirring on the sides. I first used this elastic on my Moneta Dress.

LET’S BE HONEST:
1. I cut a size C. The sizes range from A to J. The measurements on size C are: bust – 36″, waist – 28 1/2″, hips – 38 1/2.” I still have a pear shape even with these adjusted ratios. The pattern offered simple adjustment instructions for different body types. I followed the small bust adjustment and folded out 1/2″ through the middle of the dart to reduce dart width.

2. I followed the instructions by looking at the illustrations (which is what I usually do, unless the picture is confusing, then I read.) When I did my first try on, it felt a little too roomy, and I honestly felt I cut the right size for me. So I did a gradual take in on the sides from the armhole through the bust and waist and gradually came back out near the hip. Just today, when I glanced over the pattern, before writing this post, I noticed the instructions says to sew a 1″ seam down the sleeve and sides, then adjust if necessary depending on the stretch of your knit. Ah, that’s why it was big, I had stitched a standard 5/8″ seam! Oh well, next time.

3. You can’t really tell exactly how it’s going to look and fit until the elastic is sewed into the side seams to create the shirring. After I had done that, I wasn’t compelled to remove it to adjust the side seams. (Maybe I shouldn’t have been so lazy.)

3. While I love this fabric, I don’t think it’s a perfect choice for this pattern. Aside from the fact that the top should just fit me more snugly, I think the shirring at the bottom would form nicer folds with a thinner fabric such as a single jersey knit.

4. I shortened the sleeve by 1″ before cutting.

Despite not achieving the fit I envisioned based on the photo on the front of the envelope, I still like this top and I have something new to grab in my closet. I am actually very anxious to make this pattern again with a single knit and a more snug fit. I think it has the potential to be very flattering. Thanks for reading this post. I welcome your comments! Cheers, Lori

The Festival Skirt

I’m going to wear lots of skirts this spring and summer. Enough of those jeans shorts. I’m adding a second skirt to my stylish handmade collection for Fresh Make #5.
DSC_0099
The pattern I choose was Simplicity 2416. I purchased this pattern at JoAnn’s Fabrics for $1.00 during their 5 Simplicity patterns for $5.00 sale. I like this pattern because it has a retro 70’s vibe and it seemed like it would be a fun, feel good skirt to wear. I named the pattern The Festival Skirt because I could imagine a groovy gal frolicking around in a swirl skirt like this a summer music festival.

I made view B.

I made view B.

I am in love with the fabrics I choose. They are from Amy Butler’s Hapi Voile collection, purchased from my favorite online fabric store, Hawthorne Threads. This cotton voile is amazing. It’s smooth and lightweight with a beautiful drape – a delight to sew with. The cost for this fabric, including shipping was $58.50 and worth every penny.
DSC_0102

DSC_0105
DSC_0109

There's a simple elastic casing at the waist.

There’s a simple elastic casing at the waist.


I overlocked all the edges together and did a rolled hem.

I overlocked all the edges together and did a rolled hem.


LET’S BE HONEST:
1. The pattern pieces, all seven, are just a series of swirls (or flounces as they are referred to in the directions), it is viturally impossible to measure the pattern pieces for fit before cutting out the fabric. So with my new updated knowledge about my measurements, I simply cut a size 16. Always error to the larger size – you can always trim off fabric, but you can’t add on. Right? It turns out it fit fine. I probably could have gotten away with a 14, but for me, there’s nothing worse than fabric pulling across the tummy.

2. 54″ vs. 6o” I ran across this same issue with The Instead Top. The pattern envelope gave yardage amounts for 45″ and 60″, but this Amy Butler fabric is 54″ wide. Again, I thought it would be fine to buy the specified amount for 60″, but I ended up having to do some “creative” manipulations of the patterns pieces to fit them all on the fabric. I would definitely buy at least an 1/8 of a yard more of each fabric if I were to repeat this project.

3. Interesting hem. The directions instruct you to hem the second to last flouce before sewing on the last flounce. (The hem is split between the two contrasting fabrics.) This resulted in curve that I’m not sure I care for.
DSC_0113
This flouce (the flower print one) also dipped more in one spot, creating a bit of an uneven hem. But, hey, maybe I shouldn’t let that bother me. The photo on the pattern envelope kind of looked that way too.

4. I did “raise” the skirt a bit. I anticipated that the skirt would probably be too long, but also knew it would be tedious and risky to mess with the swirl pattern pieces to shorten the length. After completing the hem but before doing the elastic casing, I tried it on and determined that I would cut off 2″ from the waist to shorten it. This adjustment was minor enough that it didn’t affect the fit or look of the skirt.

Overall, I am completely enamored with the skirt! And I highly recommend the Amy Butler cotton voiles if you choose to make a Festival skirt.

Again, whether you are a sewer or non-sewer, I sincerely appreciate you for taking the time to read this post. As always, I welcome your comments and feedback. Lori