Linnet Dress no.77

I feel like Linnet Dress no. 77 is an awesome secret I’m sharing with you! I stumbled upon this dress on Pinterest and have never seen any posts about it from the online sewing community anywhere on social media. And it’s stylishly adorable!

Before I share the dress, let me digress for a moment. This is my first blog post in over five months. I have been suffering from bloggers block. For those of you that know I had a bout with breast cancer last year, let me assure you I’m doing great. My last several posts featured “reconstruction” clothes. Since my last post in September, I have sewn at least fifteen projects, mostly tops and tunics for the seasons of fall and winter. I’ve had many successes and a few failures. Lots of stuff worth sharing. But I kept finding myself so anxious to start the next project, I didn’t want to take the time to do a blog post on something I just completed. Creating lots of new clothes was part of my renewal and recovery. Additionally, I’ve been asking myself for quite some time why I blog, other than to show off my sewing skills. My “reconstruction” theme gave me a temporary purpose, but I would like to move on now. So I’ve been feeling a little lost and am looking for a way to get back my blogging mojo. I figure if I can get this post out on this fantastic dress that deserves attention, maybe I’ll be revived.

fullsizeoutput_454

dsc_0752

When I found Linnet Dress no. 77 on Pinterest, I was immediately taken by it as well as several other patterns by this Japanese company. The pattern came quickly from Japan via an Etsy site. I can’t remember how much I paid for it but I remember thinking it was pretty reasonable. No more than an indie pattern in the U.S..

fullsizeoutput_459

This is the cover sheet of the pattern that comes in a clear plastic envelope.

The pattern is printed on a substantial weight paper, and people who are more patient than me would probably trace off their size instead of cutting it up like I did. You need to add your own seam allowances.

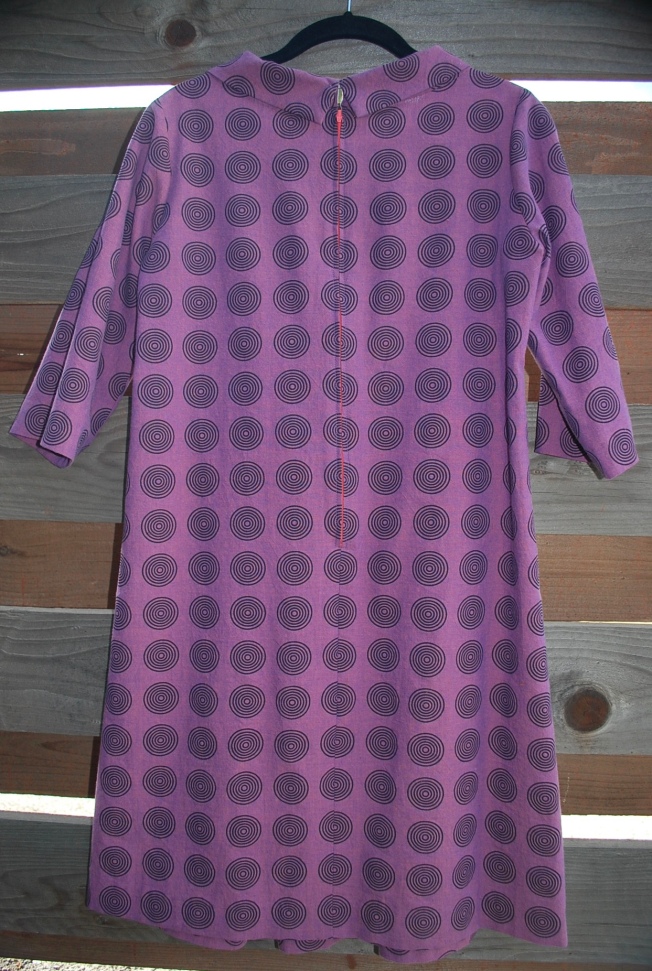
The fabric I used is Geishas and Ginkgos Circles Cotton Mystique by Andover Fabrics. I purchased the fabric from Harts Fabric online store for $12.99 per yard. The dress requires about 3 yards. I love this fabric. It’s a two tone chambray printed with the circles.

fullsizeoutput_45a

fullsizeoutput_45b

The instructions showed an invisible zipper. I choose to do a regular one in a contrasting color, just for fun. 

fullsizeoutput_45c

The collar is cut on the bias and folded down.

DSC_0772.JPG

Half way up the collar back is a button with a thread loop button hole.

fullsizeoutput_45d

Inside sneak peek.

fullsizeoutput_45e

I used a machine blind hem for the sleeves and bottom.

LET’S BE HONEST:

1. The pattern comes in size Small to Extra Large. I cut a size Small and it fit perfect. I don’t remember why I chose a Small. I can’t find a size chart anywhere. It must have been on the thrown-away scraps from the pattern sheet. I usually cut a Medium in Japanese patterns.

2. You do have to add your own seam allowances. I added 5/8″ because that’s what I’m used to.

3. The pattern accommodates different cup sizes by giving a suggested range of 6 cm to 10 cm for the length that the front pleat is stitched closed from the neckline. The length of mine is 9 cm, and I can easily see how a larger bust can be accommodated with a shorter pleat.

4. I made no adjustments in this pattern. It’s one of those patterns that from the first try-on, you know it’s a great pattern with a flattering fit.

Thanks for taking the time to read my post! Cheers! Lori

fullsizeoutput_45f.jpeg


The Carefree Dress

Who doesn’t love a flowing, cool, maxi dress for summer? One that makes you feel like your on vacation even when your just walking around the house. This is what I choose for reconstruction make #4. Click here for an explanation. I don’t think any other type of garment combines casualness and luxury the way a long, loose-fitting, sleeveless dress does. I’m really excited to share this one with you.

DSC_0670

DSC_0675

DSC_0683

The pattern I used is McCalls 7404 which I purchased on sale at JoAnn’s for $1.99. I think it is a “new release” as the date on the envelope is 2016. When I first saw this pattern, I knew I would buy it. It fit my reconstruction criteria of loose and gathered above the chest. Additionally, I was attracted to the casual maxi dress idea as I didn’t have any in my closet. I made view D.

7404

The fabric I used is Joel Dewberry, Bungalow Rayon collection, specifically Dahlia Rayon in Maze. I purchased it from Hawthorne Threads and knew I wouldn’t go wrong this selection as I was super pleased my Joel Dewberry rayon I had purchased for The Triple Digit Dress. I bought 3 3/8 yards at $9.95 per yard. I machine wash and hang dry this fabric. It’s soft and drapey, yet substantial and easy to iron.

DSC_0692

The armholes and neckline are finished with bias tape. Long strips are included as patterns pieces. There is also a bias trim inset between the bodice and the body of the dress. The pattern instructions were to iron it up and top-stitch. I ironed it down instead.

DSC_0699

DSC_0694

The back has a slit opening and hook closure. I can pull the dress on without undoing the hook. So while the opening is not actually necessary, it’s a nice design feature.

DSC_0696

There is a slit at the bottom of the center front seam.

DSC_0701

LET’ BE HONEST:

1. I cut a size Medium (12-14). It fits fine, except the armholes are very large. Before attaching the bodice to the body of the dress, I took in the bodice side seams 5/8″ to lessen the armholes, but that was not enough. I wear a “cami bra” with this dress to prevent from exposing too much.

2. Because I am not a tall person, I cut off 5″ off the bottom of the pattern pieces.

3. Because of how rayon stretches with gravity, the bottom was very uneven. I let it hang for a couple of days, then trimmed the bottom to even it out. And hemmed it from there.

4. In addition to cutting several inches off the bottom, I lowered the front slit about 2″. I really didn’t want the slit to go above my knee. Who wants to worry about a gust of wind or be careful when you sit down?

5. The most difficult thing about this dress was getting the rayon bias tape even and nice. I hand basted it in all three applications before machine stitching.

I have to say this is now one of my favorite dresses hanging in my closet. Wearing this dress is just so comfortable, free, and easy. What about you? Have you discovered a free and easy dress pattern lately?

DSC_0681


The Triple Digit Dress

I’m still sewing my summer reconstruction makes like crazy. Click here for explanation. We’ve got two, if not three, more months of HOT weather. With this being the case, I haven’t come close to maxing out on sewing for this season. However, I’m happy to take time away from my machine to share with you reconstruction make #3, a comfortable, cool summer dress.

DSC_0604

DSC_0613

DSC_0620

To belt or not to belt, that is the question.

The pattern I used is Simplicity 1668 which I got on sale at JoAnn’s for $1.99. I snatched this pattern up as soon as I stumbled upon it as it fit my reconstruction criteria perfectly – loose and gathered at the chest.

simplicity-sportswear-pattern-1668-envelope-front

The fabric is Tulip Rayon in Poppy by Joel Dewberry which I purchased once again from my favorite online store Hawthorne Threads. (I know I sound like a broken record always mentioning Hawthrone Threads, but I haven’t managed to get to Los Angeles for fabric shopping in several months. I am thankful for their great selection and great customer service.) I got 1.75 yards at a cost of $9.70 per yard. I love this fabric. I prewashed it in a cold machine cycle, and hung to dry. It’s soft, lightweight and drapey, yet not too delicate for everyday wear.

DSC_0573

DSC_0575

An elastic casing forms the gathers at the middle front.

The gathers near the shoulder are sewn to a facing. The armholes are finished with purchased bias tape.

DSC_0588

DSC_0584

There is a box pleat with top stitching at the back neckline.

DSC_0581

Curved hem is finished with a facing. Not the easiest thing in the world to do perfectly on a rayon. Mine is passable.

DSC_0591

LET’S BE HONEST:

1. I cut a size Small (10-12) at the top and graded a Medium (14-16) at the bottom. I also added 1″ in length by slashing the pattern pieces where indicated. The photo on the envelope showed the dress several inches above the knee on the model. I’m not tall, so I figured adding 1″ would fall at the knee on me. I’m happy with the overall fit and did not have to make any adjustments while sewing.

2. The pattern is labeled as “easy-to-sew.” I think that this can apply to the other views-elastic pants and shorts, and jacket. For the dress, I have to say the neckline with the elastic casing, shoulder gathers, and facings is a little fiddle-some, especially in a rayon. I wouldn’t recommend this dress for a beginner.

3. I interfaced the belt even though the directions did not call for it.

4. Now I’m going to talk the nitty gritty of practicality. I LOVE this dress. I think the pattern and fabric are a perfect match. And it couldn’t be more comforable to wear. However, I still find myself grabbing the same old shorts and sleeveless tops over this cute dress on a daily basis. Is it too “nice” to just wear around the house or a trip to the grocery store? I think the real reason I don’t throw it on more often is the fact that it’s care is “high maintainence.” First I have to accumulate a load of delicate wash cycle items to wash with it, then I will need hang it dry, and then I will need to iron it. This means it will be a long time before I wear it again once I throw it in the laundry pile.

What about you, do you avoid wearing some garments you love just because of their care requirements?

DSC_0617


Happy Coverall Dress

Except for some last minutes sewing details for my sister-in-law‘s wedding next weekend, I am madly focused on my summer “reconstruction” makes. Click here for explanation. I’m sewing much faster than I’m blogging. I’ve got lots to share. Stay tuned. Reconstruction make #2 is a simple grab-n-go dress that’s nonrevealing and has pleats in all the right places. It’s a great alternative to shorts and a T-shirt.

DSC_0593

This dress has been through the washer and dryer twice already.

The pattern I used is Simplicity 2147.  I bought it on sale at JoAnn’s for about $1. I was attracted to this pattern because of the loose fit and bodice yoke with pleats and ample chest coverage. I was not attracted to it because it says “Learn to Sew”, although that signals quick and easy – a good thing when your whipping out summer clothes. I made view B.

2147

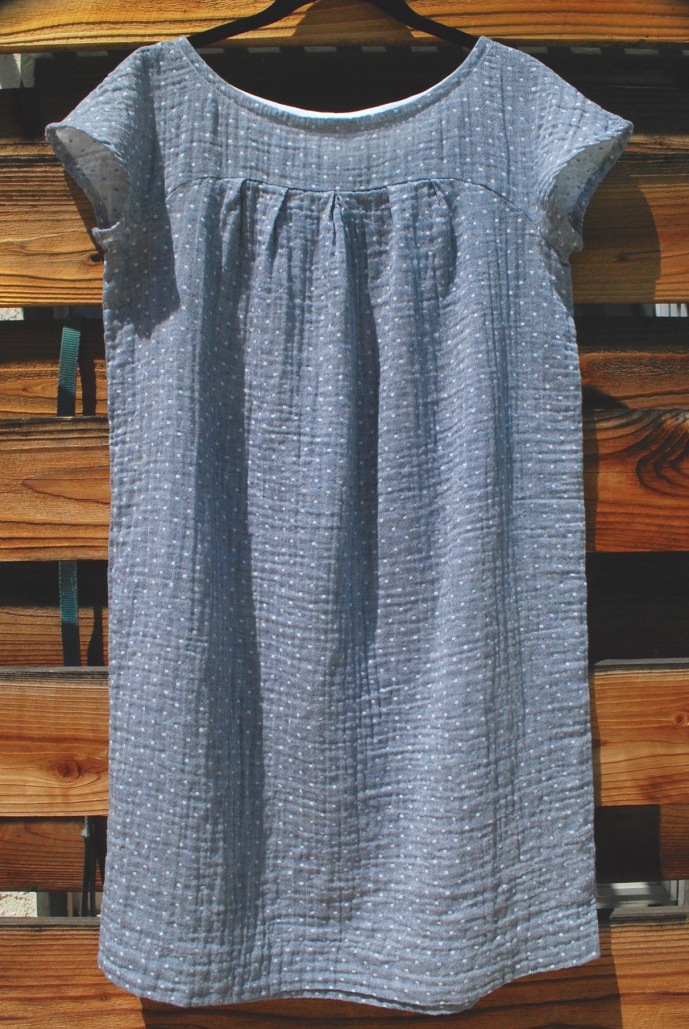
The fabric I used is Robert Kaufman, Double Gauze Chambray in Indigo. I purchased it from my favorite online fabric store Hawthorne Threads. I ordered 2 yards at a cost of $11.70 per yard. This is my first double gauze experience. I have seen many makes with double gauze floating around the online sewing community and had been curious about it for some time. I love the characteristics of this fabric, it’s soft and lightweight while having a similar fashion aesthetic of a regular chambray. However, I don’t think it was the perfect choice for this pattern. I’ll explain below.

DSC_0594

Because of the loose weave of the gauze, the fabric sort of stretches over the shoulder and creates a wing effect on the edge of the sleeves. Not a big deal, but something I wasn’t jazzed about the first time I tried it on. Can I live with it? Yes!

DSC_0599

The side view is a bit unflatteringly “full.” I don’t know if it’s because there are also pleats in the back or it’s the nature of the fabric. What I do know, however, is that as the day wears on, you get a rear end sag from the double gauze stretching out while sitting. The dress appears freshly washed in the photo.

DSC_0600

DSC_0505

The neckline is finished with purchased bias tape. The sleeves have a narrow machine hem.

DSC_0512

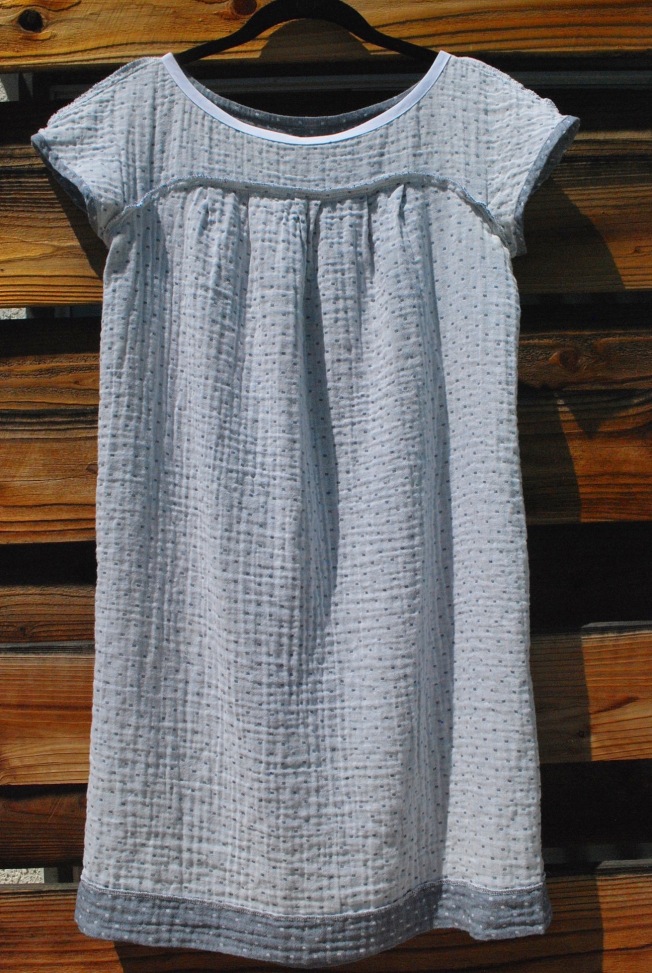
I like how the wrong side of the fabric is the “negative” of the right side.

DSC_0507.jpg

I did a machine blind hem for the bottom hem. The stitches are hiddened well in the crinkly, double gauze!

LETS BE HONEST:

1. I made a size 12 and graded out to a size 14 on the bottom half. I did not do this out of concern for my hips. I did this because I added 5″ to the hem. (View B is described as a mini-dress, which I don’t do.) I noticed that the body of the dress narrows slightly towards the bottom and I thought if I continued the inward angle following the size 12 line, it might feel a little narrow at the hem.

2. Hmm…what else can I say. Despite the winged sleeves and saggy rear end, I really love this dress and will continue to reach for it often this summer.

What about you…can you overlook disppointing details when the garment perfectly fills a need in your wardrobe?


Pack n Party Dress

A few months ago I flew out of state to attend my nephew’s wedding. I was flying one of those budget airlines where every amenity, even water, is an extra cost. I paid for one carry on bag for a four day trip, so I needed a wedding guest dress that could be rolled and stuffed into a small suitcase. A comfy, wrinkle-free polyester jersey knit dress fit the bill perfectly.

DSC_0272

The pattern I used is Simplicity 2580, which of course I bought the only way to buy big four patterns, on sale at JoAnn’s for about $1.00. I was attracted to the neckline of View C and the slightly A-lined silhouette. I traded out the short, petal sleeve for a straight, 3/4 length sleeve (from McCalls 6697).

2580

While JoAnn’s is my go to stop for patterns and notions, I rarely buy fabric there. But I was limited on my fabric shopping opportunities for the project, so I forced myself to make a selection at JoAnn’s, and I rather like this out-of-the-box choice for me. The colors are fun, and there’s plenty of pattern to hide bulges that can so easily show on a slinky knit.

DSC_0273DSC_0275DSC_0276DSC_0279

The front bodice is self-lined and is actually folded at the front neckline which creates a nice, smooth finish. I finished the back neckline with a double needle and trimmed the raw edge close to the stitching.

DSC_0286

I added clear elastic on the seam where the bodice is attached to the skirt. This is a technique I first learned making the Moneta Dress and have used it several times since.

DSC_0283

I am not a big fan of machine hems on dresses, but I think a double needle on a super stretchy knit is a safe bet.

LET’S BE HONEST:

1. I cut a straight size 14 for the bodice and the sleeve (from McCalls 6697). For the skirt, I graded to a size 16, and then additionally added a slight bit of flair which totalled 8″ of width at the bottom. I wanted to make sure the fabric draped nicely over my mid-section, hips, and thighs. I am very happy with the fit.

2. I have wrestled with skipped stitches for years using the double needle on slinky or thick knits. I finally bought a STRETCH double needle (had to order it online) and, oh my gosh, it has solved all my problems. Had I known what a difference it makes, I would have bought one 30 years ago!

3. I love the neckline on this dress! I think it is probably universally flattering on women of all bust sizes.

4. This pattern sews up easily for a seamstress experienced with sewing on knits.

IMG_4116

Here I am sitting with my dad and my son’s girlfriend, Ryley. Ryley is wearing a Alder Dress by Grainline Studio that I made for her!


The Jennifer Dress

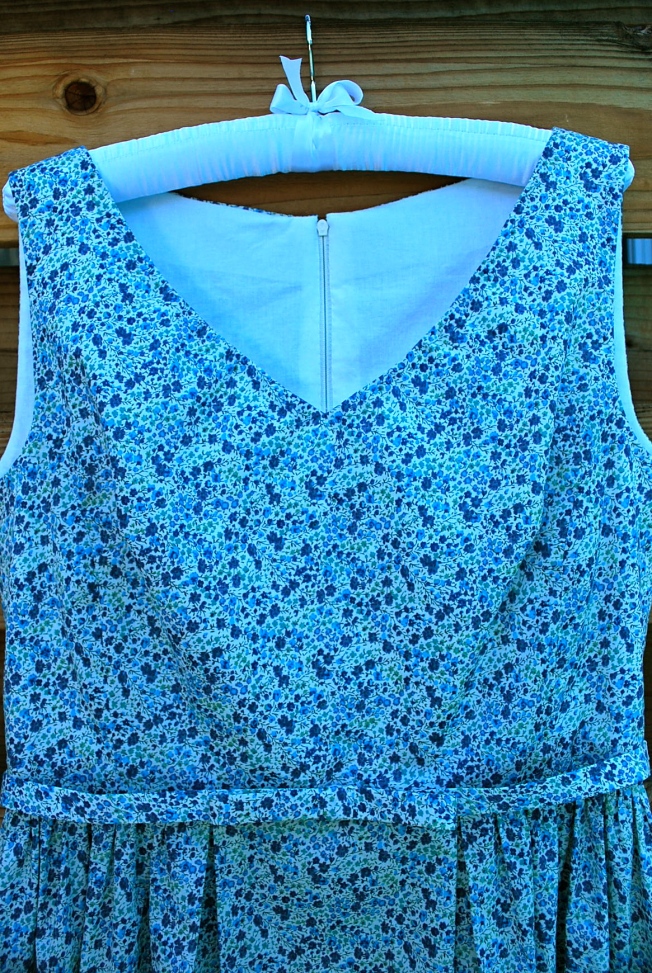
As soon as I saw this pattern while shopping a Butterick pattern sale at JoAnn’s several months ago, I knew I wanted to make this for my sister-in-law who loves that 50’s retro vibe. So I am once again sewing someone else stylish for Fresh Make #18.DSC_0551DSC_0546DSC_0554
The pattern I used is Butterick 5982. I basically made a sleeveless version of view C. As mentioned above, I bought the pattern on sale at JoAnn’s for $1.40. I named it the Jennifer Dress after my sister-in-law.DSC_0574
The fabric is a soft, smooth lawn cotton we purchased at The Fabric Store on La Brea Avenue in Los Angeles. My photos unfortunately do not do this fabric justice. It’s a calico like print of rich blue colored flowers set on a creamy white background, and it’s looks beautiful against Jennifer’s sun kissed skin.

One of the design details I really like about this pattern, along with that adorable bow, is the flat center skirt front. The gathers go up to an inverted pleat on both sides and then it’s flat for about 6″ in the middle. A flattering element for those of us whose waists and bellies aren’t what they used to be. (No, Jennifer, I’m not talking about you! I’m sure you would look good with gathers around the whole waist. I’m just speaking in general.)

Please excuse the coloring in this photos. I took it in the early morning and then went to Jennifer's house and gave the dress to her. So no retakes.

Please excuse the coloring in this photos. I took it in the early morning and then went to Jennifer’s house and gave the dress to her. So no retakes.

DSC_0521
back view

back view

The bodice is fully lined in a white cotton. I did some “slow sewing” as I attached the lining by hand along the zipper and waist. I also did a hand hem after machine sewing hem tape on the bottom edge.
You might notice some picking at the neckline. You can read about that below if you're interested.

You might notice some puckering at the neckline. You can read about that below if you’re interested.

Jennifer is on the front porch of her newly purchased home!

Jennifer is on the front porch of her newly purchased home!

LET’S BE HONEST:
1. It is always a joy for me to sew for others. The drawback is coordinating fittings or sacrificing a few when that person does not live that close to me. On the first fitting, before I applied the lining or did any finish work, the neckline layed flat on Jennifer. On the second fitting, it pooched out as if the fabric was stretched when I attached the lining at the neckline. I was flummoxed and the truth is it didn’t matter how it happened, I needed to find way to fix it. I was not up for ripping out the lining and re-doing the whole bodice. I had not yet attached the lining at the waist, I decided to run some rows of basing stitches on the lining layer only, close to the neck edge and ease in the extra width. You can see this in the photo of the dress inside. It’s not a proud sewing moment for me, but a reasonable solution. Jennifer was fine with it.

2. It’s a bit confusing as to how the bodice is supposed to fit on this pattern. Of course, the beauty of sewing is you can make it fit however you want. I just want to point out that the photo of the orange dress on the envelope front has a semi-fitted bodice, and the illustrations look close-fitted. Additionally the description on the back of the pattern says “close-fitting.” Jennifer’s bodice fits like the photo, which is a good thing because she doesn’t care for form-fitting clothes.

3. The pattern is labeled EASY. It might be easy for this style of dress, but would say it does required some intermediate sewing skills. At least some experience with gathers, zippers, facings and linings.

4. Jennifer wanted the dress to hit below her knees, so I added 5″ to the skirt bottom when cutting out the fabric. It was just enough for a 2″ hem.

I think Jennifer loves her new dress. When she put the finished dress on for our photo shoot, she didn’t want to take it off. But she did because she wanted to keep it nice to wear on the first day of school. She’s a third grade teacher.

Thanks again for reading my blog. I welcome your comments about this dress or your experiences sewing for others. Cheers, Lori

The Sunshine Jumper

I am keeping true to my declaration of wearing more dresses and skirts, and less jean shorts and capris for spring and summer. I’m building my collection of warm weather clothing with a versatile sleeveless dress for Fresh Make #8.
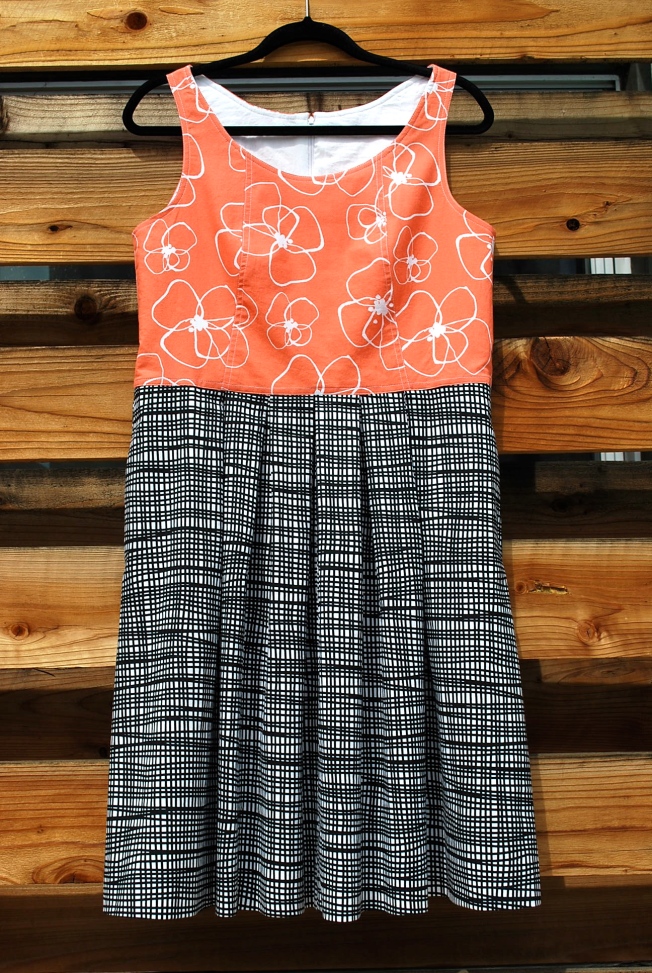
DSC_0174 The pattern I choose is Butterick 5781. I purchased it at JoAnn’s Fabrics for $1.40 as part of their 5 Butterick patterns for $7 sale. This style of dress seems to have made a bit of a comeback, and it’s been years and years since I made a dress comfy dress like this for myself. I named it the Sunshine Jumper because, while it’s a sundress, it can also be worned with a t-shirt underneath. DSC_0184 I purchased the fabric from my favorite online fabric store, Hawthorne Threads. The prints are by Lotta Jansdotter, specifically, Blomster in Coral from the Mormor collection and Ruta in White from the Sylvia collection. The fabric is quilting weight, 100% cotton, perfect for this dress. The fabric was $9.25 per yard, and I needed about 1 yard for the bodice and 2 yards for the skirt. I also lined the bodice with 1 yard of white cotton from JoAnn’s.

The dress has hidden seam pockets.

The dress has hidden seam pockets.

I’m not sure a have the perfect shoes for this dress. I think I might need to go shopping! I’m modeling it with two different types of sandals to show the versatility of the dress. DSC_0166DSC_0172

The feel and style of the dress lent itself to some double white topstitching on the bodice.

The feel and style of the dress lent itself to some double white topstitching on the bodice.

DSC_0161 The bodice is fully lined and all the seams are overlocked. The hand-sewn hem is 2″ wide.DSC_0165

LET’S BE HONEST:

1. The Butterick pattern is labeled Easy. In reality, it is easy for an experienced sewer. There are quite a few techniques that wouldn’t be easy if you were doing them for the first time such as facings, zipper, pleats, and princess seams. Overall there are no surprises or odd features to this pattern.

2. There’s no other way of saying it – I am small busted. The advantage for me of constructing my own garments is I can balance out my portions by custom fitting. With this pattern, I was going for more of a semi-fitted bodice, rather than a fitted one because I felt like a fitted bodice would emphasize the discrepancy in size between my top and bottom half, especially with a full skirt. This pattern had different bodice pattern pieces for A/B, C, and D cups. Of course I used the A/B pattern piece and still took it in at the bust after my first try-on. I took it in again at the side seams after my second try-on. I eventually achieved the fit I wanted.

3. I LOVE the pleats on the skirt. I was hesitant to make a dress with a full skirt because my extra inches through my mid-section. But these pleats lay completely flat with no extra poof where you don’t need it. I’m still staying away from gathers, but yes, I can do pleats!

4. I wanted my hemline to be between view A and C, so I added a few inches onto the skirt A length pattern piece before cutting out the fabric. I like my hem to hit right below the knee cap at the narrowist part of the leg above the calf. That’s where it most flattering because you’re showing off your curves rather than cutting your leg off at a wider part.

Overall, I love my Sunshine Jumper and plan on wearing it a whole lot this summer and spring. Thank you for taking the time to read this post. I welcome your comments. Lori

The Carol Dress

I haven’t had a shirtdress in recent memory, and definitely not one in a slinky knit. Since this is my year for trying new things, Fresh Make #3 is a knit shirtdress.DSC_0030 I used McCalls 6520. I purchased it at JoAnn’s Fabrics as part of my recent bunch of 5 McCalls patterns for $7. I have named this pattern The Carol Dress in honor of TV’s favorite 70’s mom, Carol Brady. I know her collars were more exaggerated and her hems were shorter, but this shirtdress style definitely hints back to that era.DSC_0050 I bought the fabric at Michael Levine’s in downtown L.A. on the same trip that I bought fabric for The Tina Jacket. The total cost for this project is truly something to brag about. I bought two yards of 60″ fabric for $5.00 per yard for this project. $10 for fabric + $1.40 for the pattern + $1.60 for buttons + $4.00 for interfacing + $1.95 for thread < $20! I don’t focus too much on cost for my projects because I sew for many other reasons, but the low cost for this project was worth mentioning.
DSC_0027

DSC_0028I can’t remember the last time I did a collar with a band. But it’s like riding a bike, you never forget how.
DSC_0039DSC_0037
LET’S BE HONEST:

1. This McCalls pattern is rated EASY. While this may be a simple version of a shirtdress, NO shirtdress pattern is recommended for beginners, especially one that is designed for knits only. Features such as collars, plackets and buttonholes are best practiced on woven fabrics first.

2. A word about working with this knit fabric. This synthetic knit is very stretchy and requires some slow and patient sewing. I found that I needed to hand-base about 3/8″ from the edge first before I topstitched around the collar to prevent the fabric from stretching on the top layer.

3. Numbers rear their ugly head again! Like with The Jean Skirt, the size that matched my measurements sounded way too large for me. I cut a size 14 on top and at the waist transitioned to a size 16! Wow! Just numbers, right? Last week I bought a pair of size 8 jeans at Ann Taylor. Oh pattern companys, why can’t you flatter us like Ann?

4. I’m not always the expert I think I am. I pride myself in taking the time adjust the pattern pieces to my measurements before I cut the fabric and also fit as I sew. I took 3/4″ off the length of the sleeve pattern and thought that would be fine. Well maybe the fabric stretched with the weight of the cuff, or I have really short arms – but the sleeves came out about 2″ too long. They bunched at the wrist and I knew I would not wear the dress like that. So I decided the best solution was say good-bye to an hour or so of hard work and simply cut them off!
DSC_0041
5. Shh! Big secret. I’m wearing a slip and shape wear in these photos. You got to hide the bumps and bulges when wearing a slinky knit!

Overall, I am very happy with my Carol Dress, and I am pleasantly surprised at it’s flattering fit.

Thanks for taking the time to read this post. I welcome your comments and questions.