The Kiomi Top

Eight weeks ago I had a double mastectomy because I was diagnosed with breast cancer. I’m not telling you this to shock you or for your sympathy, after all this is a sewing blog. I’m sharing this so you will know the true reason behind my choice of projects these past few months, and the months upcoming. But before I jump into sewing, I want to say that my prognosis is excellent, and I have the good fortune of not requiring any post treatments such as chemo therapy or radiation.

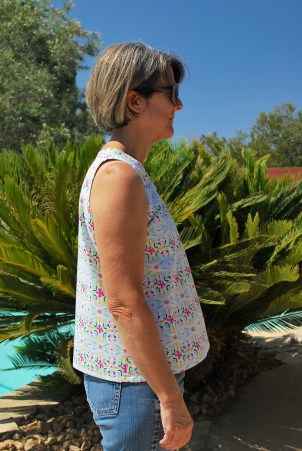
However, I am currently “under reconstruction.” My breasts are temporarily oddly shaped and uneven. That is why I am choosing tops and dress patterns that are loose and gathered above the chest. One week after surgery, I started to think about all the hot weather that is to come, looked through all my patterns, and choose The Kiomi Top from Lotta Jansdotter’s book, Everyday Style, as my first recovery make.

DSC_0526

DSC_0534

DSC_0529

DSC_0539


DSC_0519

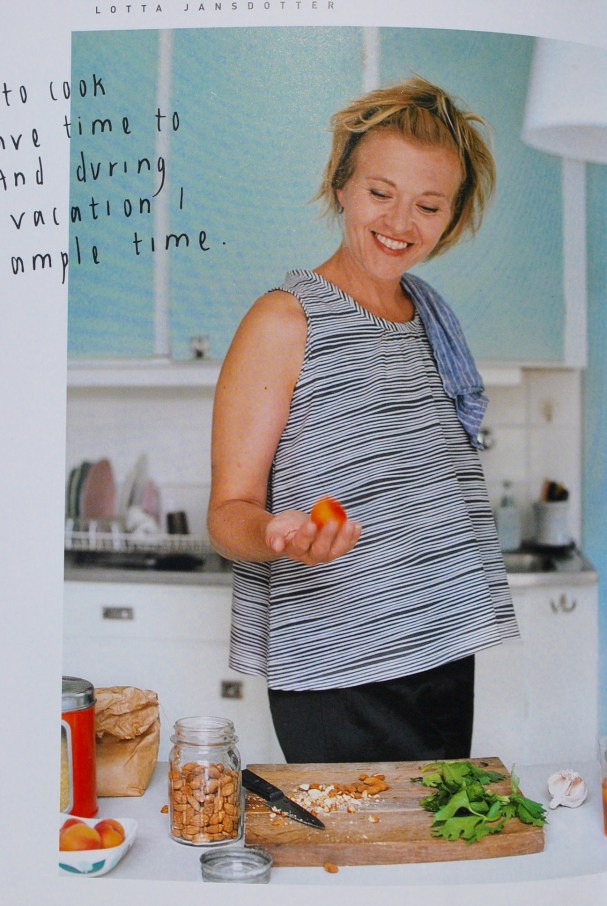
The Kiomi Top from Everyday Style by Lotta Jansdotter

I thought this pattern would make up nicely in a quilting weight cotton fabric as I desired an opaque, more substantial weight fabric rather than a voile or lawn cotton which is my usual preference for a top or blouse. I ordered two fabrics from my favorite online store, Hawthorne Threads. (As much I prefer buying fabric in person, I think it’s awesome to purchase fabric online when you have drains attached to you, can’t drive yet, and really don’t want to leave the house.) I chose two fabrics – Iza Pearl Designs, Blush & Bloom collection, Floral Stripe in Aqua, $9.95 per yard, and Leah Duncan, Lore collection, Olympus in Navy, $12.95 per yard. I bought 1 3/4 yards of each.

After studying the photos of the Kiomi in the book, I decided I would prefer less flair for this semi-cropped top. Lotta Jansdotter looks taller and thinner than me, so she can pull off a more extreme A-line. I took out eight inches of width at the bottom of the top. I did this by cutting two slashes on both the front and back patterns pieces and overlapping the openings by an inch at the bottom. I found the width to be perfect and was very happy I made this adjustment.

DSC_0528 DSC_0536

DSC_0548

I made four slashes to take out a total of 8 inches of width on the bottom.

DSC_0522.jpg

I would not look as cute as Lotta in a top this swingy.

LET’S BE HONEST:

1. The size range in this book is XS to XL. I made a Medium (bust 36 – 37 1/2) and it fit fine even though my bust size falls closer to the Small measurements.

2. I had an issue with the neckline on this pattern. With my first top, I followed the instructions to pull the neckline gathers to 3 1/2″ for the size Medium before sewing on the bias tape. This was too much gathering. It caused the neckline to be pulled into a kind of soft “V” shape and also pulled armholes towards the chest area. I studied all the photo examples in the book, and none of the necklines looked like mine which leads me to believe the measurements in the book were not adequately “tested.” For my second top, I pulled the gathers to 5″. I found this to be a much more acceptable result and looked more like the rounded necklines in the book.

DSC_0530   DSC_0540

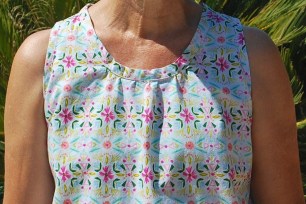
Left: Gathers are 3 1/2″. Right: The gathers are 5″.

3. I had an issue with the instructions for the neckline bias tape. You are given a pattern for 2″ bias tape and instructions to iron it down the middle and then in on both sides 1/2″. This of course creates a 1/2″ bias tape which is to be used on both the neckline and arm holes. Looking at all the photos in the book and the illustrations on instruction page, the neckline bias binding is clearly wider than the armhole binding. In a couple of the photos the neckline binding looks like it could be as wide as 1″. There are no instructions that differentiate the binding widths of neckline and armholes. I like the way the wider neckline binding looks, so of course I made adjustments on my own to achieve that. However, small details are what make a simple design such as the Kiomi unique, and I think the creators of the book owe their followers instructions and patterns pieces which will enable them to create exactly what they see in the photos.

4. Despite my complaints above, I love actually these two tops and have already worn them both several times. They serve the purpose that was intended for them – in the hot weather, they hide my not so perfect chest AND I still feel cute.

5. This is my third project from Everyday Style by Lotta Jansdotter. I have a post on the Esme Tunic here. I also made the Owyn Pants. I haven’t done a post about them, but you can see photos of them in this post.

I am especially grateful right now that I can sew. I am able to create clothes that I feel great in post-surgery. What about you, when have you felt grateful that you can sew?

DSC_0542


Advertisement

The Esme Tunic

I have felt a desire lately to put more craft and creativity into my Fresh Makes. I recently purchased the book “Lotta Jansdotter Everyday Style.” Putting a spin on one of her patterns was a perfect way for me to the get back into touch with my artsy side.

DSC_0336

That is my dog, Spright, peeking under the fence.

619Hpzge3-L._SX258_BO1,204,203,200_

The book includes patterns for five basic garments. This is the Esme Tunic. The Esme includes two other versions, a hip length top and kaftan.

photo-17

The fabric I used is Alison Glass Knits in Indigo. I purchased it online at Harts Fabrics for $15.99 per yard. It is also available at several other online fabrics stores. I had already made two simple shirts with Alison Glass Knits, and thought this would be a perfect fabric for this simple tunic. I love this knit fabric! It is very stable, substantial weight jersey knit, that after a few washings, feels like flannel. (Beware: It shrinks a lot! I prewashed this the Indigo twice because my first two projects with this fabric shrunk more in the first wash after completing and wearing.)

DSC_0340

I added a reverse applique design at the neckline inspired by Alabama Chanin. When the Alabama Stitch Book came out in 2008, I was obsessed with the techniques and garments from the book. I made countless projects for a year or two. Then time marched on and I focused on other things. But recently I felt a yearning to do some handiwork, and thought this neckline would be perfect for some embellishment. (The stencils are of my own design, not from the book.) The paint I used is Jacquard Lumiere, Pearl Megenta.

DSC_0341

The underneath fabric which is also the facing, is Alison Glass Knit in Lime, leftover from my prior project.

DSC_0304

The lime colored facing was attached so the right-side of the fabric shows through when the blue fabric is cut away.

DSC_0305

DSC_0317

I used a rounded zigzag stitch for the hem. I normally use a double needle straight stitch on knits, but I thought this would look better with the folksy style of the tunic. I leave the edges raw and cut closely to the stitching. That’s all you need to do!

LET’S BE HONEST:

1. I traced and cut a pure size medium without any alterations (except for the length). The flair was significant enough to accommodate my larger hip to smaller bust ratio.

2. I took off two inches from the length before cutting because I thought I would make it a just below hip length to wear with jeans. I tried it on and asked my 20 year old daughter for her opinion as to whether I should keep it long or make it shorter, and she said keep it long. So I did! If I knew I was going to do this, I might not have taken off the two inches. I feel perfectly comfortable in it, but, I’m old!

3. The Esme Tunic is a simple pattern that a beginner could sew. BUT not solely with the instructions provided in the book.

4. I bought this book out of curiousity and because it seems to be getting a lot of hipe on social media (or at least the stuff I follow). I have always liked Lotta Jansdotter’s asthestic and the fact that she’s Swedish. I’m part Swedish and have visitied Sweden many times. But I have to be completely honest, intially, I thumbed through it pretty quickly and thought it was a waste of money. The accessory projects are so easy, I definitely didn’t need a book to show me how to do them. But I realized I am not the target audience for this book, and it is comforting and inspiring for someone who is non-crafty to make projects from a curated book from lifestyle icon.

5. BUT, I thought, I spent money on the book, I need to make something from it. AND, I have to admit, I LOVE the cut and fit of the Esme Tunic. I might even make another one!

DSC_0343


The Sunshine Jumper

I am keeping true to my declaration of wearing more dresses and skirts, and less jean shorts and capris for spring and summer. I’m building my collection of warm weather clothing with a versatile sleeveless dress for Fresh Make #8.
DSC_0174 The pattern I choose is Butterick 5781. I purchased it at JoAnn’s Fabrics for $1.40 as part of their 5 Butterick patterns for $7 sale. This style of dress seems to have made a bit of a comeback, and it’s been years and years since I made a dress comfy dress like this for myself. I named it the Sunshine Jumper because, while it’s a sundress, it can also be worned with a t-shirt underneath. DSC_0184 I purchased the fabric from my favorite online fabric store, Hawthorne Threads. The prints are by Lotta Jansdotter, specifically, Blomster in Coral from the Mormor collection and Ruta in White from the Sylvia collection. The fabric is quilting weight, 100% cotton, perfect for this dress. The fabric was $9.25 per yard, and I needed about 1 yard for the bodice and 2 yards for the skirt. I also lined the bodice with 1 yard of white cotton from JoAnn’s.

The dress has hidden seam pockets.

The dress has hidden seam pockets.

I’m not sure a have the perfect shoes for this dress. I think I might need to go shopping! I’m modeling it with two different types of sandals to show the versatility of the dress. DSC_0166DSC_0172

The feel and style of the dress lent itself to some double white topstitching on the bodice.

The feel and style of the dress lent itself to some double white topstitching on the bodice.

DSC_0161 The bodice is fully lined and all the seams are overlocked. The hand-sewn hem is 2″ wide.DSC_0165

LET’S BE HONEST:

1. The Butterick pattern is labeled Easy. In reality, it is easy for an experienced sewer. There are quite a few techniques that wouldn’t be easy if you were doing them for the first time such as facings, zipper, pleats, and princess seams. Overall there are no surprises or odd features to this pattern.

2. There’s no other way of saying it – I am small busted. The advantage for me of constructing my own garments is I can balance out my portions by custom fitting. With this pattern, I was going for more of a semi-fitted bodice, rather than a fitted one because I felt like a fitted bodice would emphasize the discrepancy in size between my top and bottom half, especially with a full skirt. This pattern had different bodice pattern pieces for A/B, C, and D cups. Of course I used the A/B pattern piece and still took it in at the bust after my first try-on. I took it in again at the side seams after my second try-on. I eventually achieved the fit I wanted.

3. I LOVE the pleats on the skirt. I was hesitant to make a dress with a full skirt because my extra inches through my mid-section. But these pleats lay completely flat with no extra poof where you don’t need it. I’m still staying away from gathers, but yes, I can do pleats!

4. I wanted my hemline to be between view A and C, so I added a few inches onto the skirt A length pattern piece before cutting out the fabric. I like my hem to hit right below the knee cap at the narrowist part of the leg above the calf. That’s where it most flattering because you’re showing off your curves rather than cutting your leg off at a wider part.

Overall, I love my Sunshine Jumper and plan on wearing it a whole lot this summer and spring. Thank you for taking the time to read this post. I welcome your comments. Lori