
It’s still blazing outside, and I’ll be starting my part-time teaching job in less than two weeks. Therefore I was very motivated to sew up some practical work wear that can take me from end-of-summer through fall. The Factory Dress by Merchant and Mills fits the bill perfectly.


I have coveted the Merchant and Mills patterns since discovering them some time ago. When I calculated that it would cost me approximately $46 to purchase a pattern directly from the UK based company, I figured I would never own one. When I learned that I could purchase one domestically through Fancy Tiger Crafts, I took the plunge. I still paid $20 + $7.95 shipping, much more than I normally pay for patterns. I do splurge very once and a while to sample patterns outside the Big Four. The Factory Dress is “inspired by working women, with a dash of the Twenties.” I found the notion of elevating a working class uniform to something more sophicated intriging.

The fabric I used is once again from The Fabric Store on La Brea Avenue in Los Angeles. I hit their summer sale and scored this beautiful linen for $12 per yard. I purchased three yards, but could have done with a little less. Might I add, the sweet employees always measure the yardage very generously. I prewashed it in the machine “at my own risk” and also partially dried it in the dryer. I wanted to soften it a bit and give it a slight laundered linen look.
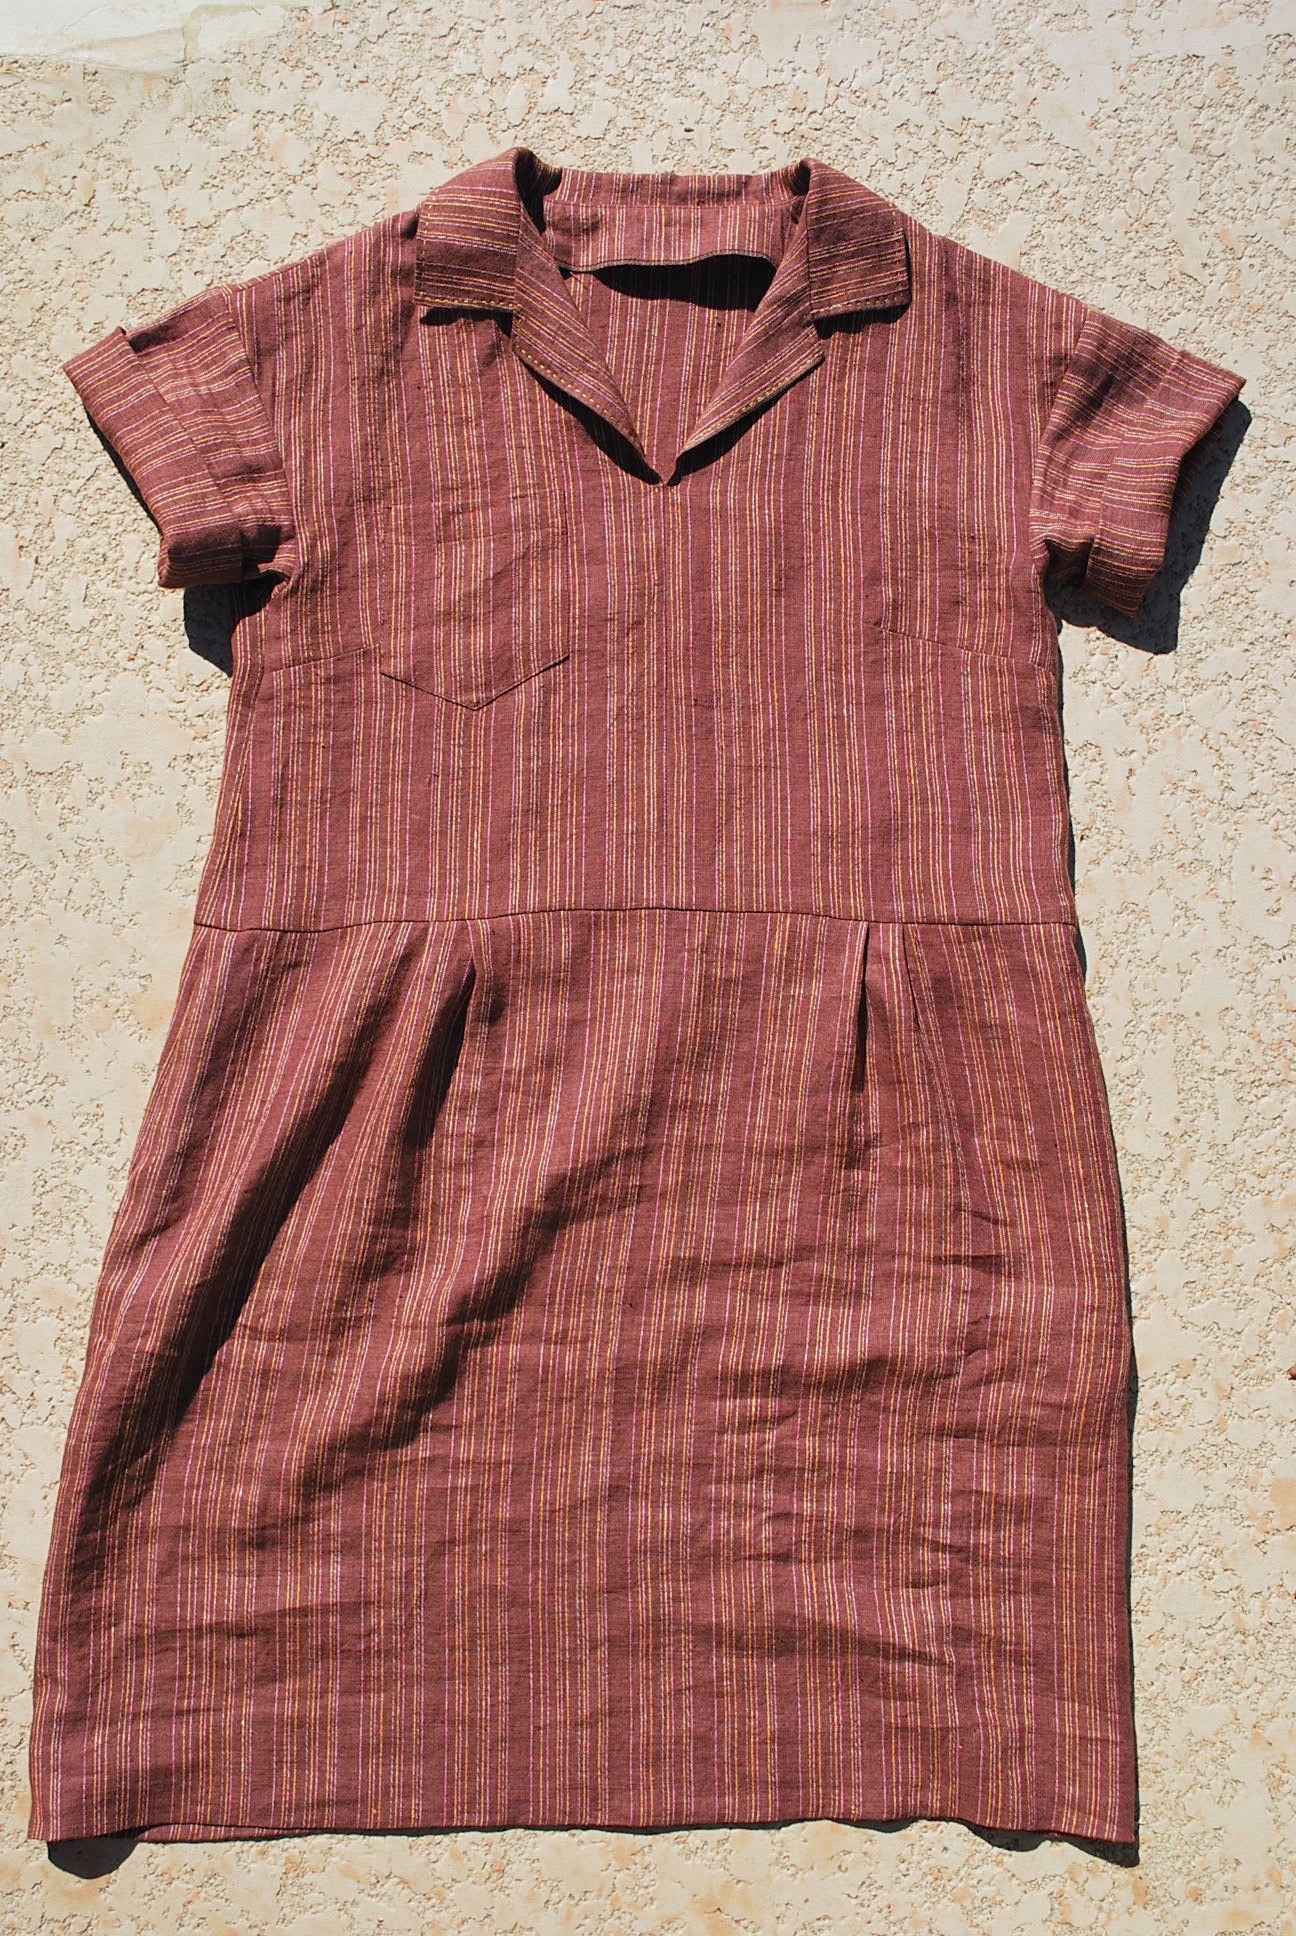
I accidently put the pocket on the wrong side. I think I make mistakes like this because I’m left-handed.

I top-stitched around the collar by hand.

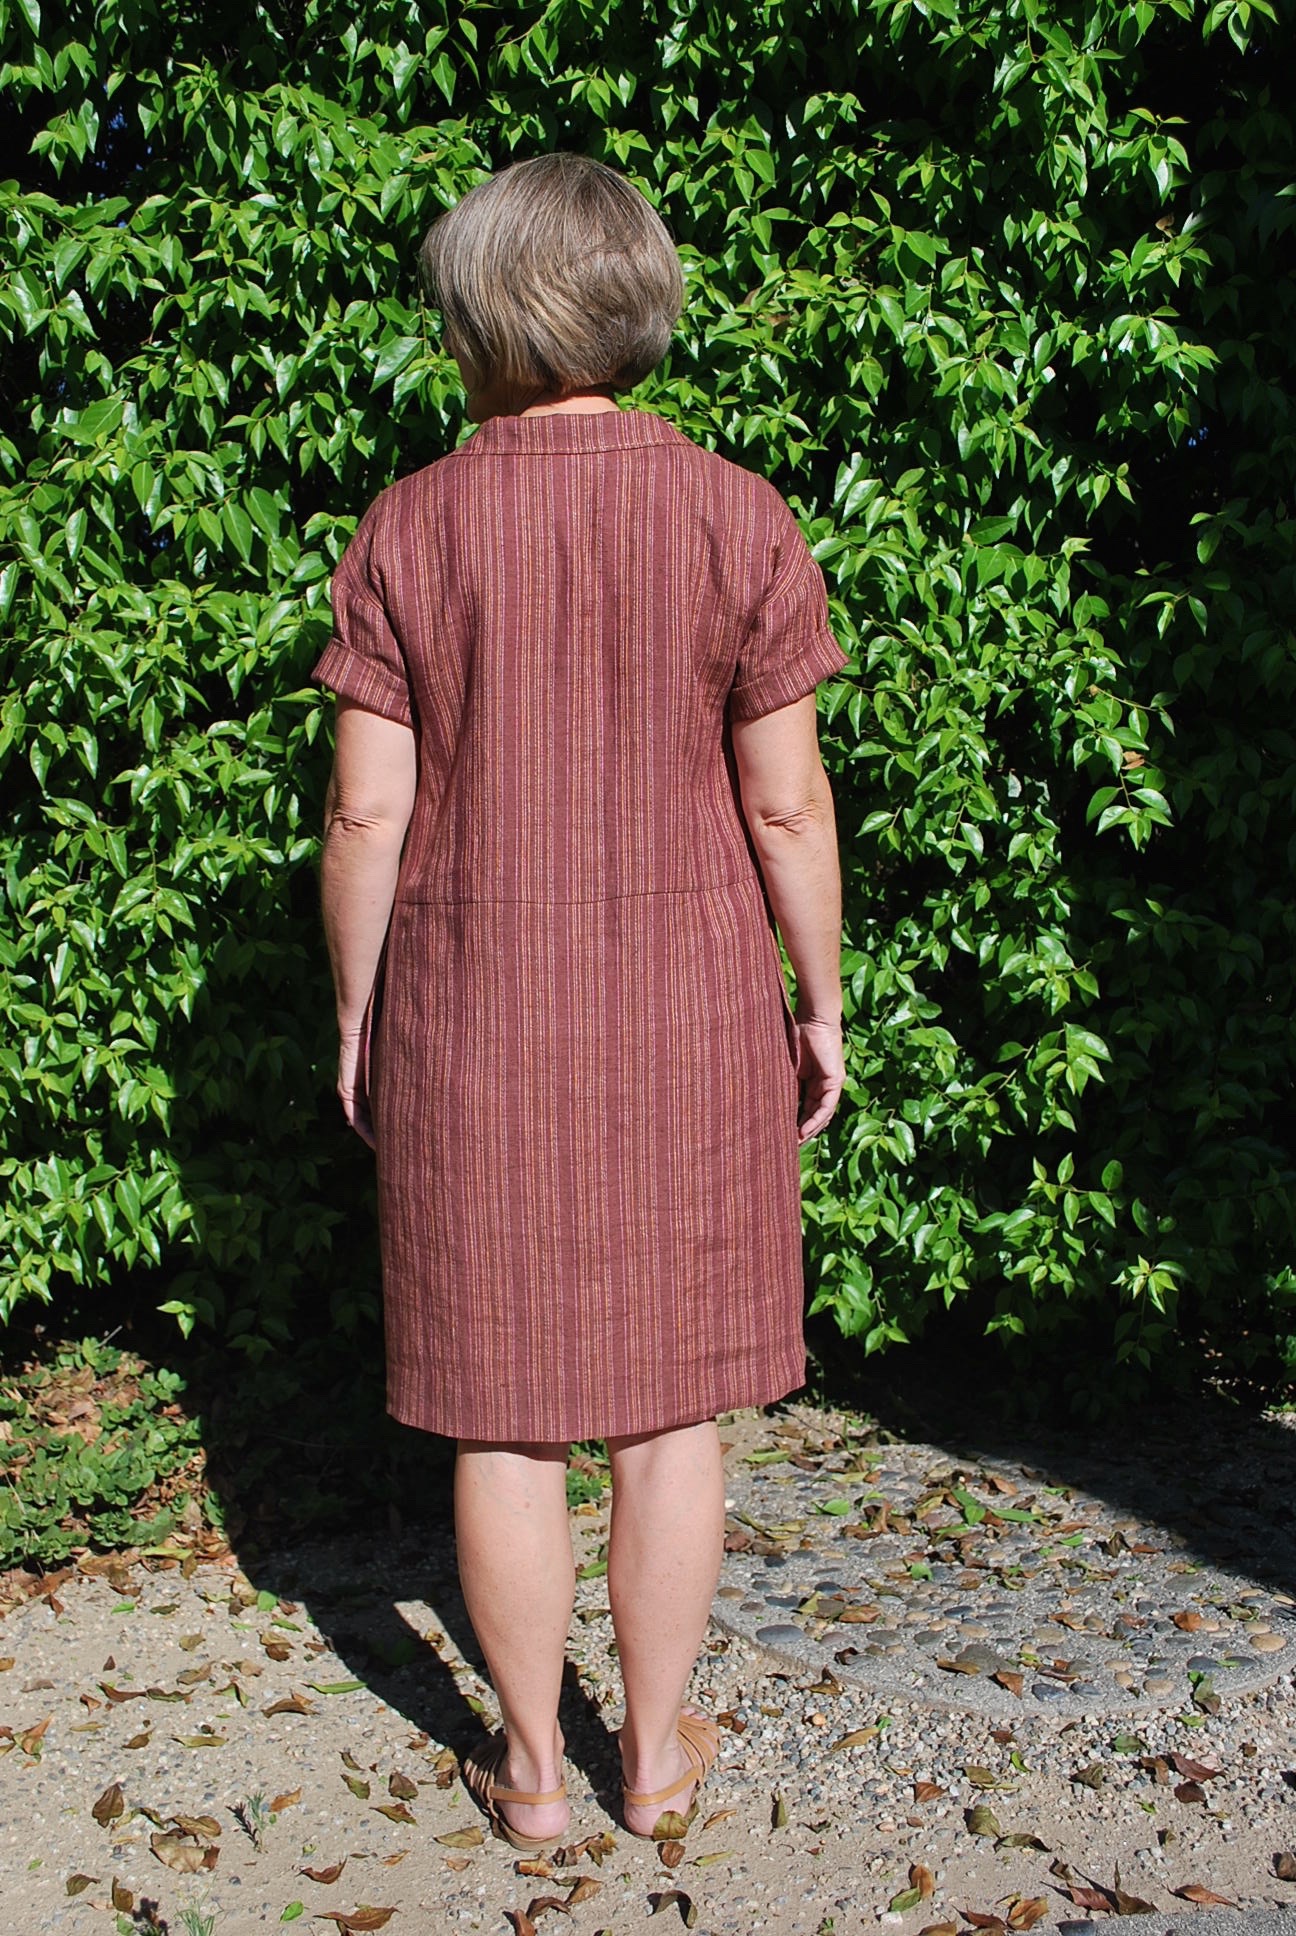
Inside peek – I serged all the seams and did a hand hem on the sleeves and bottom. It has side seam pockets.

Gosh, that morning sun is bright.
LET’S BE HONEST:
1. The pattern ranges from size 8 to 18. I cut a straight size 10, even though, according to the chart my bust is a size 12 and my waist and hips are a size 14. I read other reviews, looks at images of the dress online, and also notice how loose fitting the dress is on the model on the pattern envelope. I “get” the loose fitting style aesthetic, but what also know to be true is that style only looks flattering on very slim people. I was aimming for comfortable wearing ease, and the size 10 turned out perfect. I made no adjustments.
2. This is a well drafted pattern. The paper the pieces are printed on is like a lightweight brown bag with a smooth, shiney backing. The directions, printed on heavyweight paper, are done in vintage graphics and hand illustrations.
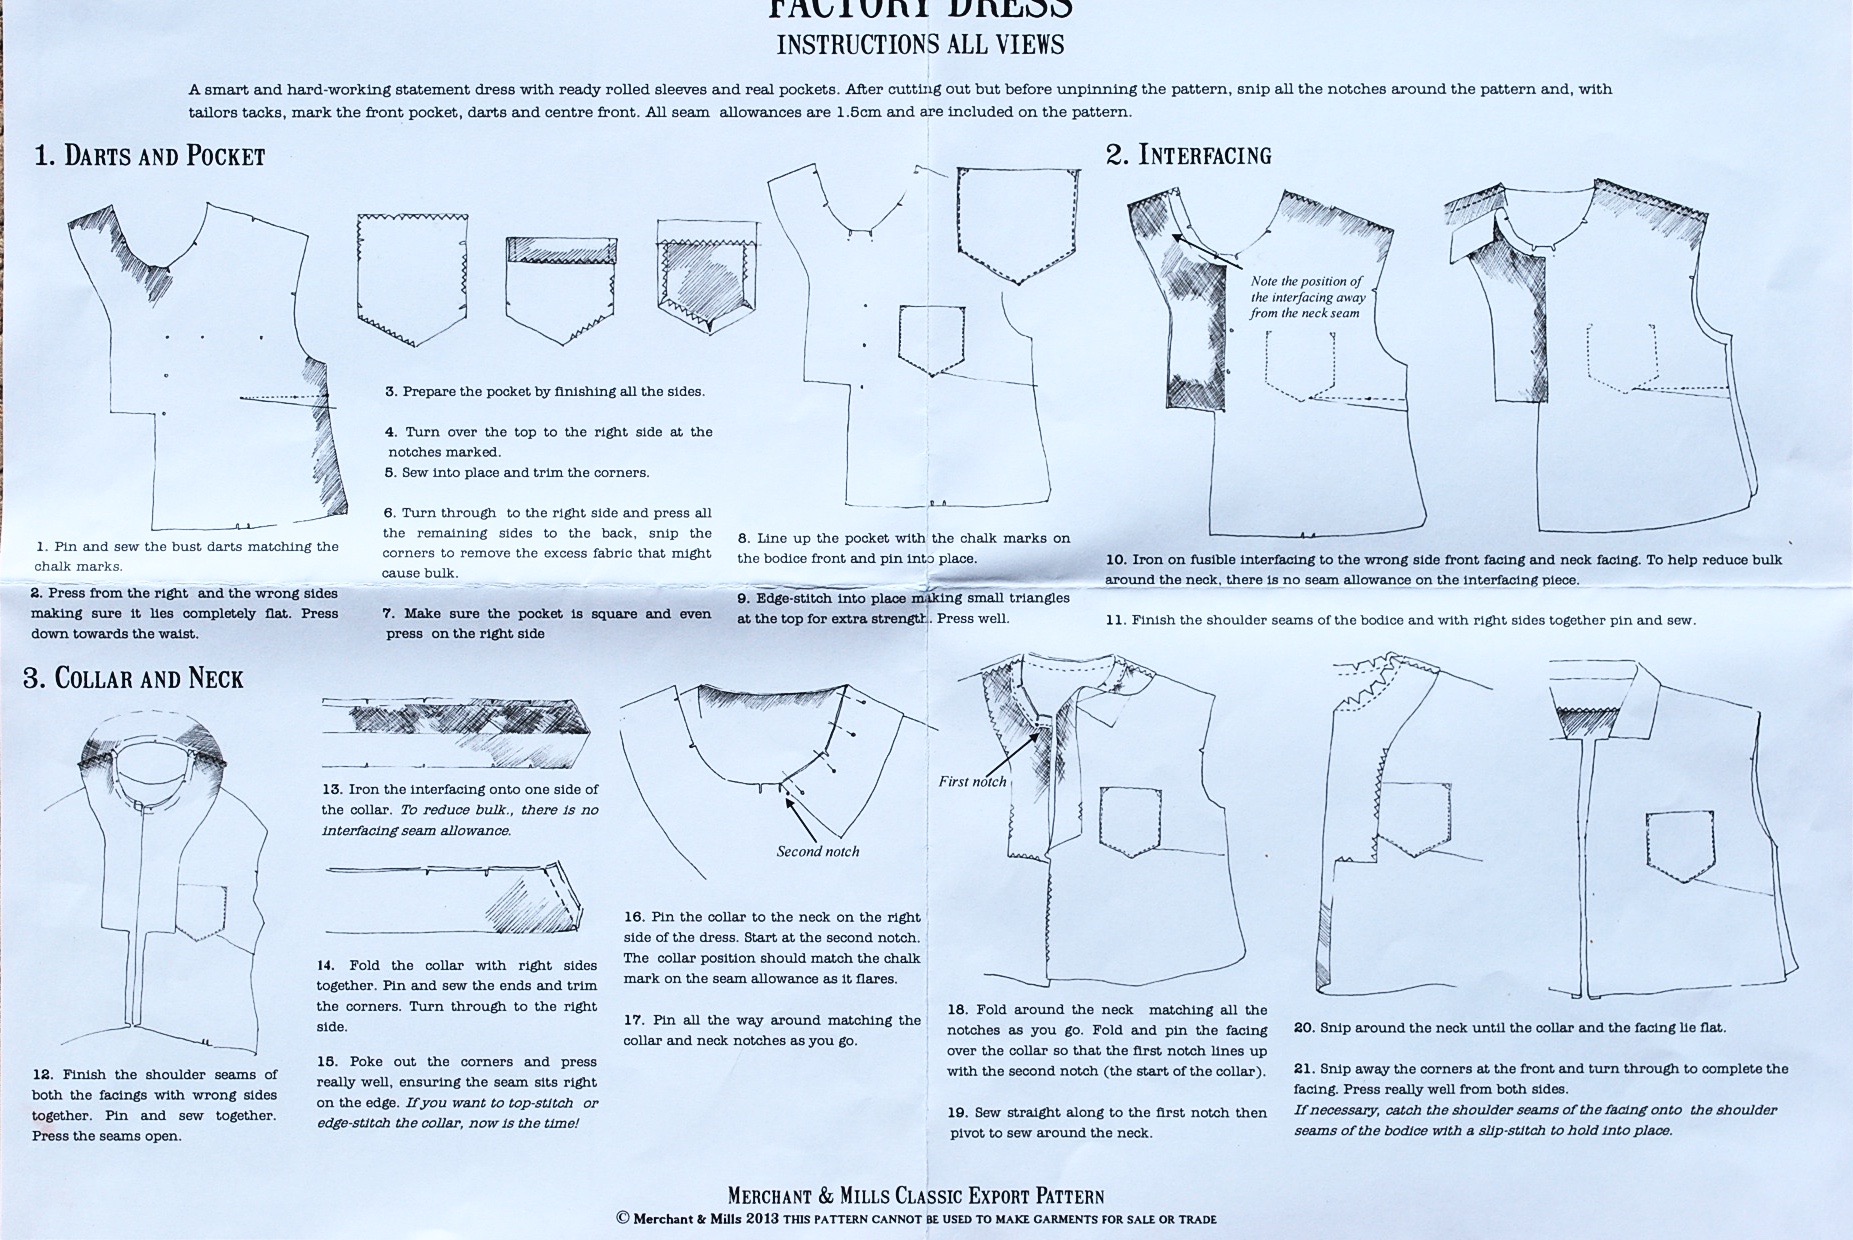

I must confess, I really only looked at the illustrations while sewing. I suspect that the written instructions are probably not quite adequate for a beginning seamstress. But I’m done nit picking pattern instructions, because I certainly wouldn’t want to write them and my hat’s off to anyone who does.
3. When wearing, there is a marked difference between the distance from the hem to the ground in the back and the front. It scoops up in the front and dips in the back. It could just be me, but I don’t completely think so. I did not engage my husband to mark the hem with my old fashion hem gauge, but I did a gradual trim before hemming, making the back 5/8″ shorter. I realize many people don’t notice or care when hems aren’t parallel to the floor, but it’s one of my pet peeves. I can thank my mother for that.
I really had no issues sewing up this dress. I can’t wait to wear it and honor those hard working women of the past!
What are your pattern buying habits? Are there patterns you have been eyeing, but cost is preventing you from buying? Do you have a price limit just on principle?
Thanks for reading my post! Cheers, Lori

It looks great. Really interested to see this made up, the pattern picture doesn’t look inspiring, it looks much better in real life. I guess that is the case with sack like dresses. Love the hand done top stitching, a nice touch.
Thanks, Barbara. I think the key is going a size down and using a semi-drapey fabric.
I really like your version ~ your fabric and size choice work nicely!
I have a difficult time spending more than $10 for Indie or $2 big four since I rarely make a pattern twice.
That sounds like about my price range, except I’ll go $4.99 for Vogue!
I’m with you re straight hems. Your words reminded me of my own mother’s hem-measuring ruler mounted on a block, I’d completely forgotten it until then. Now I’m wondering where it went! Your hand-done top-stitching is a lovely touch.
The device you described is the hem gauge I was referring too!
Love the fabric! As for me, my pattern buying has slowed wayyyy down. Now I focus on pattern companies that (a) have patterns in plus sizes, (b) I know are drafted and/or labelled reasonably well, and (c) have garments or design lines that are missing from my pattern ‘wardrobe’. I’m not particular about cost, but I do keep it in mind — for example, a $20 pattern that I’d have to size up from a 16, would simply not be worth the work. A questionable $5 pattern is more likely to come home with me. Etc.
I’ve long been eyeing a specific pattern by Named, because it is so creative — another reason I’ll buy a pattern — but I really want the paper version and that is too costly; partly due to the total cost and partly because I’d have to size up a possibly complicated pattern. Personally, I wish I were more industrious — the amount some indies charge for very, very simple patterns is mind blowing to me. If I weren’t so lazy, maybe I could get in on that racket, hah. I don’t avoid them on principle of cost alone — I would never do that — but I do shake my head at some of the popular patterns littering the sewing blogosphere.
Whew, wrote a book here! Thanks for asking such a good question.
I have to agree with about the repeated exposure of some popular indie patterns in social media. And the bones of many of those patterns are not markedly different from one you can buy on sale at JoAnn’s for a $1. It is how they are marketed and the curated image surrounding them.
Great looking dress, and thanks for the tip re Fancy Tiger Crafts
I just found your blog! I love the detailed “let’s be honest” and zoomed in detailed photos. Thank you! I discovered Merchant and Mills last year when I received their sewing handbook. It was a great manual that focuses on quality sewing details rather than speedy sewing. I have been fantasizing about their patterns too, mostly because of the inherent quality in them. Alas, most of my patterns are the disposable tissues from the Big 4 because I can get them so stinking cheap from Jo-Anns. I think I might invest in MM’s Trapeze Dress next time I splurge because of your review. It is a timeless and versatile classic that would be a great pattern to make over and over again, which would make the splurge on a sturdy pattern more sensible. Thank you for the US shop link!
I’m glad that you found my blog resourceful and that you are inspired to make a MM Trapeze dress!
Found your blog post while searching for images of this pattern. I’m considering making it for my mother, and I wanted to see some images of it made up. Yours look particularly nice 🙂
I agree with you about hem lengths – once upon a time I trained as a tailor/dressmaker, so I always look at details like that 😉 As far as I can see from the images, I think the hemline problem is caused by the front bodice part being a bit too short – maybe 2-2,5 cm… (approx. 1 inch). There might also be a hint of “dripping” at the side seams, but very little.
It is comforting to know that there is someone else out there still notices details! I think the front bodice dips up because the shoulder seams roll to the back when I wearing it. I’m not quite sure what the best before-cutting adjustment would be. Maybe you would know?
I think it’s most likely you get the shoulder seam problem because the dress is thrown slightly off balance, and then it tilts backwards. It’s a pretty common issue and the most likely reason is that the front bodice part is too short in length or/and the bust dart needs to be a bit deeper. I got the pattern yesterday and the bust dart looks shallow. You look slim, so it might be fine as it is.
If you are planning to make a new version, I would first pin some changes in this dress and see what works best – or perhaps even baste them, but I’m lazy 🙂 First pin the bust dart a bit deeper (and pin a wedge straight across the back, to keep it balanced) and see if it helps to make the dress hang with the side seams vertically from your shoulders. The second thing to try is pinning a wedge right above the skirt part; straight across the back and thinning out to nothing towards mid front (about a third in from the side). It will make the bodice part too short, but at least you’ll know how much longer to make the front.
Another thing that could cause the dress tilting backwards is if it doesn’t fit so well on your shoulders, either because the shoulder area is a bit too short (then the armholes will feel a bit tight), or if you have slightly rounded shoulder and/or upper back. If you tend to stand very straight and with shoulders back, then that could also cause tilting, because the upper back might be too high/long…
I think it’s most likely that adjusting the front length, and perhaps the bust dart, will fix the issue. I hope this helps you and that it made sense (I’m Danish and English is not my first language).
Fitting has become quite a passion for me recently, so I have a lot of thoughts about it, the how and why, balance, how to deal with generic shapes on 3-dimensional bodies, etc. I can recommend the book “The complete photo guide to perfect fitting” by Sarah Veblen, about pinning and fitting. She explains the idea of balance very well and it really helps to understand fit and how to adjust for individual body isssues. Also “Fit for real people” by Pati Palmer/Marta Alto is very useful. A very practical and straightforward approach to patterns changes and fit issues.
I have never formally studied fit and know it’s something I could learn much more about. Thanks for your suggestions, especially the book recommendations. Good luck with your Factory Dress!
I’m making this dress right now and have run into some difficulties with the sleeve. If I match the double notch to the double notches on the back of the bodice, there appears to be too much length on the arm piece vs. the arm opening on the bodice. Does this happen for you too? Any ideas?
Hmmm…I made this so long ago, I can’t remember any sleeve fitting issues. In general, I always run a machine basting stitch at 3/8 and 5/8 between the front and back notches on the sleeve. Then I pull on them a little (without forming gathers) to bring in the extra fabric of the sleeve ease. You might try this, if you have done this already.
I bought the pdf pattern online. They’re a little bit of effort to print and assemble (this was my second), but I find it a workable solution. I first found the dress in gray wool, already made, in a thrift store! I just finished making one from flowery cotton using my pdf pattern. I love yours, and you did a great job matching the stripes on the back! Very attractive on you!